Document UT-MT-0428
Page 34 of 35
Edition 11/03/2014
Supersedes edition 04/30/2012
INSET RUNWAY EDGE LIGHT SLRE
INSTRUCTION MANUAL FOR USE, INSTALLATION AND MAINTENANCE
Reassembly the light unit following instructions of paragraph
“Closing the Fixture”,
“Leakage Test”
and
“Reinstalling the fixture”
.
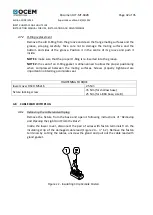
Figure 26 - Vibration-Damping Block
4.10
PRESSURE VALVE
If a leakage is found through the pressure valve during an air pressure test, check
carefully where the leakage happens. If the leakage is between the valve (Figure 27 -
n°1) and the lower cover, check the tightening of the valve body to the lower cover
from the inside of the fixture.
In case the pressure valve needs replacing, operate as follows, considering the fixture
already opened following instructions of
“Removing and Opening the Light Unit From
the Base”
. Remove the valve cap (Figure 277 - n°3). Unscrew the valve body with
gasket from the inside of the lower cover (Figure 277 - n°2) by clamping the
hexagonal end section of the valve body. Screw the new valve on the lower cover;
tightening torque is 0.35 Nm. Check the valve core (Figure 277 - °4) is tightened to
the valve body (Figure 27 - n°5) and then screw its cap (Figure 277- n°3).
Reassembly the light unit following instructions of paragraph
“Closing the Fixture”,
“Leakage Test”
and
“Reinstalling the fixture”
.
2
1
3
4
5
Figure 27 - Lower Cover with Pressure Valve


