background image

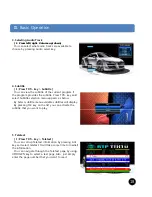
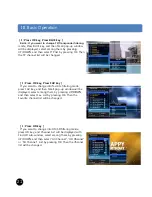
[ I : Press OK key, Press BLUE key ]

BLUE : If you want to change TP(Transponder fi

III. Basic Operation

BLUE : If you want to change TP(Transponder fi

mode, Press BLUE key, and then Small pop-up wi

will be displayed, select among them by pressing

UP/DOWN, and then select TP list by pressing OK

the TP channel list will be changed.

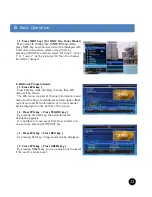
[ I : Press OK key, Press FAV key ]

If you want to change into favorite filtering mod

y

g

g

press FAV key, and then Small pop-up window w

displayed, select among them by pressing UP/DO

and then select Fav. List by pressing OK. Then the

Favorite channel list will be changed.

[ I : Press HD key ]

If you want to change into HD/SD filtering mod

press HD key, and Channel List will be displayed 

Find HD sub-window, select among them by pres

UP/DOWN, and then select “All Channel”, “HD Ch

or “SD Channel”. List by pressing OK. Then the ch

list will be changed.

21

ltering

ltering 

indow 

K. Then 

de, ,

will be 

OWN, 

de, 

with 

ssing 

hannel” 

hannel 
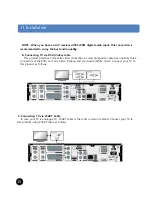
Summary of Contents for SF 2028 HD OPTIMA 3D

Page 1: ......

Page 2: ... schalten A Netztrennung Netzschalter B Standby Modus C Deep Standby Modus 1Watt III Grundfunktionen 01 K l h lt 01 Kanal umschalten 02 Lautstärke einstellen 03 Audio Tonspur auswählen 04 Untertitel auswählen 05 Videotext Teletext 06 Programm Informationen Info 07 Kanal Liste Programmliste Au 08 Elektronischer Programmführe 08 Elektronischer Programmführe 09 Time Shift Zeitverzögertes Fe 10 Aufnah...

Page 3: ...ngen F Erweiterte Einstellungen G Aufnahme Einstellungen G Aufnahme Einstellungen 2 INSTALLATION A Antennen Einstellungen B Satelliten Suche C Netzwerk Einstellungen D System Informationen 3 SERVICE A Kanal Manager B Ereignis Manager C Speicher Manager D Werkseinstellungen 4 SYSTEM A CI Slot V Fehlersuche SW Update durchführ 27 27 27 27 27 27 28 28 29 29 29 30 30 31 31 32 32 32 33 33 33 33 ren 33 ...

Page 4: ...r Receiver dürfe werden Sicherstellen dass Receiver und Netzstecker mit k Stecken Sie niemals irgendwelche fremden Metallg Gerätes Lassen Sie Kinder niemals unbeaufsichtigt den Re Wartungsarbeiten dürfen nur von qualifizierten Fac Ziehen Sie immer den Netzstecker bevor Sie das Ziehen Sie immer den Netzstecker bevor Sie das sondern nur ein leicht angefeuchtetes Tuch um ev 4 e mfangreichen Funktione...

Page 5: ... 55013 2001 A1 2003 A2 2006 EN 55020 2002 A1 2003 A2 2005 EN 61000 3 2 2000 2006 A2 2005 EN 61000 3 3 1995 A1 2001 A2 2005 EN 60065 2002 A1 2006 Gerätetyp Type Digitaler HDTV Satellitenreceiver Service Service OCTAGON Germany Buendtenaecker 2 D 79730 Murg Tel 0049 0 7763 704484 Fax 0049 0 7763 704483 E Mail info octagon germany de Internet www octagon germany de Garantie Die Gewährleistungszeit en...

Page 6: ...usschalt 4 VOL Im Normal Modus navigieren im Men 5 SD Kartenleser Integrierter SD Ka 6 USB Vorderseite USB Anschluss fü 7 Smartcard reader slot Kartenleser 8 CI Slot für Common Inter 6 keit bevor Sie das Gerät in Betrieb nehmen und diverse Informationen werden angezeigt s Programme zu wechseln im Menü Modus zum nü ten Standby Betrieb s Lautstärke einzustellen im Menü Modus zum nü rtenleser ür USB ...

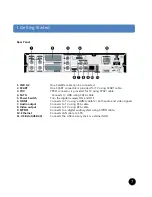
Page 7: ...I HDMI Ausgang zum T 7 AUDIO L R Audio Anschluss anal 8 Video Video Anschluss anal 9 S PDIF Di it l A di A 9 S PDIF Digitaler Audio Ausga 10 Ethernet Netzwerkanschluss LA 11 USB USB Anschluss für US Tuner1 2 ss g YPbBr YUV r externe Speichergeräte HDD Festplatte etz TV Gerät og Stereo Audio Ausgang Weiß Rot og Composite Video Ausgang Gelb ti h AC3 ng optisch AC3 AN Netzwerk SB Speichergeräte 7 ...

Page 8: ... Slot Wenn Sie verschlüsselte Sender sehen möchten jeweiligen Anbieters SmartCard und CAM Conditional Access Mo Stecken Sie das CAM zusammen mit der Smart 8 n benötigen Sie eine passende SmartCard des odule Initialisierung tCard in den CI Slot ...

Page 9: ... Sleep Timer einstellen Wechseln zwischen TV und Radio Modus Direkte Eingabe von Sendernummern und Zahlen Direkte Eingabe von Sendernummern und Zahlen Zeigt zuletzt angesehene Sender Kanalliste für HD SD Auswahl Hauptmenü öffnen Menü Fenster schliessen Cursor auf ab und links rechts bewegen Cursor auf ab und links rechts bewegen Zeigt die Senderliste an Im Menü auswählen Informationsfenster des la...

Page 10: ... Record 38 Play 39 Prev 40 Rew 41 Next 42 F FWD 10 hen Bookmark setzen entfernen Springen zum nächsten Lesezeichen Positionierer Wiedergabe anhalten fortsetzen Wiedergabe Aufnahme Startet die Aufnahme Wiedergabe Inhalt Sprung zum Anfang Titel Sprung Schneller Rücklauf Go to end position Schneller Vorlauf ...

Page 11: ...eeTV Addon Support Wettervorhersage Funktion W b R di I t t R di F kti Web Radio Internet Radio Funktion Tastatur Maus Support über USB Anschluss Blindscan SD HD Hardware Support Multi LNB Unterstützung durch DiSeqC Steuerung Hochauflösendes 32 bit OSD Oberfläche Favoriten Gruppen für TV Radio Kanalsortierungsfunktionen wie löschen umbenen OSD Menü in verschiedenen Sprachen Teletext Videotext Unte...

Page 12: ...den verursacht unter Anwendung von den Informa enthalten werden Die Anweisung und die Beschreibung der Zeit dieses Bedienungsanleitungs Produktion Der Funktionen Technologie AlleSpezifikationen sind abh Funktionen Technologie AlleSpezifikationen sind abh Markenzeichen HDMI das HDMI Firmenzeichen und H eingetragene und geschützte Warenzeichen von HDMI DIF ie Vertreter sind nicht zu irgendeiner Art ...

Page 13: ... S N 5 D di Decoding Decoding MPE Sampling rate 32 4 S N 6 LNB LNB supply horiz vert 13 1 Control signal 22k General General Dimensions W Weight without HDD App 13 wer consumption 12 1W SK 8PSK R 601 720x576 480p 576p 720p 1080i 1080p EG 2 MPEG 4 compatible 5 Msymbol s 3dB EG 4 AAC HE MPEG 1 Layer1 2 and 3 4 1 48 kHz 5dB 18V Max 400mA kHz DiSEqC 1 0 1 1 1 2 USALS x H x D 300 x 57 x 220 mm p 1 44kg...

Page 14: ...er Receiver bietet mehrere Möglichkeiten für A Anschluss über ein HDMI Kabel Um die best mögliche Bildqualität zu erhalten meisten HD TVs verfügen über einen HDMI Ansch Rückseite verfügt der Receiver dazu über eine HDM d t it Hilf i HDMI K b l dort mit Hilfe eines HDMI Kabels an räterückseite räterückseite zess des Receivers Bitte lesen Sie diesen nktion des Systems sicherzustellen rsten Schritt s...

Page 15: ...ßen Sie ihr TV Gerät entsprechend dem na p C TV Anschluss über ein SCART Kabel Falls Sie ein analoges TV Gerät besitzen ist der Verwenden Sie in diesem Fall das folgende Anschl 15 Geräterückseite einem S PDIF Digital Audio Eingang besitzen mögliche Audio Qualität zu erzielen el osite Video Anschluss Ein solches Kabel besitzt 3 gelb und zwei Audio Stecker weiss rot achfolgenden Schema an g r SCART ...

Page 16: ...r eine kurz C Deep Standby Modus 1W Mode Im Menü Erweiterte Einstellungen können Sie d den Receiver über die Fernbedienung ausschalten w wird der Receiverkomplett heruntergefahren und ve Receiver über die Fernbedienung wieder eingeschal äterückseite ausschalten Damit wird das Gerät komplett vom Netz ber diesen Schalter ein aus zu schalten Falls rde benötigt dieser eine längere Bootzeit usschalten ...

Page 17: ...e an Sie können die Auswah Hilfe der HOCH RUNTER Tasten auswählen ROTE Taste Alle Kanäle werden nach Kanalnummer sortiert angezeigt GRÜNE Taste Alphabetische Sortierung der Kanäle GELBE Taste Sortierung der Kanäle nach Verschlüsselung CAS BLAUE Taste Sortierung der Kanäle nach g Transponder TP CH Taste Schaltet zum vorhergehenden oder nächsten K Kanalnummer eingeben Geben Sie eine Zahl ein Es wird...

Page 18: ...m Menü den Punkt Untertitel aus Es werden die verfügbaren Untertitel angezeigt Mit Hilfe der OK Taste aktivieren Sie die Anzeige der Untertitel 5 Videotext I Drücken Sie die TXT Taste Videotext Sie können Videotextinformationen anzeigen in dem Sie die TXT Taste drücken und dann im Menü den Punkt Videotext auswählen Nach einer kurzen Ladezei werden die Informationen angezeigt Sie können mit Hilfe d...

Page 19: ...Wochentag 09 Zeit 15 Mu 16 Seit 17 gew 18 For 19 Auf 20 SAT 10 Signalstärke 11 Tuner T1 T2 12 Videotext 21 CAS 22 Pro 23 Qua 7 Kanal Liste Kanal Auswahl Menü I Drücken Sie die OK Taste Drücken Sie die OK Taste um die Kanal Liste zu aktivieren Es stehen dann folgende Funktionen z Verfügung 19 20 ste auf dem Bildschirm angezeigt Der Sie die MENU Taste BENUTZER SETUP Info Leiste zeigt umfassende Info...

Page 20: ... Sie OK Taste GRÜNE Taste GRÜNE Taste Alphabetische Sortierung der Kanäle Wählen Sie in dem zusätzlichen Fenster mit Hilfe der HOCH RUNTER LINKS RECHTS Taste Buchstaben aus und bestätigen Sie die Auswahl mit OK Daraufhin wird Ihnen die Auswahl der Kanäle in alphabetischer Sortierung angezeigt g g g I Drücken Sie OK Taste GELBE Taste GELBE Taste Sortierung der Kanäle nach Verschlüsselung CAS Wählen...

Page 21: ...ezeigt I Drücken Sie OK Taste FAV Taste FAV Taste Sortierung der Kanäle nach Favoriten Wählen Sie in dem zusätzlichen Fenster eine Favoritenliste aus und bestätigen Sie die Auswah OK Die Kanalliste wird entsprechend angezeigt I Drücken Sie OK Taste HD Taste HD Taste Sortierung der Kanäle nach HD SD Auflösung Wählen Sie in dem zusätzlichen Fenst SD oder alle Kanäle aus und bestätigen Sie die A mit ...

Page 22: ...nformationen zu den Sendungen sowie einem Sym für gegebenfalls verfügbare Zusatzinformationen zu Sendung Eine kurze Information zur aktuellen und nächsten Sendung wird am unteren Bildschirmrand nächsten Sendung wird am unteren Bildschirmrand angezeigt I Drücken Sie EPG Taste GELBE Taste Mit Hilfe der GELBEN Taste können Sie die Zusatzinformationen zur Sendung anzeigen Mit Hilfe der LINKS RECHTS Ta...

Page 23: ...l Video Recorder zwei integrierten DVB S2 Tunern Sie können bis g Programme gleichzeitig aufnehmen Sie können Sendungen auf zwei Arten aufnehmen Sofortaufnahme I Drücken Sie die REC Taste Drücken Sie die RECORD Taste um einen Kana aufzunehmen Sie können bis zu 3 Kanäle paralle aufnehmen Die Standard Aufnahmedauer wird im PVR Menü festgelegt I Drücken Sie MENÜ Taste Benutzereinstellungen PVR Einste...

Page 24: ...andos Verzeichnis anlegen in Verzeichnis verschieben löschen umbenennen BLAU Detailinformationen zur Datei zum Verzeichnis Folgende Medienformate werden unterstützt PVR Aufnahmen MPEG2 MPEG4 TS Video Dateien avi mkv mp4 ts rmvb rm M ik D i 3 Musik Dateien mp3 Bild Dateien bmp gif ico jpeg mng pbm pgm png ppm tif tiff xbm xpm Dokumenten Dateien txt pdf Binär Dateien mdl ndb kdb xml 13 PIP Bild in B...

Page 25: ...tern markiert Ein Icon vom M Menü entfernen Navigieren Sie im Hauptmenü zu dem gewünschte Eintrag und wählen Sie diesen mit der M Taste ab Der Stern an diesem Eintrag verschwindet Web Browser I Drücken Sie die M Taste Web Browser Dieses Produkt unterstützt einen Web Browser b i Web Cam anzeigen I Drücken Sie die M Taste Web Cam Viewe Sie können eine UVC kompatible Web Cam http www ideasonboard org...

Page 26: ...Free TV 1 BENUTZER Dies ist die benutzerspezifische Kategorie Sie können eine eigne Liste mit Hilfe des Browsers anleg g g 2 TV Kanäle 3 Filme 4 Cartoons 6 Erwachsene 7 Russisch Die Listen für die Kategorien 2 7 werden von eine Webserver heruntergeladen Drücken Sie die GELBE Taste um die Liste herunterzuladen 26 6 gen g m ...

Page 27: ...es TV Kanals gesetzt Zeitdifferenz Sie können die Zeitdifferenz Ihrer Zeitzone einstellen Sommer Winterzeit Automatische Umstellung zwischen Sommer und Winterzeit 12 24h Format der Zeitanzeige 12h 24h Beim Blättern der Zeitzone wird die Stadt angezeigt C Kindersicherung I Drücken Sie die MENU Taste Benutzereinstellungen Kindersicherung Sie können verhindern dass Kinder Kanäle schauen können die fü...

Page 28: ... Animation für die Listen ein ausschalten Recall Liste Konfiguriert das Verhalten der REC Taste E AV Einstellungen I Drücken Sie MENÜ Taste Benutzereinstellungen AV Einstellungen TV System Stellen Sie das Systemformat ein d für Ihr TV geeignet ist PAL NTSC SECAM PA NTSC S i häl i Wähl Si d S i häl Seitenverhältnis Wählen Sie das Seitenverhältn Ihres TVs Sie können 4 3 16 9 und AUTO wähl Video Form...

Page 29: ...e MENU Taste Benutzereinstellungen Aufnahme Einstellungen In diesem Menü können Sie die Aufnahmeeinstellungen konfigurieren Time Shift Zeitverzögertes Fernsehen Sie g können einstellen dass Time Shift automatisch aktivier wird und bis zu 1 oder 2 Stunden zurückgespult werden kann Anderenfalls müssen Sie zunächst eine Aufnahme starten bevor Sie Time Shift verwenden können Aufnahmemedium Wählen Sie ...

Page 30: ...SC yp g WideBand Digiturk MDU 1 5 LNB Frequenz Wählen Sie die für den LNB geeignete Frequenz 22KHz Umschalter Wählen Sie Auto 0KHz 22KHz DiSEqC Schalter Wählen Sie DiSEqC 1 0 A oder DiSEqC 1 1 1 16 q Positioner Einstellung Positioner Typ Wählen Sie Kein DiSEqC oder USALS Satellit Wählen Sie einen Satelliten Transponder Wählen Sie einen Transponde Antennen Menü Zum Antennen Menü wec Such Menü Zum S...

Page 31: ...che Aktivieren Sie die Netzwerksuche Kanal Modus Wählen Sie die Kanäle aus die gefunden werden sollen Alle Unverschlüsselt Nur TV Gefundene Kanäle auf anderen Tuner kopieren Wählen Sie ja um die gefunden Kanäle auf den anderen Tuner zu kopieren Manueller Modus Sie können den Empfangsmodus einstellen Darübe hinaus können Sie den Transponder ändern oder eine Feineinstellung vornehmen Blind Modus Für...

Page 32: ...System Version 3 SERVICE A Kanal Manager I Drücken Sie MENU Taste SERVICE Ka Manager Im Kanal Manager können Sie TV und Radiokan verwalten INFO View Ändern Sie den Kanal im kleine Fenster OK Kommando Drücken Sie die OK Taste Favoriten Kanalnamen oder PID zu editieren Sie können Kanäle löschen verschieben oder verstec Mit den vier farbigen Tasten können Sie die Kanalliste filtern 32 N N on DB anal ...

Page 33: ...gen I Drücken Sie die MENU Taste SERVICE Werkseinstellungen In diesem Menü können Sie die Nutzerdaten Transponder Satelliten Server und CAS Konfiguration zurücksetzen Wenn Sie auf die Werkseinstellungen zurückwechseln möchten wählen Sie Werkeinstellungen und bestätige Sie mit OK 4 SYSTEM A CI I Drücken Sie die MENU Taste SYSTEM CI Schacht Der CI Common Interface Schacht für CAM Module im PCMCIA Fo...

Page 34: ...e den gewählten Kanal Prüfen Sie die TV gen und die gewählte Signalquelle Sie eine andere Auflösung Drücken Sie die ION Taste Sie die Punkte unter Kein Bild Sie die Punkte unter Kein Bild Sie die Signalstärke und Qualität Falls diese Werte sind prüfen Sie die Ausrichtung Ihrer schüssel Sie die Punkte unter Kein Bild Sie die Lautstärkeeinstellungen an TV und Sie die Fernbedienung auf den Receiver S...

Page 35: ...b Schritt 5 Sie können der Fortschritt des SW D Schritt 6 Schalten Sie das Gerät nicht ab We Schritt 6 Schalten Sie das Gerät nicht ab We ist startet das Gerät automatisch neu ob die LNBs mit den richtigen Anschlüssen ob die LNBs mit den richtigen Anschlüssen verbunden sind die Einstellungen im Installationsmenü die DiSEqC Einstellungen im enü ob die Satellitenschüssel auf den richtigen ob die Sat...

Page 36: ......

Page 37: ......

Page 38: ...a SCART Cabl 3 P O Off 3 Power On Off A Complete Power Shutdown B Standby Mode III Basic Operation 01 Switching Channel 02 Volume Control 03 S l ti A di T k 03 Selecting Audio Track 04 Subtitle 05 Teletext 06 Program Information Info ba 07 Channel List Channel Selectio 08 Electronic Program Guide 09 Time Shift 10 Recording 10 Recording 11 Recording Play 12 Media Browser 13 PIP Picture in Picture 1...

Page 39: ...g F Advance Setting G PVR Setting G PVR Setting 2 INSTALLATION A Antenna Setup B Satellite Search C Network Setup D Information 3 SERVICE A Channel Manager B Event Manager C Storage Manager D Factory Reset 4 SYSTEM A CI Slot V Troubleshooting Guide How to up 27 27 27 27 27 27 28 28 29 29 29 30 30 31 31 32 32 32 33 33 33 33 pgrade s w 33 34 3 ...

Page 40: ... holes and lead to a high temperature of th Do not stack other electronic devices on t Do not insert any kind of pointed objects the product This will damage the product 5 Connecting the Satellite Cable Disconnect the power of the product befo Otherwise it may cause damage to the LN 4 ctured in compliance with EU consumer safe f AC 100V 250V and 50Hz 60Hz Please check range ect from the mains befo...

Page 41: ...sk Drive In case of using external U 10 Hard Disk Drive In case of using external U Do not move the product or turn the power still running This may result in damage to the HDD and th The company shall not be liable for any corru use or misuse of users 11 Battery There is danger of explosion if batteries are i Replace batteries only with the same or equiv h for the satellite dish ghtening iances a...

Page 42: ...Control channel 3 Power button Switches the recei 4 VOl Control Volume 5 Memory Card slot Connects the mem 6 USB Slot Usb slot1 2 0 Up 7 Smartcard reader slot One Smartcard slo 8 Common Interface One Common Inte 6 ng your product ame and status ver between Standby and Power ON modes mory card connects the USB memory stick or external HDD ot is provided erface slot is provided ...

Page 43: ...V using 8 Video output Connects to TV using 9 S PDIF C t t di it l 9 S PDIF Connects to a digital a 10 Ethernet Connects LAN cable to 11 USB slot USB2 0 Connects the USB me n be connected f r is provided for TV using SCART cable ovided for TV using YPbPr cable ing SATA cable ver ON and OFF a HDMI cable for both audio and video signals RCA cable RCA cable di t i S PDIF bl audio system using S PDIF ...

Page 44: ... CAS as well as S 1 Insert a Smartcard into the CAM or smartca 2 O h S d i d i h CAM 2 Once the Smartcard inserted into the CAM 3 Make sure that the CAM remains inserted w 8 aid subscribers can enjoy them Scrambled services Module CAM and a subscription card belonging e CI is the slot on a digital receiver into which a e front of the digital receiver has a common nal Access Module CAS To be able t...

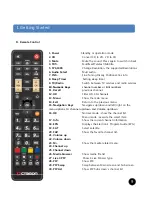
Page 45: ...supported Resolutions Muti audio Fine Tuning Diseqc Positioner Cas info Setting sleep timer Switch between TV services and radio services channel number or Edit numbers channel number or Edit numbers previous channel Filter HD SD channels Show the main menu Return to the previous menu Navigates up down and left right on the nel up down and Volume up down nel up down and Volume up down Normal mode ...

Page 46: ...E 36 STOP 37 Rec 38 Play 39 Prev 40 Rew 41 Next 42 F FWD 10 rk jump Ti Timer ine Tune mark Pasue Playing or Recording immediately Stop Recording or Playing media file Channel Recording will be started Play content Go to start position Playback in rewind mode Go to end position Playback in forward mode ...

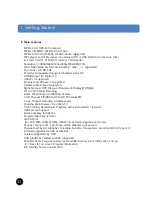
Page 47: ...ve Channel Decoding simultaneously Youtube Web Browser Free Web TV Time Shifting Recording Playback with Ext USB C S t USB Camera Support Quick and Easy Installation Programmable Event Timer 2xUSB Ports for PVR MP3 JPEG MOVIE USB Wi Fi Soft Various channel edit Sort Move HIDE Pare Channel Sort by All Alphabet Scramble Sate Firmware upgrade via USB or Internet Firmware upgrade via USB or Internet T...

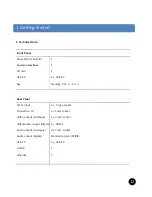
Page 48: ... USB 2 0 1 x USB 2 0 Key Standby Vol Ch Rear Panel Sat IF input 2 x F type socket Connection TV 2 x Scart socket Video output analogue 1 x Cinch socket Video audio output digital 1 x HDMI Audio output analogue 2 x Cinch socket p g Audio output digital Standard optical SPD USB 2 0 1 x USB 2 0 e SATA 1 Ethernet 1 DIF 12 ...

Page 49: ... N 5 D di Decoding Decoding MPE Sampling rate 32 4 S N 6 LNB LNB supply horiz vert 13 1 Control signal 22k General General Dimensions W Weight without HDD App 13 wer consumption 12 1W SK 8PSK R 601 720x576 480p 576p 720p 1080i 1080p EG 2 MPEG 4 compatible 5 Msymbol s 3dB EG 4 AAC HE MPEG 1 Layer1 2 and 3 4 1 48 kHz 5dB 18V Max 400mA kHz DiSEqC 1 0 1 1 1 2 USALS x H x D 300 x 57 x 220 mm p 1 44kg ...

Page 50: ...ovides a variety of audio video co A Connecting TV via HDMI cable For the sake of the best picture quality especia For the sake of the best picture quality especia recommended Most HDTVs have HDMI connector rear panel of this product one HDMI connector is a product using a HDMI cable as follows der allation process of Product Please read each s properly rs and one of the first steps is to connect ...

Page 51: ... connectors at the both end one Video Yellow this product as follows p C Connecting TV via SCART Cable In case your TV is analogue TV SCART cable is this product using SCART cable as follows 15 h S PDIF digital audio input this connection is y nection as well Composite cable has normally three and two Audio White Red Connect your TV to the most common method Connect your TV to ...

Page 52: ...normally used to turn the power o switches off or on In this mode the system is not c shorter time to turn it on and off C Deep Standby Mode 1W Mode In Advance Setting menu when you set Deep S ON OFF Deep standby is working nce it is ON you do not need to turn it on or stem if you turned it off by this switch on or off If you press POWER it instantly completely shutdown and thus it takes a Standby...

Page 53: ...ess OK key Channel List menu appea can move up and down to select the channel tha want to tune into Red key All channels are listed Red key You can search channel by alphab filtering Yellow key you can find channels by CAS fi Blue key you can find channels by TP filteri CHANNEL key If you press CHANNEL or key this will cal y p y Channel bar with changed channel Channel Number Enter a channel numbe...

Page 54: ... TXT key and select Subtitle selection menu appears as below By Select subtitle menu available subtitles will display By pressing OK key on the list you can activate the subtitle that you want to play y p y 5 Teletext I Press TXT key Teletext You can call up Teletext information by pressing AV key and select teletext It will take some time to load a the information You can navigate through the Tel...

Page 55: ...or 08 Date Time 09 Time 15 Mu 16 Scre 17 Aud 18 Aud 19 Res 20 SAT 7 Channel List Channel Selection Menu I Press OK key If OK k thi ill ti t Ch l Li t 10 Strength 11 Tuner T1 T2 12 EBU Teletext 21 CAS 22 Pro 23 Qua If press OK key this will activate Channel List m below 19 20 n bar is always displayed for OSD timeout I g OSD Timeout Information bar is designed to hannel that you are currently watch...

Page 56: ...GREEN key GREEN If you want to change into alphabetical y g p filtering mode press GREEN key and then small pop up window will be displayed select among them by pressing LEFT RIGHT UP DOWN and then select alphabet by pressing OK Then the alphabetical channe list will be changed I Press OK key Press YELLOW key YELLOW If you want to change into CAS filtering mode press YELLOW key and then small pop ...

Page 57: ... change into favorite filtering mod y g g press FAV key and then Small pop up window w displayed select among them by pressing UP DO and then select Fav List by pressing OK Then the Favorite channel list will be changed I Press HD key If you want to change into HD SD filtering mod press HD key and Channel List will be displayed Find HD sub window select among them by pres UP DOWN and then select A...

Page 58: ...ing channel then EPG menu will be shown The EPG menu consists of Channel information Ev name and the flag of extended event description B current and next EPG information of current channe will be displayed on the bottom of the screen I Press EPG key Press YELLOW key By pressing YELLOW key the extended event description appears It is possible to move event from Now to Next an vice versa by pressin...

Page 59: ...key 10 Recording This product is a Personal Video Recorder with integrated DVB S2 tuner You can record three programs at the same time There are two ways t operate and manage recording Instant Recording g I Press REC key You can start recording a channel that you are watching by pressing RECORD key You can reco channels Default duration is set in PVR Setup Menu I MENU key USER SETUP PVR Setting an...

Page 60: ...N Sort by name size date YELLOW command make folder move to Folde delete Rename BLUE Detail Info of the file or folder Supported media formats are as following pvr recorded file MPEG2 TS MPEG2 MPEG4 T movie file avi mkv mp4 ts rmvb rm music file mp3 photo file bmp gif ico jpeg mng pbm pgm p ppm tif tiff xbm xpm doc file txt pdf software binary image mdl ndb kdb xml 13 PIP Picture in Picture This p...

Page 61: ...en move cursor you want unregister menu Item Press M key The star mark disappears In M menu that items also disappear Web Browser I Press M key Web Browser This product supports Web Browser Web Cam Viewer I Press M key Web Cam Viewer If UVC compliant video input webcam device http www ideasonboard org uvc is connected wit this product then you can watch webcam video on Webcam Viewer menu or web br...

Page 62: ...y is used for User So user make fre list and then download in s w web browser by usb o y hdd 2 TV Channels 3 Movies 4 Cartoons 6 Adult 7 Russian 2 7 free tv category is used for downloading free list form web server press yellow key and then you can see download popup Press ok you can download free tv list form web 26 6 ee or e tv m ...

Page 63: ... you can select time display style 12 2 hour For your reference when you scroll time zone the y y name of city will be displayed C Parental Lock I Press Menu key USER SETUP Parental Lock You can prevent children from watching channels which are unsuitable for them Only the person who knows the password can watch the prohibited channel In the parental lock menu you can select six password options C...

Page 64: ...ect this mode channel list menu will be animation by your option Recall List when you select on Press Recall key Channel recall list is display E AV Out Setting I Press Menu key USER SETUP AV OUT Setting TV System you can select Display format according to your TV type PAL NTSC SECAM PAL NTSC modes are supported Aspect Ratio you can select the aspect ratio of di TV 4 3 16 9 d screen according to y...

Page 65: ...f you set Time Shift to Enable or 2 Hour You can use time shift without recording a channel explicitly Recording Storage Configuration for selecting the g g g g recording device If you attached the storage SATA USB device then you can select the default recording device Recording Duration Configuration for default use record duration If you select 2 Hour then you can record a 2 Hour of channel whe...

Page 66: ...DU 1 5 g LNB Frequency Select a proper LNB Frequen 22KHz Switch Select between Auto 0KHz 22KHz DiSEqC Switch You can set DiSEqC 1 0 A B or DiSEqC 1 1 1 16 Positioner Setup Positioner Type you can select None DiS yp y 1 2 or USALS by pressing keys Satellite Select a satellite Transponder Select a transponder Antenna Setup goto Antenna Setup menu Search Setup goto Search Setup menu Search Start Sear...

Page 67: ...de Channel Mode Select one of search types between All FTA TV Only Copy searched CHs to other Tuner Select YES Searched channel is copyed the other Tuner Manual Mode Additionally Transmission method can be edited y You can adjust or edit transponder in Edit TP and Fine Tune function Blind Mode When a new satellite is selected or you want to search all Transponder from a satellite which is known or...

Page 68: ...s Version 3 SERVICE A Channel Manager I Press Menu key SERVICE Channel Manager Channel Manager consists of TV and Radio cha control INFO View change to selected channel on TV window OK command If you press OK key then yo edit favorites Lock Channels Edit Channel Name PID delete move hide channels You can filter channels using 4 color keys like channel list menu 32 rsion stem nnel small u can and ...

Page 69: ...ctory Reset I Press Menu key SERVICE Factory Reset On this menu you can initialize data for user configuration satellite transponder channels server and CAS If you want to go back to Factory Default status then press Factory Default OK 4 SYSTEM A CI Slot I Press Menu key SYSTEM CI Slot f f f The CI Common Interface is an interface for a standard PCMCIA module in receiver If you want to watch a scr...

Page 70: ...is firmly he video output port RCA jack is firmly ed to the TV or VCR hat you have selected the correct channel or Output on your TV TV s video resolution is SD 576p or 480p you hange Resolution by pressing 576 1080 key o Picture above o Picture above he signal level If this is low then try adjusting the nt of your dish o Picture above he volume level of the TV and STB he mute status of the TV and...

Page 71: ...tep2 Press File browser key Step3 Press Left Right key go to s w Brow Step4 Move cursor to mdl and then press Step5 you can see the downloading proce Step6 do not power off if download is fin t you have connected the LNBs to correct t you have connected the LNBs to correct ns on the switch t you have set the connected Setting in the n menu t you have selected this in the Installation t the dish is...

Page 72: ......

Reviews: