background image


23 

9. TUBES 


9.4.  Replacing tubes 


Attention 

Improper disassembly 
Damage to the tubes due to improper disassembly or assembly. 

Changing tubes is a job for qualified technicians! 


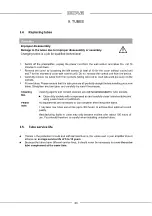
1.  Switch off the preamplifier, unplug the power cord from the wall socket, and allow the unit 10 

minutes to cool down. 

2.  Remove the cover by loosening the M4 screws (a total of 10 for the cover without control unit 

and 7 for the shortened cover with control unit). Do not remove the control unit from the device. 

3.  Carefully remove the tubes from their sockets, taking care not to exert sideward pressure on the 

sockets. 

4.  Fit new tubes. Please ensure that the tube pins are all perfectly straight before inserting your new 

tubes. Straighten any bent pins very carefully by hand if necessary. 

Cleaning 
tips


Cleaning agents and contact cleaners are 

not recommended

 for tube sockets. 

►  Clean dirty sockets with compressed air and carefully clean tarnished tube pins 

using a wire brush or toothbrush. 

Please 
note: 

No adjustments are necessary to your amplifier after fitting new tubes. 

It may take new tubes some time (up to 300 hours) to achieve their optimum sound 
quality. 

Manufacturing faults in tubes may only become evident after about 100 hours of 
use. You should therefore be careful when installing untested tubes. 

9.5.  Tube service life 


Thanks to the protection circuits and soft start electronics, the tubes used in your amplifier should 
achieve an 

average service life of 5 to 10 years


Because the tubes have different service lives, it should never be necessary to renew 

the entire 

tube complement at the same time


Summary of Contents for HP 700 SE

Page 1: ...HP 700 SE Owner s Manual English...

Page 2: ...t from the classic circuit designs has not done the technology any favors Today s loudspeakers and source equipment provide better performance than ever before but also make greater demands on amplifi...

Page 3: ...4...

Page 4: ...00 SE in multi channel mode 17 8 Remote control for volume 8 1 Remote control operating elements 19 8 2 Battery replacement 19 9 Tubes 9 1 Line tube layout 20 9 2 Phono tube layout 21 9 3 Control unit...

Page 5: ...ons 35 12 2 1 HP 700 SE preamplifier dimensions in mm 35 12 2 2 External power supply dimensions in mm 35 12 3 Diagrams 36 12 3 1 HP 700 SE line frequency response 36 12 3 2 FFT interference spectrum...

Page 6: ...elf OCTAVE tube technology OCTAVE amplifiers are equipped with a proprietary control and monitoring system we call Power Management This is an electronic brain within the amp that regulates and contro...

Page 7: ...ISION TECHNOLOGY IN THE LINE STAGE The term precision technology stands for a circuit in tube technology that has an extreme bandwidth up to 1 MHz an impressively low output resistance of 130 ohms and...

Page 8: ...alance control allows channel separated volume adjustment in 1 dB steps This technology eliminates any controller related sound shifts Using 12 position stepped switches the setting is long time stabl...

Page 9: ...uld also only be replaced by a qualified technician Always replace fuses with ones of the same type and rating If your amplifier requires servicing please ship or take your equipment directly to OCTAV...

Page 10: ...e your OCTAVE amplifier near flammable materials gases or vapors Avoid areas where there may be heavy accumulations of dust or where the amplifier may be subject to mechanical vibration Place your OCT...

Page 11: ...before connecting the power cable to the wall socket 5 Check that the volume control is not set at maximum before playing music through the preamplifier and that the function switch 1 is set to the se...

Page 12: ...s bypassed This setting is intended for multi channel applications with volume control on the multi channel receiver The bypass HT RCA input is separate the bypass function can be switched to an XLR i...

Page 13: ...o or line input module 8 IN 5 RCA input Line level input for CD tuner etc 9 IN 3 XLR input Balanced line level input for CD DAC etc 10 IN 6 RCA input Line level input for CD tuner etc 11 IN 7 RCA inpu...

Page 14: ...17 18 OUT 3A OUT 3B Two pairs of XLR outputs for balanced output stages XLR output for balanced power amplifiers 1 ground 2 positive 3 negative ground lift XLR With the ground lift the XLR outputs ca...

Page 15: ...en the power supply is on During the start up phase the start and muting LEDs illuminate on the preamplifier After the start up phase the start and muting LEDs go out if the mode switch is not set to...

Page 16: ...nd left on the multi channel source are connected to the bypass input 13 on the HP 700 SE if the multi channel device only has RCA outputs If the multi channel receiver also has balanced outputs for t...

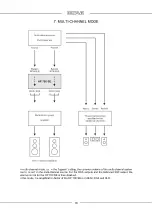
Page 17: ...g the common volume of the multi channel system has to be set on the multi channel source For the RCA outputs and the balanced XLR output the volume control for the HP 700 SE is then disabled In this...

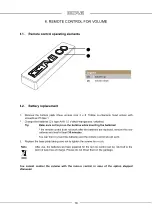
Page 18: ...inserting the batteries If the remote control does not work after the batteries are replaced remove the new batteries and wait at least 30 minutes You can then re insert the batteries and the remote...

Page 19: ...ed when opening the cover and injury through electric shock Before opening the cover switch the device off and unplug the power cord Tube layout line board Tube layout line board V 1 ECC82 12 AU 7 V 2...

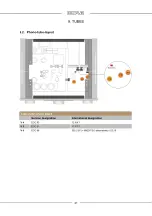
Page 20: ...21 9 TUBES 9 2 Phono tube layout Tube layout phono board German designation International designation V 4 ECC 83 12 AX 7 V 5 ECC 81 12 AT 7 V 6 ECC 88 6922 SV 6N23P SV alternatively 6 DJ 8...

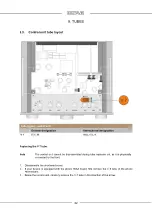
Page 21: ...V 7 tube Note The control unit cannot be disassembled during tube replacement as it is physically connected to the front 1 Disassemble the shortened cover 2 If your device is equipped with the phono...

Page 22: ...tubes Straighten any bent pins very carefully by hand if necessary Cleaning tips Cleaning agents and contact cleaners are not recommended for tube sockets Clean dirty sockets with compressed air and...

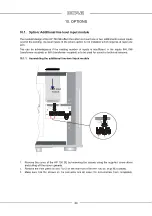
Page 23: ...of inputs is insufficient or the inputs IN4 IN8 transformer coupled or IN9 transformer coupled is to be used for sound or technical reasons 10 1 1 Assembling the additional line level input module 1 R...

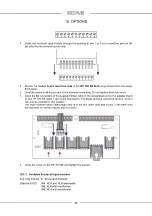
Page 24: ...ors of the supplied ribbon cable in the designated slot on the adapter board on the HP 700 SE slots 1 and 2 are equivalent The blade terminal cannot be twisted since it can only be inserted in one pos...

Page 25: ...entire frequency range with channel matching of at least 0 3 dB The phono RIAA amplifier of the HP 700 SE must always be supplemented with an input module A maximum of two phono input modules can be i...

Page 26: ...enuated with the switchable subsonic filter The roll cutoff frequency is outside of the audible range at 15 Hz Condition on delivery Subsonic filter on Phono frequency response with and without subson...

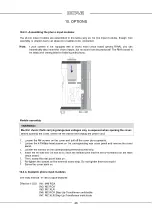
Page 27: ...ing the cover switch off the device and unplug the power cord 1 Loosen the M4 screws on the cover and pull off the cover plate upwards 2 Loosen the 4 Phillips head screws on the corresponding rear cov...

Page 28: ...ated attenuators originate from high frequency technology Compared to more simple non compensated variants their advantage is that the frequency bandwidth and phase shift are not affected 28 Rotary kn...

Page 29: ...ally helpful in old muffled and bass weak analog recordings and in new digital productions which sometimes feature a distinct high frequency tending towards sharpness Here corrections of 3 dB truly wo...

Page 30: ...nsisting of individual resistors The stepped attenuator now senses the connecting points of the resistor ladder The advantages of this solution are obvious thanks to the low tolerance fixed resistors...

Page 31: ...nd when they are switched on and off audible clicks and pops in the system s loudspeakers may occur Solution The only solution is to use a single power socket board for your entire system and to use a...

Page 32: ...Gain High 98 dB 38 V Signal to noise ratio Gain Med 104 dB 18 V Signal to noise ratio Gain Low 110 dB 8 V Equivalent noise level 14 nV Hz Frequency range Gain High RCA 10 Hz 200 kHz 0 7 dB 0 7 MHz 6...

Page 33: ...pend on input module Overall Gain MC Gain Low Pre Out RCA XLR Gain Low 70 dB Med 77 dB High 83 dB MC Gain High Pre Out RCA XLR Gain Low 79 dB Med 86 dB High 92 dB General data Power consumption 35 60...

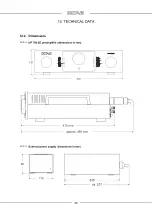
Page 34: ...35 12 TECHNICAL DATA 12 2 Dimensions 12 2 1 HP 700 SE preamplifier dimensions in mm 12 2 2 External power supply dimensions in mm...

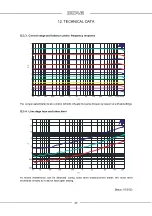
Page 35: ...gain of line stage in Gain Low 12 dB Med 18 dB and High 25 5 dB settings 12 3 2 FFT interference spectrum Comparison of the RCA and XLR interference spectrum No mains interference on either of the in...

Page 36: ...pensated balance pre control exhibits virtually the same frequency response with all settings 12 3 4 Line stage hum and noise level No mains interference can be detected during noise level measurement...

Page 37: ...38...

Page 38: ...specifications in pursuit of better OCTAVE logo is a registered trade mark of Andreas Hofmann Copyright byAndreas Hofmann OCTAVEAUDIO T 49 0 7248 3278 ANDREAS HOFMANN F 49 0 7248 3279 REUTAECKERSTR 5...

Reviews: