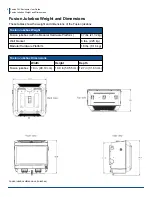
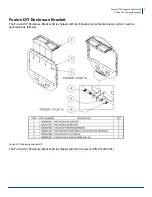
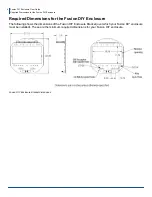
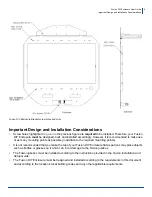
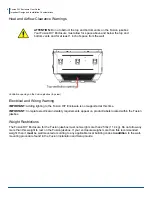
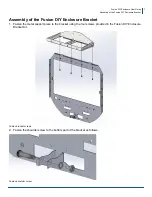
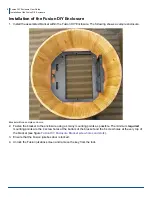
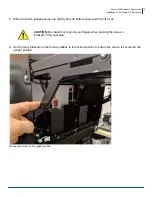
background image

10

Fusion DIY Enclosure User Guide
Installation of the Fusion DIY Enclosure

7. Place the assembled bracket/enclosure over the Fusion jukebox so that the screen passes through the 

opening at the center of the enclosure. The following shows a 

sample

 enclosure.

Place enclosure over the Fusion jukebox

Summary of Contents for TouchTunes Fusion DIY

Page 1: ...allation of the Fusion DIY Enclosure Disclaimers Jukebox Warranty Disclaimer Limitation of Liability Disclosure Assumptions It is assumed that You have a Fusion jukebox before you start the design of...

Page 2: ...and dimensions of the Fusion jukebox Fusion jukebox dimensions in inches Fusion Jukebox Weight Fusion jukebox with no Modular Hardware Platform 47 lbs 21 32 kg Wall bracket 5 lbs 2 26 kg Modular Hardw...

Page 3: ...sion DIY Enclosure Bracket The Fusion DIY Enclosure Bracket Kit is shipped with the following metal bracket pieces which must be assembled as follows Fusion DIY Enclosure Bracket Kit The Fusion DIY En...

Page 4: ...quired Dimensions for the Fusion DIY Enclosure The following shows the dimensions of the Fusion DIY Enclosure Bracket over which your Fusion DIY enclosure must be installed These are the minimum requi...

Page 5: ...use of as many mounting points as possible in addition to the required mounting points It is not recommended that you make the top of your Fusion DIY Enclosure flat as patrons may place objects such...

Page 6: ...estrictions The Fusion DIY Enclosure for the Fusion jukebox must not weigh more than 25 lbs 11 4 kg Do not allow any more than this weight to rest on the Fusion jukebox If your enclosure weighs more t...

Page 7: ...ssembly of the Fusion DIY Enclosure Bracket 1 Fasten the metal support piece to the bracket using the four screws provided in the Fusion DIY Enclosure Bracket Kit Fasten bracket screws 2 Fasten the sh...

Page 8: ...within a sample enclosure 2 Fasten the bracket to the enclosure using as many mounting points as possible The minimum required mounting points are the 4 screw holes at the bottom of the bracket and t...

Page 9: ...ghtly from its bottom panel and then lift it out 6 Set the two L brackets on the Fusion jukebox to the locked position to ensure the screen is secured in the upright position Securing the screen in th...

Page 10: ...of the Fusion DIY Enclosure 7 Place the assembled bracket enclosure over the Fusion jukebox so that the screen passes through the opening at the center of the enclosure The following shows a sample en...

Page 11: ...hassis without the enclosure as a visual example only Position of bracket on bare Fusion jukebox 9 Make sure that the striker bracket located at the bottom interior of the assembled bracket enclosure...

Page 12: ...lts to the top interior of the Fusion jukebox the location for each wing bolt is circled in green in the following figure Location for wing bolts interior of the Fusion jukebox 12 Close and lock the F...

Page 13: ...S AND WITHOUT ANY WARRANTIES OF ANY KIND INSTALLATION OPERATION AND USE OF THE KIT IS AT YOUR OWN RISK THE OCTAVE MUSIC GROUP INC DOES NOT MAKE AND HEREBY DISCLAIMS ANY AND ALL WARRANTIES WITH RESPECT...

Reviews: