background image

13

CLONING

For ease of setup where a user may have more than one LRC300,
the complete contents of a remote (IR codes, Macros, button names
and clock settings) can be transferred to another LRC300 remote by
a "cloning" process. One remote must be set to transmit mode whilst
the other set to receive mode, while joined by a cloning cable.

After approximately 7 minutes the displays should show "OK!"
and  return to normal operation. All data has been transferred.
If the clone fails the receiver remote will show "ERROR" then "CL-REPT"
(Clone Repeat). Put the transmitting remote back into Clone mode and
repeat the process. A successful clone must be done to the receiving
remote once the clone process has been started, as cloning overwrites
the complete software in the receiving remote. 
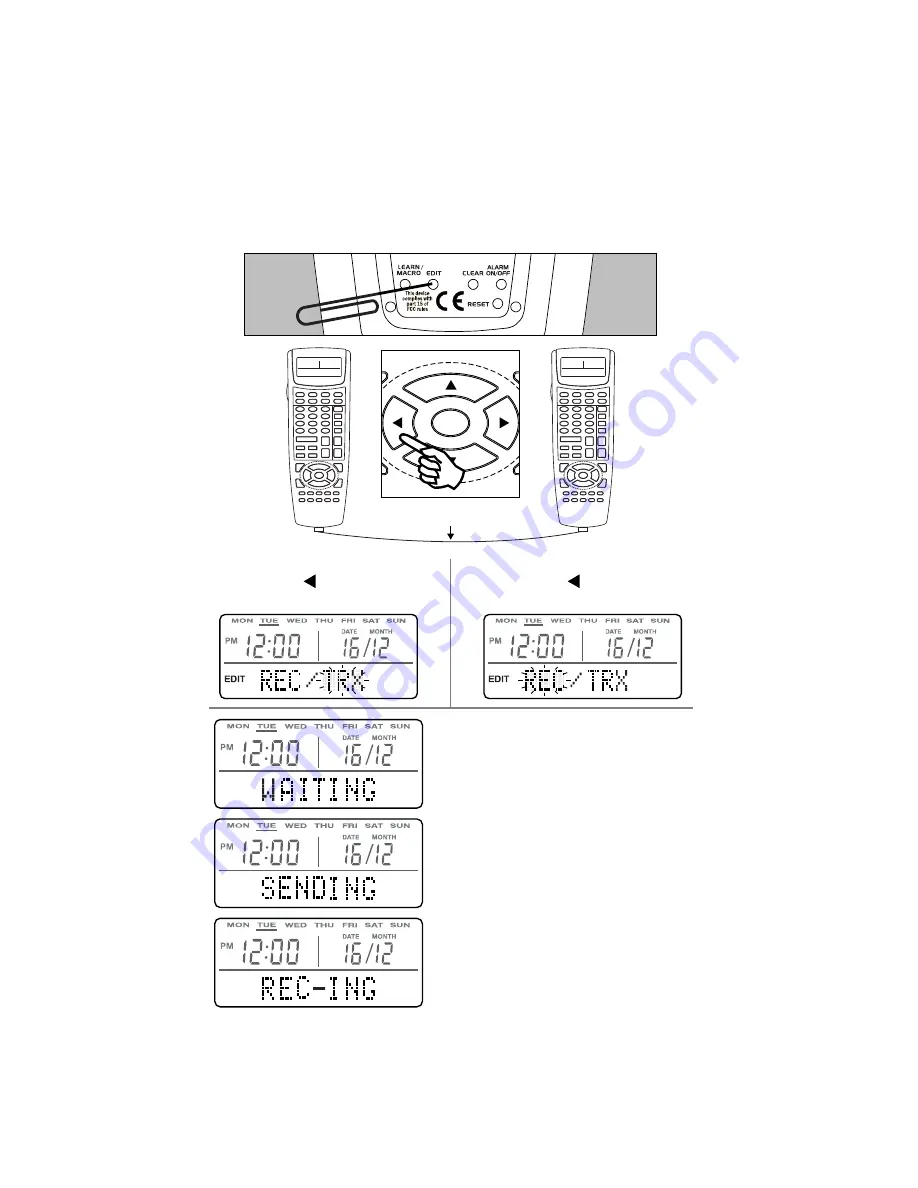
Press ENTER on the
receiving remote. 
Display shows "WAITING".

Press ENTER on the
transmitting remote.
Display shows "SENDING".

The receiving remote display
will now show "REC-ING" to
indicate it is receiving data.  

LRC300
SET AS
RECEIVER

LRC300

SET AS

TRANS-

MITTER

For the receiving LRC300,

Press the      button until

"REC" is flashing.

EXIT

GUIDE

ENTER

MENU

TITLE

For the transmitting LRC300,

Press the      button until

"TRX" is flashing.

CLONING CABLE

On the back of the remote press the EDIT button 

4

 times 

(using a 

paperclip or similar) on BOTH remotes to enter Clone mode.
"REC/TRX" will appear on both the displays. 

Summary of Contents for LRC300

Page 1: ...Editable device names Clock and Alarm features Backlit display and keys Hard coded dedicated Octopus buttons Learning storage buttons compatible with nearly all source equipment High power IR output...

Page 2: ...A BUS keypads Standby CCTV only used when an Octopus video switcher is installed Select Mute Vol Function Up and Vol Function Down In addition there are 38 buttons per device bank that can be taught...

Page 3: ...PUT 4 INPUT 5 INPUT 6 LOCAL 1 LOCAL 2 CLEAR 1 SELECT EXIT REC TIME GUIDE ENTER MENU TITLE VOL PLAY PAUSE STOP MUTE 2 3 4 5 6 7 8 9 10 0 CD DVD RAND INFO ON SLEEP VID OFF STATION TRACK BAND DISC CCTV T...

Page 4: ...RM TIMER ON OFF 4 ENTER 1 Use only Alkaline type batteries 1 Remove the battery cover 2 Insert 4 AAA LR03 sum 4 batteries 3 Close the battery cover until it clicks In case of battery replacement all s...

Page 5: ...ress the or buttons to start editing REAL TIME CLOCK DATE MONTH YEAR WEEKDAY SETTING When finished press the EDIT button or wait 15 seconds to exit Real Time Clock mode Follow the steps below to set t...

Page 6: ...ed radio station The 1 button can also contain a Macro if desired e g starting a CD player 4 Once the timer has been set a small alarm clock symbol appears on the display to indicate the timer is acti...

Page 7: ...tton is pressed after 8 seconds the remote will automatically select the next storage button for you LEARN appears flashing on the display Press the desired storage button e g button 1 LEARN will stay...

Page 8: ...keypads without an Octopus hub being required 8 Note It is NOT possible to teach new codes or Macros into the 6 dedicated Octopus System buttons as they are always needed to control the Octopus keypad...

Page 9: ...vely a Clear All operation will reset the whole remote to its default factory settings including all pre codes See the CLEARING STORED DATA section for more information INPUT 4 INPUT 5 INPUT 6 LOCAL 1...

Page 10: ...name with the first character flashing 2 Press the button whose display name you want to change 4 Press the CLEAR button on the front of the remote to clear a character or insert a space The name wil...

Page 11: ...M POWER to confirm that the Macro will be entered into the button INPUT 4 INPUT 5 INPUT 6 LOCAL 1 LOCAL 2 CD DVD TUNER REC TIME RAND INFO ON SLEEP VID OFF The display will then show STEP 1 to confirm...

Page 12: ...ing for this step but all other steps will work as expected Delays of 1 99 seconds can be programmed between Macro steps the default delay if no delay is specified is 0 5 seconds The dedicated Octopus...

Page 13: ...and repeat the process A successful clone must be done to the receiving remote once the clone process has been started as cloning overwrites the complete software in the receiving remote Press ENTER...

Page 14: ...de data in a whole device bank press the CLEAR button twice 3 To clear ALL the IR code data and Macros in the remote including all device button and pre code names and all button names press the CLEAR...

Page 15: ...isplay shows EMPTY If an IR code is present in the button the symbol will appear whilst the code is sent When the battery is low a battery symbol appears on the display LOW BATTERY INDICATOR When the...

Page 16: ...ment Such modifications could void the user s authority to operate the equipment COMPLIANCE WITH FCC RULES THIS DEVICE COMPLIES WITH PART 15 OF THE FCC RULES OPERATION IS SUBJECT TO THE FOLLOWING TWO...

Reviews: