background image

7  Use of the BIOM 4

16 / 34

Instruction manual BIOM 4 (G/54400/1011/en)

7.3.3

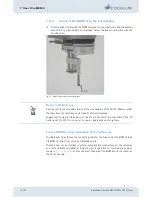
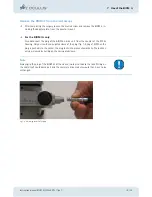
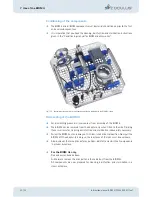
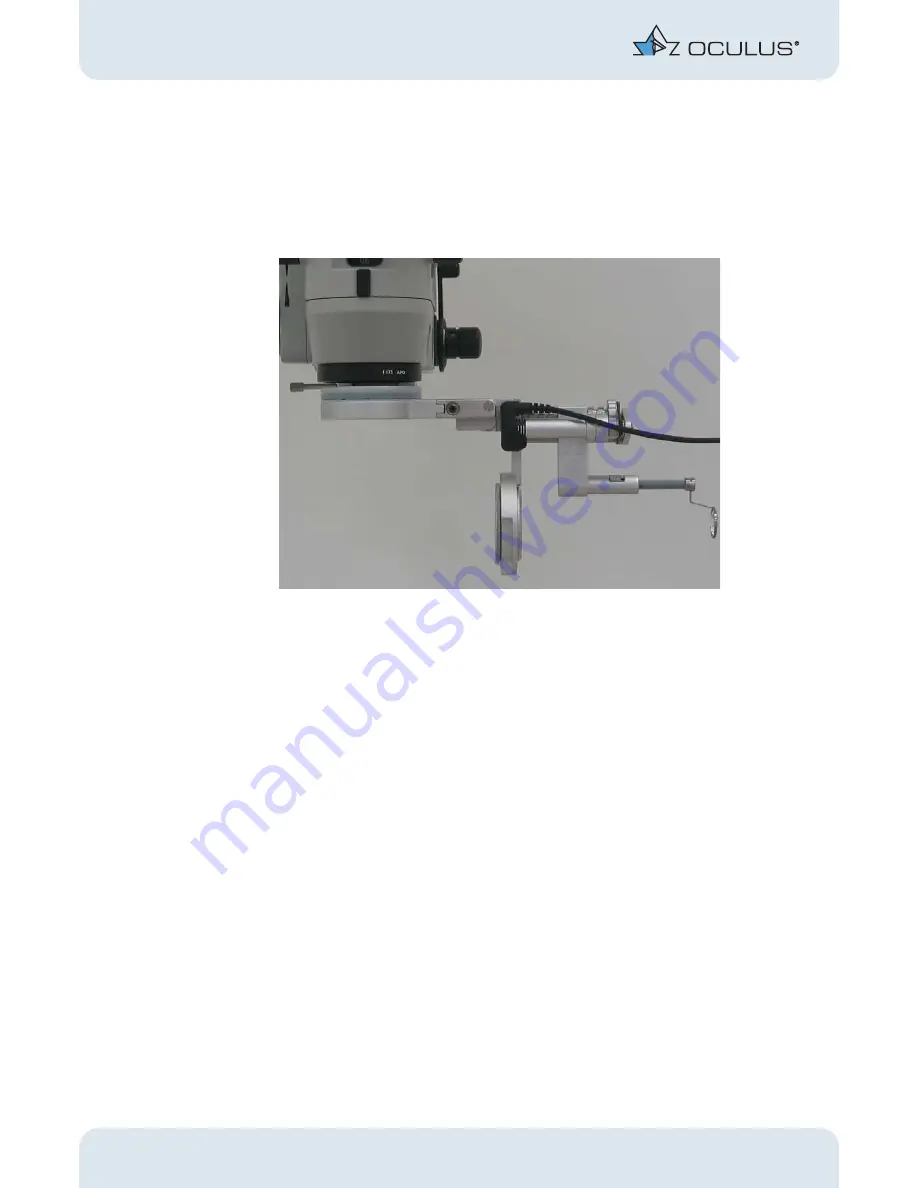
Swing the BIOM 4 to the parked position

During extra-ocular surgery phases, swing the BIOM out of the beam path into the
parked position. 

When swinging out the BIOM, push in the safety slider, including the front lens, with
your finger, until the slider reaches the limit stop. 

fig. 7-8: BIOM 4c at parked position

Make the basic settings at the microscope

Make the basic settings at the microscope in accordance with the manufacturer’s
specifications.

Adjust the microscope to the anterior eye segment and perform the surgery steps
under microscope illumination, including insertion of the infusion.

When using the BIOM 4 focusing function, heed the following points:

Before swinging it to the operating position, make sure that the BIOM has been set
to the shortest overall length.

Before starting the focusing process, check whether the ophthalmoscopy front lens
is far enough away from the patient’s eye.

Make sure that the front lens does not come into contact with the eye.

While focusing the BIOM, the working height of the microscope must never be ad-
justed, nor must the focusing function of the microscope be used.

Summary of Contents for BIOM 4

Page 1: ...INSTRUCTION MANUAL Binocular Indirect OphthalmoMicroscope...

Page 2: ...tion manual before operating the device In particular pay attention to the safety instructions This operating manual describes the following BIOM 4 models BIOM 4c and 4cl long version BIOM 4m and 4ml...

Page 3: ...n 8 7 Use of the BIOM 4 9 7 1 Prior to each use 9 7 2 Assembly and handling 10 7 3 Preparing the BIOM 4 for use 12 7 3 1 Under sterile conditions Perform a safety function test 13 7 3 2 Connect the BI...

Page 4: ...Table of Contents iii ii...

Page 5: ...arate operating instructions for the SDI 4 and accessories Note We reserve the right to change the scope of delivery in line with ongoing technical devel opment Component BIOM 4m Instruction manual Bo...

Page 6: ...cerning organisation The law requires that the manufacturer expressly informs the user about safety aspects concerning the handling of the device This chapter contains a summary of the most im portant...

Page 7: ...ce using original accessory parts supplied by us and when the device is in technically correct working order Do not use the unit if it is damaged in this case get in touch with your supplier Observe t...

Page 8: ...egment of the eye and outside of the eye the microscope should be remaining at this position height Before swinging it to the operating position make sure that the BIOM has been set to the shortest ov...

Page 9: ...IOM 4 is intended for use with compatible designed operating microscopes in hos pitals clinics or other institutions for human medicine Use only operating microscopes named by OCULUS Optikgeraete GmbH...

Page 10: ...t the image for non contact wide angle observation of the fundus and vitreous body The combination of operating microscope and the optical components of the BIOM 4 allows examination of the vitreous b...

Page 11: ...e between the operating microscope and the front lens is set using the adjusting wheel at the BIOM 4 For BIOM 4c only Press the combination foot switch to focus by means of the electric motor This hei...

Page 12: ...uction in the use of the BIOM 4 and its accessories will be done by an Oculus employee or by a duly authorized Oculus representative A part of the mounting fixture generally remains installed at the m...

Page 13: ...ving Components of the BIOM Check that the safety slider for the lens holder runs smoothly by sliding it in and out several times by hand Check that the focus adjustment wheel can be adjusted with eas...

Page 14: ...e belt is available 7 2 Assembly and handling All components of the BIOM 4 must be on hand and must be sterile and must be assem bled under sterile conditions Choose the appropriate optics Use the app...

Page 15: ...eyes the maximum field of view with this lens is approx 70 whereas the working distance is approx 3 4 mm The outside diameter of the lens mount is 12 mm Note All steam autoclavable front lenses menti...

Page 16: ...the lens Make sure that the lens is properly aligned For the BIOM 4c only Mount the drive belt at the BIOM 4c For all three pulleys the drive belt should run in the recesses provided for that purpose...

Page 17: ...for 90 and a detent for this purpose Make sure that the housing body can be shifted without resistance fig 7 5 Moving Components of the BIOM 4m Check that the safety insertion for the lens holder run...

Page 18: ...y unsterile parts of the microscope Suggestion If surgery is to be done on the left eye connect the control cable at the left hand side of the SDI Or vice versa if surgery is being done on the right e...

Page 19: ...at the end of the plug 2 first Then fit the other semi open part 1 over the cable Proceed in reverse order prior to conditioning fig 7 7 Installation of the cable duct at the BIOM 4c Caution The cabl...

Page 20: ...anufacturer s specifications Adjust the microscope to the anterior eye segment and perform the surgery steps under microscope illumination including insertion of the infusion When using the BIOM 4 foc...

Page 21: ...ion of the posterior eye segment After all preparations for surgery in the posterior segment have been completed proceed as follows without changing the microscope position Use a suitable endoillumina...

Page 22: ...mum required in order to achieve as wide a fundus view as possible The use of the focusing function with the microscope foot pedal when the BIOM 4 is in use only changes the size of the image field ke...

Page 23: ...OM 4c drive unit from the coupler at the SDI 4c housing Only pull on the corrugated sleeve of the plug fig 7 9 page 19 When the plug is pushed into the socket the plug locks into place automatically T...

Page 24: ...d in reverse order from assembly of the BIOM 4 The BIOM 4 can be removed from the adapter only when tilted to the side Dividing these two items for cleaning desinfection and sterilization is absolutel...

Page 25: ...BIOM 4 out or slide the safety insertion upwards to facilitate cleaning of the optics so that you can clean the lens with a sterile swab Make sure that the cornea is sufficiently moistened with a suit...

Page 26: ...the screws with a suitable screw driver Image is cropped or out of center The SDI other components or the BIOM 4 adapter are incorrectly mounted at an angle The front lens clip is bent or mechanically...

Page 27: ...r failure or power outlet is not ac tive The electric sockets on the support are in use but inactive Establish the connection to the SDI 4c Establish the connection to the 6V 15V power supply Inform t...

Page 28: ...lling it out of the position Clean the clutch disk of the magnetic clutch that is mounted on the base plate Install the new drive module To do so insert the square shoulder of the drive module the cor...

Page 29: ...or to sterilization treat all moving parts of the BIOM 4 with a sterilizable silicone oil free conditioning lubricant Remove any excess oil from the surfaces as staining could otherwise occur The foll...

Page 30: ...leaned and disinfected in a dishwasher with a mildly alkaline detergent as well as in the disinfector refer to the Reconditioning Manual All BIOM 4 adapters provided by us are autoclavable with steam...

Page 31: ...was care fully manufactured using quality materials and modern production methods Any soft ware included in the delivery was tested by us and complies with technical standards Prior to and while opera...

Page 32: ...additional in formation Manufacturer Service Addresses Germany OCULUS Optikger te GmbH M nchholzhaeuser Str 29 D 35582 Wetzlar Germany Tel 49 641 2005 0 Fax 49 641 2005 295 E mail sales oculus de 13 D...

Page 33: ...54400 1011 en 29 34 14 Order Information Accessories and Replacement Parts Basic unit Accessories for the BIOM 4c BIOM 4cl Component Order number BIOM 4c 54400 BIOM 4cl 54403 BIOM 4m 54462 BIOM 4ml 54...

Page 34: ...ter for Leica M690 with 0 Coobserver 54444 Adapter for Leica M500 M501 M620 54445 Adapter for Leica M690 54446 Adapter for Leica M841 M820 M844 54448 Dovetail for Zeiss OPMI VISU Lumera 54511 Distanci...

Page 35: ...7 Reduction lens for f 200 mm 54545 Reduction lens for f 225 mm 54548 Reduction lens for Retroskop 54544 Component Order number Autoclavable lenses Wide Field lens Diameter 12 mm for BIOM 4 53601 Wide...

Page 36: ...2 Types for Leica microscopes SDI 4c 6 15 V 54330 SDI 4e 6 15 V 54310 SDI 4m mechanical 54312 Width 63 mm Depth 111 5 mm Height 110 145 mm Total height approx 123 158 mm Range of safety extension rod...

Page 37: ...nual Type B application Type of device protection IP 64 Temperature 10 C 50 F to 40 C 104 F Humidity 30 to 70 Air pressure 700 hPa to 1060 hPa BIOM 4 steam autoclaving max 134 C 273 F Reduction lens o...

Page 38: ...OPMI CS with Retrolux 1 3 CS OPMI CS withRetroskop 1 2 CS OPMI MDI MDO MDU OPMI VISU 150 VISU 160 OPMI VISU 200 VISU 210 OPMI Lumera OPMI Lumera T Leica M500 M501 M620 M650 M690 M820 M840 M841 M844 M...

Reviews: