background image

10

DIY GAMING NOTEBOOK

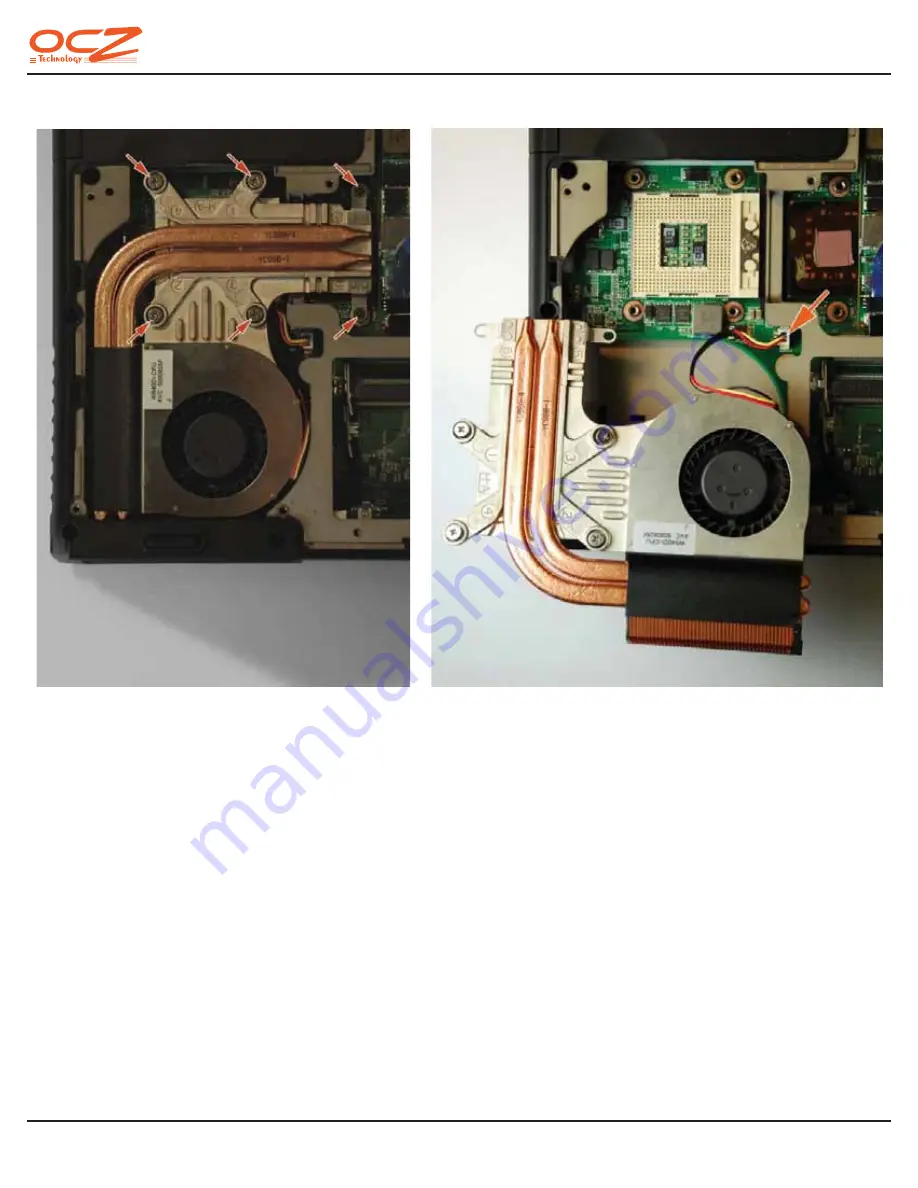
Locate the six screws (arrows) and unscrew them in the order indicated on the heatspreader (1-6). 
Carefully li the cooling aggregate out of the cavity and place it on the side of the shell. It is not 
necessary to disconnect the fan from its power header on the motherboard (see arrow, right 
picture). 

Summary of Contents for OCZDIY17A2 Series

Page 1: ...SETUP GUIDE DIY GAM I N G N O T E B O O K Model OCZDIY17A2 Series...

Page 2: ...G NOTEBOOK Familiarize yourself with the notebook before opening it up and exposing the inside to dust and other environmental factors The picture below shows the loca on of all important components b...

Page 3: ...e The OCZDIY17A2 notebook uses a Serial ATA SATA interface for the HDD therefore any 2 5 mobile HDD purchased for this system needs to comply with the SATA standard The two HDD bays are located undern...

Page 4: ...03 DIY GAMING NOTEBOOK A er removal of the screws the drive mounts can be pulled from the laptop chassis...

Page 5: ...moun ng holes for the screws Turn the drive mount over as shown and align the HDD with the moun ng holes for the screws Once the drive is a ached to the bay by fastening the four screws the en re mou...

Page 6: ...tures the memory expansion slots and the CPU socket Remove the nine screws using a small Phillips type Screwdriver and gently li the access panel at the relieved tab arrow Please remove the ba ery bef...

Page 7: ...06 DIY GAMING NOTEBOOK Iden fy the memory slots shown inside the orange frame arrow For easier iden ca on the picture shows the slots with memory modules already installed...

Page 8: ...l be vacant and look like shown below Please note that the two memory slots are keyed arrows to ensure correct orienta on of the memory modules Also note the reten on clips arrowheads that will engage...

Page 9: ...ts and slightly tap them to ensure their full inser on Then gently press the modules down star ng with the lower module un l they lie at and engage with the reten on clips as shown in the picture belo...

Page 10: ...he processor or CPU The CPU used in the OCZDIY17A2 laptop is a mobile Intel Core2 Duo processor with a Socket PGA478 pinout The CPU heatsink and blower are already pre assembled and mounted in the are...

Page 11: ...nscrew them in the order indicated on the heatspreader 1 6 Carefully li the cooling aggregate out of the cavity and place it on the side of the shell It is not necessary to disconnect the fan from its...

Page 12: ...cket The corner marked by the arrow is used for orienta on of the CPU marked by a golden triangle on the CPU package The arrowhead points to the locking screw that opens the socket for CPU inser on gr...

Page 13: ...ket as shown in the pictures above Also note the orienta on of the locking screw with the notch facing the closed posi on Please apply some thermal grease to the heatsink and or CPU die and align the...

Page 14: ...OTEBOOK Congratula ons it is me to connect the power supply to the ba ery and re up your new system Keep in mind that the ini al charge of the ba ery may take up to 4 hours before you can fully enjoy...

Page 15: ...PORT For warranty support and technical information about your DIY Gaming Notebook visit www ocztechnology com All OCZ PRODUCTS include free technical support for direct expert advice Contact OCZ Tech...

Reviews: