A
B
tip:
Cut and insert a section of
a coat hanger wire through
the hole. This will more
easily identify the hole
location in the attic.
tip:
To bring in the most light
available, always try to
position dome/flashing
so it views direct sun
throughout the day
without obstruction,
from trees, buildings, etc.
C
D
Solar Flair 14" Tubular Skylight
1
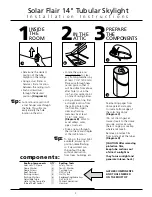
• Determine the desired
position of the tube
skylight on the ceiling.
• Using a stud finder or
hammer, find a location
between the ceiling joists.
• Push a screwdriver
through the desired
position.
(Diagram A)
INSIDE
THE
ROOM
2
IN THE
ATTIC
3
PREPARE
THE
COMPONENTS
• Locate the wire and
adjust location to clear
any framing members by
at least 7 1/4” (204 mm).
Place wire through new
center point so that it
will be visible from above
after hole is cut in the
roof, and as center point
on face of ceiling below.
• Using a plumb line, find
a straight location from
the ceiling hole to the
roof location. Again,
clear any framing
members by at least
7 1/4” (204 mm).
(Diagram B)
Work to
avoid valleys, wires,
pipes, ducts, etc.
• Drive a nail up through
the roof deck and shingles
at the roof location.
I n s t a l l a t i o n I n s t r u c t i o n s
Rooftop Components
QTY.
Solar Lens™ Dome
(1)
Dome Washer
(4)
Dome Screws
(4)
Roof Flashing
(1)
Flashing Screws
(8)
Flashing Washers
(6)
Adjustable Tube
(1)
Hole Cutting Template
(1)
Tube of Roof Sealant
(1)
Rooftop Tools
Safety Glasses
Pencil / Marker
Caulking Gun
Utility Knife
Flat Pry Bar
Reciprocating/Sabre Saw
Drill (w/ Bits)
Phillips Screwdriver
Hammer
components:
Peel backing paper from
dome gasket and apply
to inside bottom edge of
the solar lens dome
(Diagram C)
.
(Do not stretch gasket.
Insure it seals to the dome
securely, and make sure
there is no gap or overlap
where ends meet).
Remove protective film
from inside of all the tubes.
(Diagram D)
[CAUTION: After removing
protective film,
keep tube sections out
of direct sunlight as
they focus sunlight and
generate intense heat.]
GATHER COMPONENTS
AND TOOLS NEEDED
ON THE ROOFTOP
3


