H
E
F
G
tip:
You may have to drill
a hole inside the traced
diameter of the hole to
insert saw blade.
important:
Solar Lens™
Dome should
see the sun
throughout the
day for optimum
performance.
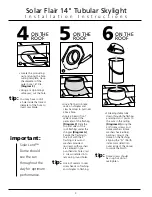
• Locate the protruding
nail and using the hole-
cutting template, trace
the diameter of the
outer hole. 16” Dia.
(Diagram E)
• Using a reciprocating/
sabre saw, cut the hole.
•
Use a flat bar to break
seals on shingles and
claw hammer to pull nails
above hole.
•
Apply a bead of roof
sealant around the
perimeter of the flashing.
(Diagram F)
Slide the
top and sides of the
roof flashing under the
shingles
(Diagram G)
.
Secure the flashing to
the roof with the 2”
flashing screws and
washers provided.
(6 screws with washers
are centered in pre-
punched star holes; last
2 screws installed into
remaining round holes.
• Slide adjustable tube
down through the flashing
and adjust so it points to
the wire in the ceiling.
(Diagram H)
Using the
3/4"dome screws and
dome washers (dome
washers have rubber
backing), mount the
dome on the flashing
aligning the “N” (North
indicator molded into
outer edge of the dome)
towards the North.
tip:
Dome screws should
be snug but do not
overtighten.
Solar Flair 14" Tubular Skylight
I n s t a l l a t i o n I n s t r u c t i o n s
4
ON THE
ROOF
5
ON THE
ROOF
6
ON THE
ROOF
OUTER HOLE
4
tip:
Use roof sealant to seal
screw heads on flashing
and shingles to flashing.


