J
M
L
K
tip:
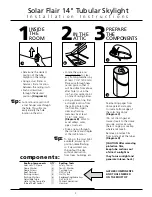
Drill a pilot hole inside
the traced diameter of the
hole to insert saw blade.
• Using hole cutting guide
and pencil, locate
protruding wire and
trace the diameter of
the ceiling inner hole.
14-1/2” Dia.
(Diagram J)
• Use a keyhole/drywall
saw to cut the hole.
• Secure the ceiling trim
ring with the 4 black
drywall screws provided.
Screws are driven thru
drywall into 4 white
ceiling anchors.
• Remove screw caps
from ceiling trim ring and
insert into drywall screw
head to hide screws.
(Diagrams K & L)
components:
GATHER COMPONENTS
AND TOOLS NEEDED
IN THE ATTIC
Attic Components QTY
Adjustable tube
(1)
Tube
(1)
Roll of foil tape
(1)
Tube ring seal
(1)
TOOLS
Tape Measure
Tin Snips
Utility Knife
• Place tube ring seal
around adjustable tube
and roll into position at
flanged end. Gently push
tube into trim ring (tube
ring seal should sit tightly
between trim ring and
tube).
(Diagram M)
important:
Please see
Cut Your Tube
chart on following page.
7
INSIDE
THE
ROOM
INNER HOLE
TRIM RING
SCREW CAP
CEILING/
DRYWALL
TRIM RING
TUBE
TUBE RING SEAL
ANCHOR
5
Solar Flair 14" Tubular Skylight
I n s t a l l a t i o n I n s t r u c t i o n s
8
IN THE
ATTIC
N
CONNECTING TUBE
ASSEMBLY
Be sure to measure and
cut if necessary, before
removing adhesive strip
and assembling connecting
tube.
(Diagram N)
• After referring to “cut
your tube chart” on the
next page, use metal
shears to shorten the
extension tube, allowing
for a 1” overlap at
each end.
9
IN THE
ATTIC
ADHESIVE STRIP


