background image

10

REMOTE CONTROL

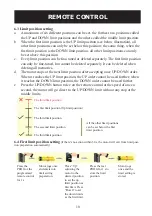
6.3 Limit position setting

a.  A maximum of six different positions can be set, the furthest two positions called 

the UP and DOWN limit positions and the others called the middle limit position. 

b. When 

the 

fi

 rst limit position is the UP limit position (see below illustration), all 

other limit positions can only be set below this position; the same thing, when the 

fi

 rst limit position is the DOWN limit position, all other limit positions can only 

be set above this position

c.  Every limit position can be 

fi

 ne-tuned or deleted separately. The 

fi

 rst limit position 

can only be 

fi

 ne-tuned, but cannot be deleted separately. It can be deleted when 

deleting all memories.

d.  The motor stops at the next limit position after accepting once UP/DOWN order. 

When it reaches the UP limit position, the UP order cannot be used further; when 
it reaches the DOWN limit position, the DOWN order cannot be used further.

e.  Press the UP/DOWN button twice on the remote control at the speed of once a 

second, the motor will go direct to the UP/DOWN limit without any stop at the 
middle limits.

The third limit position

The 

fi

 rst limit position (Up limit position)

The third limit position

The seceond limit position

The third limit position

All the other limit positions 
can be set below the 

fi

 rst  

limit position

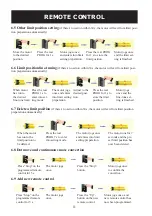
6.4 First limit position setting 

(if there’s no action within 30 s, the motor will exit from limit posi-

tion preparation automatically)

Press the 
PROG of the 
programmed 
remote control 
for 1 s

.

Motor jogs once 
and enters into 
limit setting 
preparation.

Press “Up” 
adjusting the 
motor to the 
desired position 
to set the up 
limit position as 

fi

 rst limit. Press 

“Down” to set 
the down limits 
as the 

fi

 rst limit.


Press the rear  
PROG for 1 s to 
store the limit 
position.

Motor jogs 
once and the 
limit setting is 
stored.

Summary of Contents for Luxury roller blind system

Page 1: ...1 USER GUIDE FOR MOTORISED ROLLER BLIND WITH RF REMOTE CONTROL Model Luxury roller blind system ODSIF...

Page 2: ...er wheel 7 4 Warnings 8 5 Mounting the system 8 6 Remote control 9 6 1 Programming the remote control 9 6 2 Change of direction 9 6 3 Limit position setting 10 6 4 First limit position setting 10 6 5...

Page 3: ...er blind adapter wheel remote control bottom list and wall ceiling brackets The model is a slim line design making the roller blind system ideal for installation where there is limited space General f...

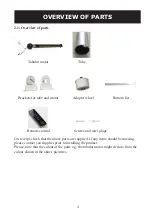
Page 4: ...2 1 Overview of parts On receipt check that the above parts are supplied If any items should be missing please contact you supplier prior to installing the product Please note that the colour of the p...

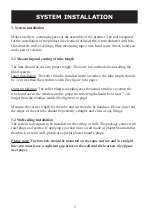
Page 5: ...stallation The roller blind is installed over the actual window covering the whole surface of the window and its glass the tube length should be at least 7 cm longer than the window width See figure n...

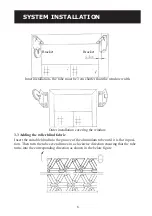
Page 6: ...allation covering the window Bracket Bracket 3 3 Adding the roller blind fabric Insert the suitable blind into the groove of the aluminium tube until it is flat in posi tion Then turn the tube several...

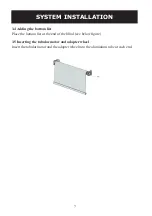
Page 7: ...3 4 Adding the bottom list Place the bottom list at the end of the blind see below figure 3 5 Inserting the tubular motor and adapter wheel Insert the tubular motor and the adapter wheel into the alum...

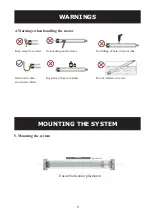
Page 8: ...Keep away from water No knocking on the motor No drilling of hole on motor tube Downward cable avoid water inflow Keep away from corrodents Do not immerse in water MOUNTING THE SYSTEM Spirit level Ens...

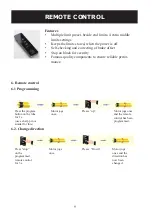
Page 9: ...Famous quality components to ensure reliable perfor mance 6 Remote control Press the program button on the tube for 1 s use a sharp pin or similar for this Motor jogs once Presss up Motor jogs once a...

Page 10: ...UP order cannot be used further when it reaches the DOWN limit position the DOWN order cannot be used further e Press the UP DOWN button twice on the remote control at the speed of once a second the m...

Page 11: ...ired posi tion Press the rear PROG for 1 s to store the limit position Motor jogs once and the fine tune set ting is finished 6 7 Delete a limit position if there s no action within 30 s the motor wil...

Page 12: ...deleted 6 11 Delete all the memories Press Stop on the programmed remote control for 5 s The motor jogs once Press the rear PROG for 7 s within 10 s The motor jogs twice and all the memories have now...

Page 13: ...heating protection b The power was cut off Solution a After cooling down the motor will work again b The motor will work again once the power is on HOW TO CODE WALL SWITCH TROUBLE SHOOTING Press the p...

Page 14: ...to our choice FREE OF CHARGE The warranty becomes void if the defects are due to wrong installation use or misuse of the product repairs performed by unauthorised third party forced adjustments or ch...

Page 15: ...15 RESERVATIONS 10 Reservations Technical specifications subject to changes without prior notice...

Page 16: ...16 ODSIF 3460 Birker d Danmark Tel 45 45 81 22 11 www odsif dk E mail info odsif dk CONTACT INFORMATION...

Reviews: