background image

www.odu.de

ODU MEDI-SNAP® 

A

Page 4

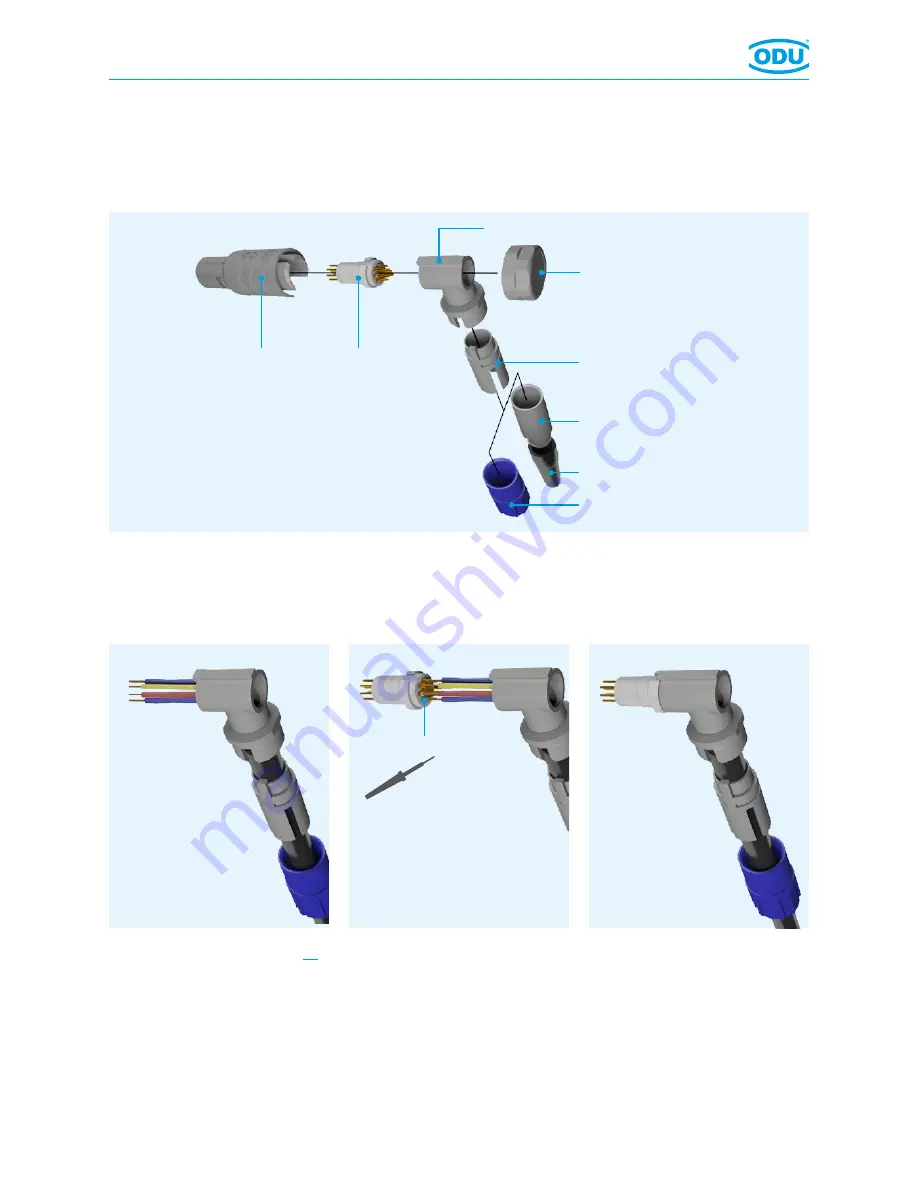
Assembly Right-angled Plug Size 1

1.  Strip cable and wire (see page 10). 
2.  Slide back nut and cable collet and  

right-angled part over the cable.

3.  Pre-tinning of strands.
4.  Solder the litz wires according to 

contact arrangement. 

Recommended cleaning agent:  

Isopropyl Alcohol.

5.  Slide the right-angled part against 

contact insert. 

Caution: Don’t damage the  

contacts.

6.  Slide the cable collet against 

right-angled part.

Housing

Cable collet

Back screw

Right-angled part

Back nut for  cable bend relief

(style 2) 

010.013.003.000.000 

Assembly Instructions

Back nut (style 1) 

Cable bend relief

Insert with  

solder capacity

Summary of Contents for MEDI-SNAP

Page 1: ...www odu de ODU MEDI SNAP Assembly Instructions Straight Plug Size 1 Right angled Plug Size 1 In line Receptacle Size 1 Straight Plug Size 2...

Page 2: ...nd cable collet over the cable 2 Strip cable and wire see page 10 3 Pre tinning of strands 4 Solder the litz wires A according to contact arrangement Recommended cleaning agent Isopropyl Alcohol 010 0...

Page 3: ...ntacts 6 Put the assembled cable con sidering the guidings B into the housing 7 Screw and fasten back nut on the assembled in line receptacle Caution Consider tightening torque see page 10 If necessar...

Page 4: ...wires according to contact arrangement Recommended cleaning agent Isopropyl Alcohol 5 Slide the right angled part against contact insert Caution Don t damage the contacts 6 Slide the cable collet aga...

Page 5: ...angled part and screw it with the back nut If necessary secure thread C with adhesive see page 10 Caution Consider tightening torque see page 10 8 Screw back screw on the assembled plug and fasten it...

Page 6: ...ire see page 10 3 Pre tinning of strands 4 Solder the litz wires A according to contact arrangement Recommended cleaning agent Isopropyl Alcohol 010 013 004 000 000 Assembly Instructions Housing Cable...

Page 7: ...ntacts 6 Put the assembled cable con sidering the guidings B into the housing 7 Screw and fasten back nut on the assembled in line receptacle Caution Consider tightening torque see page 10 If necessar...

Page 8: ...cable and wire see page 10 3 Pre tinning of strands 4 Solder the litz wires A according to contact arrangement Recommended cleaning agent Isopropyl Alcohol 010 013 005 000 000 Assembly Instructions Ho...

Page 9: ...ontacts 6 Put the assembled cable considering the guidings B into the housing 7 Screw and fasten back nut on the assembled in line receptacle Caution Consider tightening torque see page 10 If necessar...

Page 10: ...after some time Use only the indicated adhesive 2 Tightening torque Dimension L mm Size 1 Size 2 12 15 Torque moment Size 1 Torque moment Size 2 Nm Nm Straight plug 0 25 0 5 Right angled plug clampin...

Reviews: