background image


12 


Charging Battery 

The device has a built-in rechargeable battery. No extra battery 

installation is required. Just charge the device when it indicates low 

battery.   

To charge the battery

, connect the device to any standard wall 

outlet using the power adaptor. It takes about 5 hours to fully charge 

the battery. 


Note: 

a. We advice to use only the delivered power adapter with this 

tablet. 

b. You can operate the device even when it is being charged. But for 

extended battery life, it is suggested NOT to use the device when 

it is charging.   

c. It is recommended to charge the battery before you use the 

device for the first time.   

d. For maximum performance, lithium-ion batteries need to be used 

often. If you don’t use the device often, be sure to recharge the 

battery at least once per month. 

e. Should the rechargeable battery of the device discharge 

completely, connect the device to the main power source for 

approximately 5-10 minutes before attempting normal operation. 

f. In some cases, devices which have been charged for longer 

periods of time may not be able to be switched back on. Should 

this occur, make a Reset. 


Summary of Contents for EliteWin 360

Page 1: ... Using the Pen 15 Installing Memory Card 17 Connect via USB 18 Transferring Files 19 Turning On Off 19 Screen Lock 19 Using the Touch Screen 20 Customize Home Screen 25 Bluetooth Connection 26 Access Internet Wifi 27 Virtual Keyboard 29 Using the Web Browser 30 Sending Receiving E Mails 32 Photo Playback 34 Camera usage 36 One Drive File Explorer 37 Windows Desktop 38 System Settings 39 Troublesho...

Page 2: ...the battery at least once per month to maintain battery life Charge the battery if a The battery level icon displays An empty battery b The device powers off automatically when restarted c There is no response when pressing keys with keys unlocked and battery full When the device is being formatted or transferring a file do not interrupt the connection Otherwise data may be corrupted of lost When ...

Page 3: ...that may be of sufficient magnitude to constitute a risk of electric shock To reduce the risk of electric shock do not remove the cover or back as there are no user serviceable parts inside Refer servicing to qualified personnel The exclamation point within an equilateral triangle is intended to alert the user to the presence of important operating and maintenance instructions in the literature ac...

Page 4: ...U To prevent possible harm to the environment or human health from uncontrolled waste disposal recycle it responsibly to promote the sustainable reuse of material resources To dispose of your used device please use the return and collection systems available in your area or contact the retailer where the product was purchased They can take this product for safe environmental recycling Note Please ...

Page 5: ...declares that the device EliteWin 360 is in compliance with Directive 2014 53 EU The full text of the EU declaration of conformity is available at the following internet address www odys de Service Downloads http www odys de web downloads_de html ...

Page 6: ...o establish a safe volume level Set your volume control at a low setting Slowly increase the sound until you can hear it comfortably and clearly without distortion Listen for reasonable periods of time prolonged exposure to sound even at normally safe levels can also cause hearing loss Be sure to use your equipment reasonably and take appropriate breaks Be sure to observe the following guidelines ...

Page 7: ... video files in commonly used formats showing photos and access internet functions using the build in Wi Fi function It is exclusively meant for this purpose and must only be used for the same This also includes paying attention to all information contained in this operating manual especially in the safety instructions Any other usage is considered to be improper and may lead to material damages a...

Page 8: ...party Application Support With the built in WindowsTM OS you can install a large number of third party applications in this device Please note that you need to insert a Micro SD Card for it Built in G sensor The screen changes to landscape or portrait automatically when the device rotates Entertainment You can enjoy music movies pictures and e books with the Mobile Tablet Accessories USB Cable Pow...

Page 9: ...9 Buttons Ports ...

Page 10: ...e stop functioning or operate abnormally press and hold for 15 seconds to reset the device off 6 USB 3 0 Support for USB stick Surf stick 7 Power jack Charge and power the tablet with the included power adapter 8 Micro SD Card Slot Accommodates any standard SD SDHC memory card 9 Micro HDMI Connect to a TV or other display 10 Headphone jack Audio output connection for head phones Note Speaker outpu...

Page 11: ... used as a traditional notebook Tablet PC or propped touch screen PC Note The device will automatically switch to the tablet mode when opened to an angle of 180 200 A notice will appear in the display The keyboard will automatically be deactivated when reaching the above mentioned angle and reactivated when folded back ...

Page 12: ...xtended battery life it is suggested NOT to use the device when it is charging c It is recommended to charge the battery before you use the device for the first time d For maximum performance lithium ion batteries need to be used often If you don t use the device often be sure to recharge the battery at least once per month e Should the rechargeable battery of the device discharge completely conne...

Page 13: ...13 Using the keyboard Note When the tablet overlaps on the keyboard the display will be turned off as soon as it is erect the display will be turned on again ...

Page 14: ...16 Fn Entf Insert 4 Fn F2 Open System settings 17 Fn y to input Fn Shift y to input 5 Fn F3 Decrease the brightness 18 Fn x to input 6 Fn F4 Increase the brightness 19 Fn Function key 7 Fn F5 Decrease the volume 20 Windows Key 8 Fn F6 Increase the volume 21 Fn Move to the top of the page 9 Fn F7 Mute 22 Fn Page up Fn Page down 10 Fn F8 Toggle screen 23 Fn Move to the end of the page 11 Fn F9 lock ...

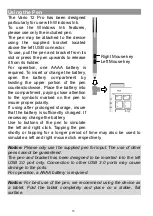
Page 15: ...rked on the pen to insure proper polarity If using after prolonged storage insure that the battery is sufficiently charged If necessary change the battery Use to buttons of the pen to simulate the left and right click Tapping the pen shortly or tapping for a longer period of time may also be used to simulate a left and right mouse click respectively Notice Please only use the supplied pen for inpu...

Page 16: ...can find programs designed for use with windows ink such as sticky notes sketch pad screen sketch etc Other programs designed for Windows Ink may be installed here Notice Should no Windows Ink Icon be available right click the taskbar at the bottom of the screen and activate the context menu that opens Windows Ink Workspace View ...

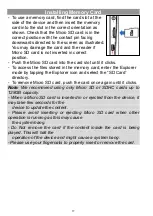
Page 17: ...the memory card enter the Explorer mode by tapping the Explorer icon and select the SD Card directory To remove Micro SD card push the card once again until it clicks Note We recommend using only Micro SD or SDHC cards up to 128GB capacity When a Micro SD card is inserted in or ejected from the device it may take few seconds for the device to update the content Please avoid inserting or ejecting M...

Page 18: ... show upward when connecting cables while the screen is above Please note Only use connecting cable with a maximum length of 100cm Please make sure when connecting the USB adapter or connector cables attention to the correct alignment of the connector before inserting it into the USB socket on the unit Incorrect insertion may cause damage to plug and socket Screen Hooks Top Bottom ...

Page 19: ... This device will sleep with the screen off if it stays inactive for a few seconds You can briefly press the Power button to turn on the screen and wake it up Screen Lock The screen automatically turns off and locks itself after a set period of time When the screen turned off press the Power button to light up the screen Slide the screen upwards to unlock After the system start up the start screen...

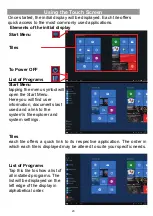
Page 20: ...e list will be displayed on the left edge of the display in alphabetical order Start Menu tapping the menu symbol will open the Start Menu Here you will find user information documents last used and a link to the system s file explorer and system settings To Power OFF Tiles each tile offers a quick link to its respective application The order in which each tile is displayed may be altered to suite...

Page 21: ...Tap this symbol to display all opened applications next to another or to display the active application in the foreground NOTICE This function is only available when at least one application is running Important settings or backgraund applications may be found here Battey Status and Settings Wireless Network Settings Volume Settings Open the Function Bar See below ...

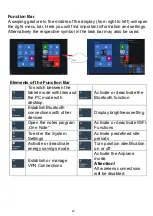
Page 22: ...de with tiles and the PC mode with desktop Activate or deactivate the Bluetooth function Establish Bluetooth connections with other devices Display brightness setting Open the notes program One Note Activate or deactivate WiFi Functions To enter the System Settings Activate predefined idle periods Activate or deactivate energy savings mode Turn position identification on or off Establish or manage...

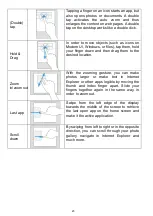
Page 23: ...location Zoom in zoom out With the zooming gesture you can make photos larger or make text in Internet Explorer or other apps legible by moving the thumb and index finger apart Slide your fingers together again in the same way in order to zoom out Last app Swipe from the left edge of the display towards the middle of the screen to retrieve the last open app on the home screen and make it the activ...

Page 24: ...Please consult the respective software developer for further information or support Note Installed on this unit are various third party applications Apps whose author is not Axdia International All rights and obligations remain the sole responsibility of the author of these applications Axdia accepts no liability for any malfunction of third party apps For support or license inquiries please conta...

Page 25: ...to work on it The selected application will be marked and two symbols will appear in the corners Tap the above menu to pin the selected application to the task bar Tap the menu to display further functions Press and hold the tile of an application to move it to another location Place programme icons on the home page Open the list of program as defined above Tap and hold a little longer on a progra...

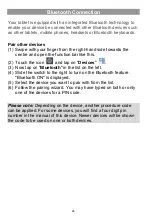
Page 26: ...ch the icon and tap on Devices 3 Now tap on Bluetooth in the list on the left 4 Slide the switch to the right to turn on the Bluetooth feature Bluetooth ON is displayed 5 Select the device you want to pair with from the list 6 Follow the pairing wizard You may have typed on both or only one of the devices for a PIN code Please note Depending on the device another procedure code can be applied For ...

Page 27: ...network and that no other settings of this network like MAC address filter will deny the connection Connect to a WPS capable router This device also supports Wi Fi Protected Setup WPS if your router is WPS capable you can use WPS button to connect this player to your router Note Consult the user manual of the router and learn how to add a WPS device to the router Please use the manual setup if WPS...

Page 28: ...assword and then tap on Connect Your Tablet will now attempt to establish a connection to that WiFi hot spot with the network parameters you entered If the connection is successful the message Connected to XXX will appear under the WIFI setting Note The available network list is constantly refreshed automatically When the Wi Fi is enabled Your Tablet will connect automatically to your configured n...

Page 29: ...bers and Characters f Control key Ctrl g Emoticons h Space bar i Adjust keyboard layout Special character Some or the keys provide the possibility to enter special character 1 Press the corresponding key and keep pressing 2 While pressing move your finger tot he desired character 3 Release to write the selected symbol Please note The keyboard layout changes according to OSD language settings a b c...

Page 30: ...til you are ready To open a link simply tap it You can open several web pages at a time view them all at once on the screen and then tap one of them to view it in full screen To go back directly to the Home screen tap the Home icon Depending on where you are in the web browser holding down on an item will give you access to more options To fill in a text field tap in the field then use the virtual...

Page 31: ...31 Settings Reload Page Favorite Bar New Tab Split Page Touch to enter a web address Save actual site as favorite Edit and save current Website to MS Notes Previous Page Next Page ...

Page 32: ...efore using the email service Tap the email icon to access the email app alternatively tap on the app shortcut to display all apps and then tap on the email icon to launch the email app The mailbox of the E mail address indicated during setup is displayed Label message Mark as read unread Settings Folders mailboxes Reply Forward Write a new e mail Delete current mail ...

Page 33: ...Tap to write an e mail Tap in the corresponding field for the recipient To the subject and the text in order to make each input More options for this mail Send mail Discard mail Add elements to this mail Text formatting ...

Page 34: ... thumbnail to view the photo in full screen mode Open the sub folder if the photo is stored in a sub folder to display the photo video contents as thumbnails View Photo Tap on a photo to display it Swipe from right to left to scroll further To scroll backwards swipe from left to right Place your thumb and index finger on the screen at the same time and pull the fingers apart to enlarge the page Sl...

Page 35: ...d if four pictures at minimum are in the current folder All pictures from this folder will be repeated continuously Rotate picture Post production functions for the selected photo Share picture Start slide show More settings Delete picture ...

Page 36: ... Record Tap this icon to start a video recording A photo is taken by tapping on the camera Zoom Simultaneously tap with two fingers at the screen Drag the fingers together or apart to zoom out or in Show Pictures Switch Camera Picture Settings Take a Picture Start Video Recording Advanced Settings ...

Page 37: ...ucted above Now open the OneDrive programme Screen elements File Search for files Drives View Setting Share Elements Edit File Window Functions Set Symbol Bar Properties Previous Next Go Layer above Address bar for drives and folders Close minimize Reduce size Window ...

Page 38: ...and deactivate the tablet mode The desktop is displayed and provides the familiar interface of other versions of Windows Tap once briefly to click Tap twice briefly for a double click Tap until a square appears around your finger in order to perform a right click ...

Page 39: ...desired function to modify settings Drag your finger across the screen to display more settings outside of the screen When settings are finalized swipe from the top edge to the bottom to close settings Activate Windows to activate your version of Windows Note You will only have all features available without restrictions after activating your version ...

Page 40: ...iles can cause different noise or cannot be played Ensure that the files are not damaged Try different earphones Ensure that the Wi Fi function is enabled and that a wireless network is within range Characters are corrupted Ensure that the language is set properly No Wi Fi connection Ensure that the Wi Fi function is enabled and that a wireless network is within range Enter the correct password Ob...

Page 41: ...D in router configuration Decrease distance to router Firmware update or change channel No Internet Connecting Not connected MAC filter active Deactivate filter in router configuration No Internet Connecting Authenticati on Not connected Password wrong or wrong spelling Check and re enter password No Internet Connecting Authenticati on Retrieving IP address Not connected Router configurat ion faul...

Page 42: ... earphone port built in speaker Built in microphone E book Format PDF Audio MP3 MPEG1 2 2 5 Audio Layer 1 2 3 WAV MS ADPCM IMA ADPCM PCM APE Version 3 95 3 97 3 98 3 99 normal and fast except high and extra high FLAC FLAC Audio Video Format AVI Xvid Divx 4 5 6 except GMC QPEL Divx for License Audio Codec MP3 AC3 MKV H 264 MPEG4 XVID DIVX4 5 6 MOV MPEG4 H 264 Audio Codec MP3 3GP MP4 H 264 H 263 MPE...

Page 43: ...00 8000 GIF Static Max 1000 1000 Network Connection Media Wi Fi 802 11 b g n Battery Charge Time About 5 6 hours Battery Life About 6 8 hours Display 11 6 TFT LED Touchpad capacitive touch pad 1366 x 768 pixels SNR 65dB above Frequency Response Range 20Hz 20KHz Power Supply Rechargeable lithium ion polymer battery AC Adapter AC Input 100 240V 50 60Hz DC Output 5V 2A Physical Parameters Storage Tem...

Page 44: ...f marginal differences compared to the target appearance and workmanship provided these have a negligible effect on the product s fitness for use in the event of damage caused by chemical or electrochemical effects by water or generally from abnormal conditions Damage that is brought about by disregard of the user manual or other improper handling unauthorized interventions in the installed system...

Page 45: ... 6 If the device has built in data storage the customer is responsible for backing up the data before sending back the device Axdia is not liable for data loss from clients devices that are sent in Axdia reserves the right to restore the factory settings on devices that are sent in Please therefore make a note of your personal settings where appropriate 7 This warranty does not affect your legal w...

Page 46: ...he outside of the package in such a way that it is visible and clearly legible 3 You must enclose a copy of the sales slip as proof of purchase 4 Once AXDIA has received the product it will meet its warranty obligations in accordance with the warranty conditions and will return the product to the sender with carriage and insurance paid Service outside of warranty AXDIA can refuse any service claim...

Reviews: