ODYS
Prim
o
Win
12
–
Quickst
a
rt
Home
screen
Once
started,
the
Start
‐
Screen
will
be
displayed.
The
individual
icons
offer
quick
access
to
the
respected
application.
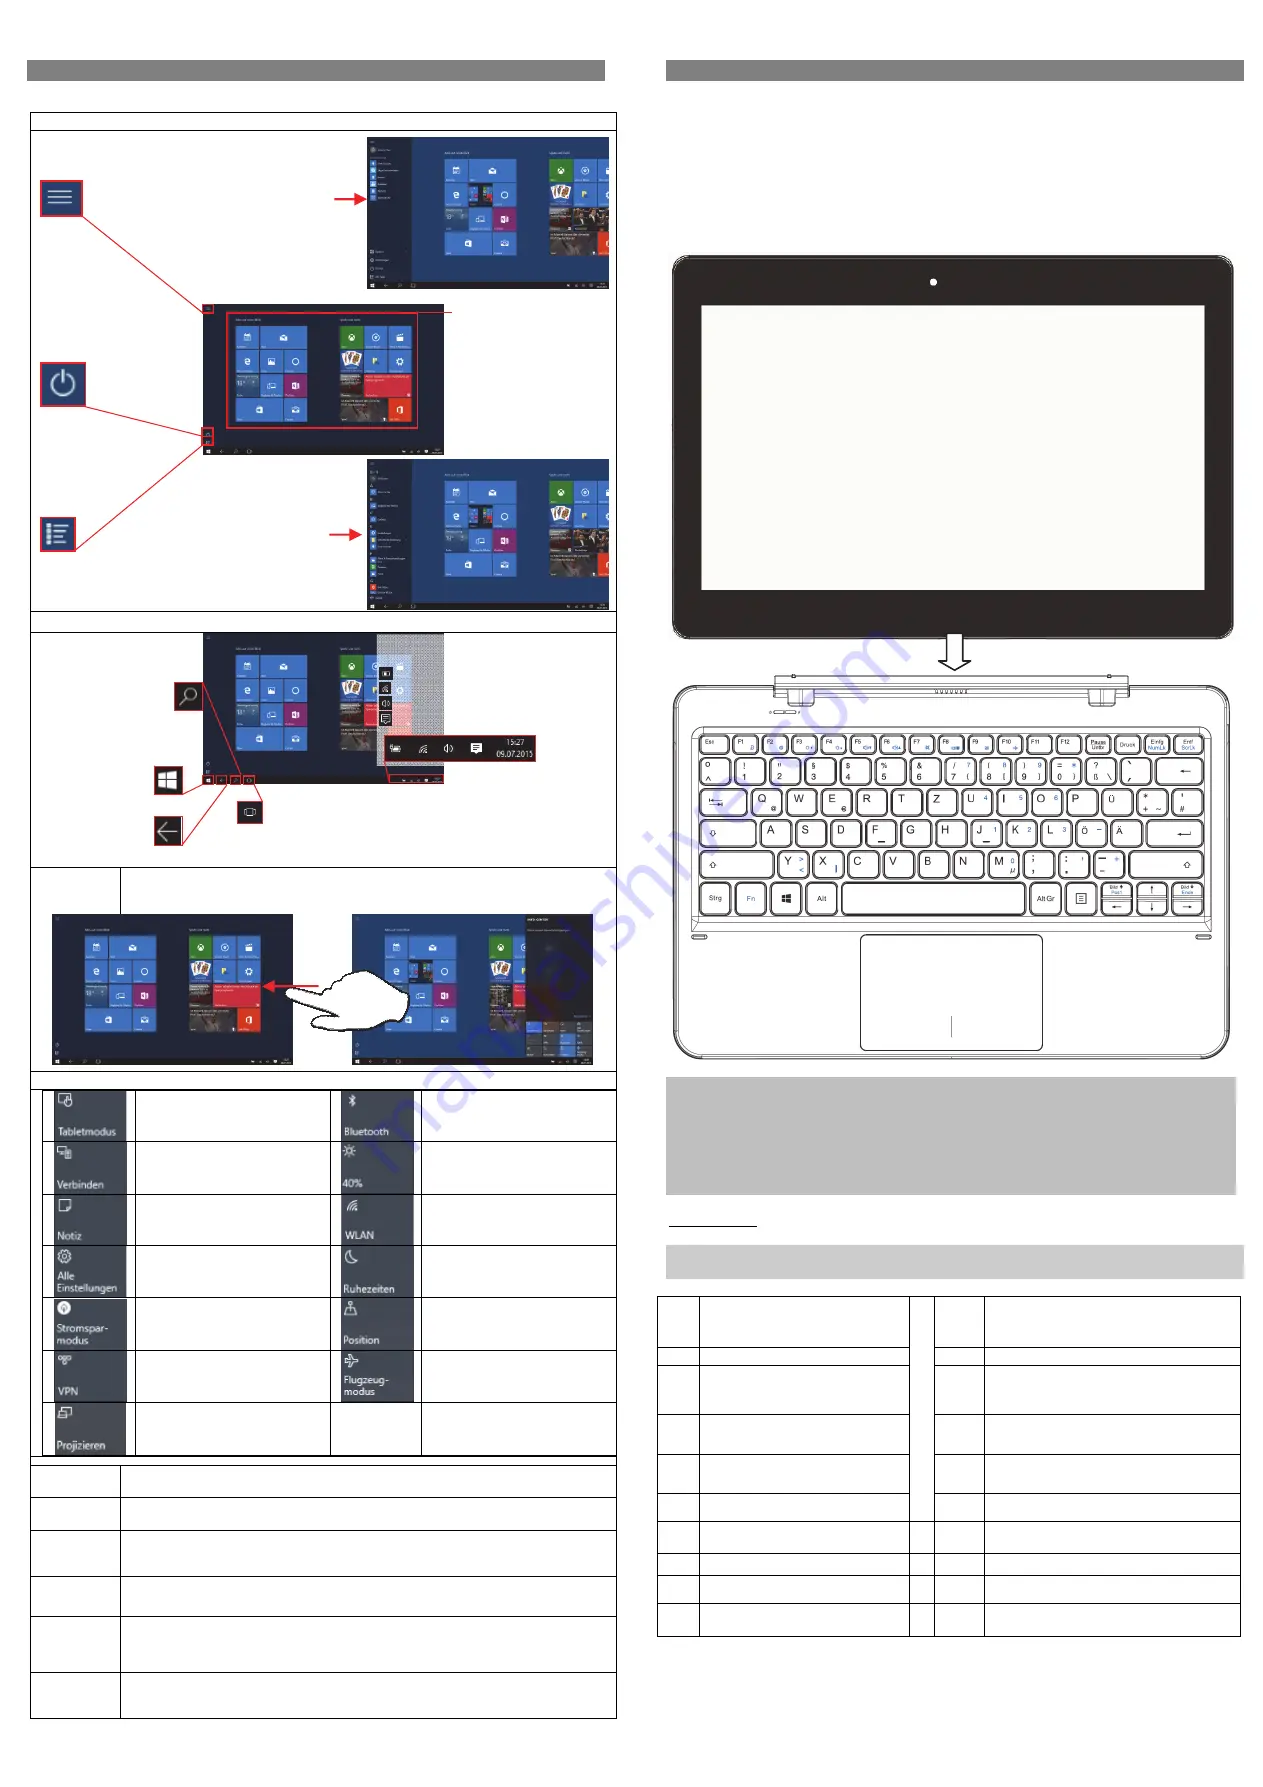
Start
Screen
Elements
Elements
on
the
Taskbar
Function
Bar
A
right
to
left
swipe
opens
the
Menu
‐
Bar
Here
you
may
find
important
information
and
settings.
Alternatively,
tapping
the
appropriate
icon
on
the
Taskbar
will
also
access
this
menu.
Elements
of
the
Functions
‐
Bar
Switch
between
the
tablet
mode
using
tiles
and
the
PC
mode
using
the
desktop.
Enable
or
disable
Bluetooth
Bluetooth
connections
with
other
devices
Adjust
the
monitor
brightness
Opens
the
Note
Program
„One
Note“.
Enable
or
Disable
WLAN
Access
System
Settings
Enable
defined
rest
periods
Enable
or
disable
power
saving
mode
Positioning
on
or
off
Set
and
enable
VPN
connections
Activate
Airplane
Mode
Attention!
All
wireless
connections
will
be
disabled.
Project
the
screen
content
to
a
external
monitor
Tapping
Tapping
an
icon
with
your
finger
will
start
Apps
from
the
Windows
menu
and
may
also
be
used
to
select
or
open
images
and
other
documents.
(Double)
Tapping
Double
tapping
the
desktop
will
act
as
would
a
double
mouse
‐
click.
Use
to
open
Apps
and
folders
or
files.
Tap
and
hold
for
2
Seconds
Duplicates
a
“Right
Mouse
Click”
on
the
touch
screen
and
opens
the
context
menu
of
the
selected
item.
Holding
/
Moving
To
move
an
object,
icon,
file
or
window
to
a
different
position,
press
and
hold
down
the
desired
item
with
your
finger
and
slide
the
item
to
the
desired
position
and
release.
Magnify
/
Minimize
To
magnify
an
object,
image,
text
or
app,
place
your
thumb
and
index
finger
together
on
the
object.
Swipe
in
an
outward
motion,
separating
your
thumb
and
index
finger
to
magnify
an
image,
text
or
app.
Swipe
in
the
other
direction
to
minimize.
Scroll/
swipe
To
scroll
images
or
documents
or
to
navigate
throughout
the
internet,
swipe
the
screen,
depending
on
the
direction
you
wish
to
scroll.
Using
the
keyboard
For
the
sake
of
using
convenience,
this
device
is
designed
to
be
equipped
with
a
dedicated
keyboard.
Follow
these
steps
to
connect
the
keyboard
to
your
tablet:
1.
Place
the
dedicated
keyboard
on
an
even
and
stable
plane
(e.g.
desk);
2.
Hold
your
tablet
with
two
hands,
align
the
connector
and
the
two
magnetic
contacts
on
the
keyboard
to
the
jack
and
positioning
slots
at
the
bottom
of
the
tablet.
3.
As
soon
as
the
keyboard
is
connected
to
the
tablet,
it
is
ready
for
use.
4.
You
can
rotate
the
tablet
to
overlap
the
keyboard
as
you
do
with
a
laptop.
5.
To
remove
the
keyboard
from
the
tablet,
lift
the
combination
up
first.
6.
Now
push
the
remove
button
at
the
keyboard
directely
in
front
of
the
screen
and
pull
the
tablet
gently
upwards
out
of
the
docking.
Note:
1.
This
keyboard
is
a
plug
‐
and
‐
play
device;
you
can
connect/disconnect
it
anytime.
2.
There
is
no
notification
or
indication
for
the
keyboard
connection,
except
for
appearance
of
the
mouse
icon
(arrow)
as
you
put
your
hand
onto
the
touch
area.
3.
When
the
tablet
overlaps
on
the
keyboard,
the
display
will
be
turned
off;
as
soon
as
it
is
erect,
the
display
will
be
turned
on
again.
4.
Since
the
keyboard
is
powered
by
the
tablet,
it
has
no
built
‐
in
battery
inside.
Keyboard
parts
Note:
Some
keys
have
several
different
assignments!
Important
key
combinations
can
be
found
at
the
chart
below.
(1)
Status
indicator:
a)
Device
turnde
on
b)
Caps
Lock
on
(11)
Fn
+
F10:
Airplane
Mode
(2)
Fn
+
F1:
Turn
screen
off/on
(12)
Fn
+
Einfg
to
activate
the
NumLock.
(3)
Fn
+
F2:
Open
System
settings
(13)
Fn
+
Entf:
Scroll
Lock
(4)
Fn
+
F3:
Decrease
the
brightness
(14)
Fn
+
y
to
input
>
Fn
+Strg
+
y
to
input
<
(5)
Fn
+
F4:
Increase
the
brightness
(15)
Fn
+
x
to
input
|
(6)
Fn
+
F5:
Decrease
the
volume
(16)
Fn
Function
key
(7)
Fn
+
F6:
Increase
the
volume
(17)
Windows
Key
(8)
Fn
+
F7:
Mute
(18)
Fn
+
Bild
:
Move
to
the
top
of
the
page
(9)
Fn
+
F8:
Toggle
screen
(19)
Fn
+
Bild
:
Move
to
the
end
of
the
page
(10)
Fn
+
F9:
lock
the
touchpad
(20)
Touchpad
Search
Use
the
search
box
to
search
the
internet
for
certain
terms
or
to
easily
locate
device
settings
and
installed
Applications.
Windows
‐
Key
Used
to
return
to
the
start
menu.
Back
Return
to
previous
view
Tap
this
icon
to
display
all
opened
Apps
side
by
side.
The
active
App
may
also
be
displayed
as
the
first
window
in
the
list
Notice:
This
function
is
not
available
when
no
applications
are
running
Important
settings
and
background
processes
may
be
found
here.
Battery
status
and
settings
Display
and
Wireless
Network
(Wi
‐
Fi)
settings
Volume
Settings
Opens
the
Functions
‐
Bar
(see
below)
Program
List:
Tap
this
icon
to
list
all
installed
APPs
in
alphabetical
order
on
the
left
edge
off
the
display.
Start
Menu
Tapping
the
menu
icon
will
open
the
start
menu.
Here
you
will
find
user
information,
last
used
documents
and
links
to
the
file
explorer
and
system
settings.
Start
displays
shutdown
options
Tiles
offer
quick
access
to
its
corresponding
APP.
The
appearance
may
be
adapted
to
suite
you
personal
needs
or
prolonged.
1
2
3
4
5
6
7
8
9
10
11
14
15
16
17
19
18
20
12
13


