NEXT: MENU SYSTEM »
GETTING STARTED
POWERING DOWN
While it may seem an odd time to note this, it is important to know that there is a preferred
method to shutting down the Odyssey7Q. On the left side of the case, the F2 SHUT DOWN
button should be pressed. This prompts a confirmation to “SAFELY POWER DOWN UNIT?”
Powering down in this fashion properly closes the files and directory system on the SSDs,
preventing corruption. If the Odyssey7Q should ever suffer a failure and the F2 SHUT DOWN
sequence does not function properly, the unit can be Force Power Off by holding the PWR
ON button by the power socket on the lower left corner of the Odyssey7Q, or simply by pulling
the power connector out of the power socket. If the Odyssey7Q is ever powered down in this
fashion, it is important to run a recovery on the SSDs in the Odyssey7Q menu at MENU »
ODYSSEY » SSDs » RECOVER SSD1 » RECOVER SSD2.
SETTING UP & USING THE ODYSSEY7Q
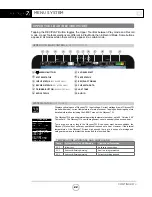
The touch screen of the Odyssey7Q features all of the device’s controls in a straightforward,
easy to navigate structure. Each box is a “virtual button.” Tap it briefly to activate/deactivate
it, or hold it for a few seconds to open up the menu defining its function. The controls at the
top of the display (Upper Tool Bar) are the recording, playback and formatting administration.
The controls at the bottom of the display (Lower Tool Bar) are the image analysis adjustments.
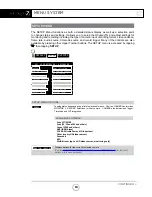
THE ODYSSEY7Q MENU
Starting on the left, tapping the
☼
button brings up the initial setup menus for the Odyssey7Q.
Don’t be intimidated by the number of selections in the
☼
section. This is by far the most in-
depth section of the Odyssey7Q touchscreen menus. More information about the Odyssey7Q
Menu System is available on the following pages.
DEMO MODE
Out of the box the Odyssey7Q is in DEMO MODE and must be owner-registered with
Convergent Design. On the Odyssey7Q a watermarking blue bar will appear on the lower
third of the image both on the OLED and in the recording while in DEMO MODE. The Record
Options are also available in their own DEMO MODE even once the unit is activated, so that
they may be tested but will show a blue bar in the frame. Activation of each Record Option
eliminates the blue bar.
To activate the Odyssey7Q after initial purchase, go to
Convergent-Design.com
, create a user
account and add the device to your account. When you add a device to your account you will
be provided with the Basic Activation Key for that device. Once this is completed, any time you
wish to purchase or rent a Record Option, return to the Convergent Design website and follow
the prompts to the online store. Upon payment the website will present a code which can then
be entered into the Odyssey7Q by tapping the appropriate button under the Activation menu.
To see if a selection has been enabled, tap on the option’s button to see if ACTIVE appears.
17


