background image

5 Uso

1. Estrarre 

l'apparecchio dall'imbatto e rimuovere la piastra di montaggio dall’apparec-

chio girandola in senso antiorario.

2.  Montare la piastra al soffitto nella posizione desiderata. A questo scopo occorre

praticare fori nel soffitto. Inserire i tasselli di plastica nei fori e fissare la piastra di
montaggio al soffitto tramite le viti.

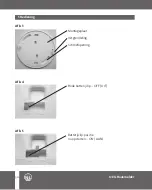
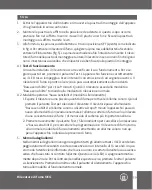
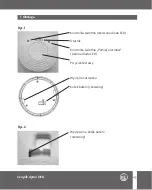
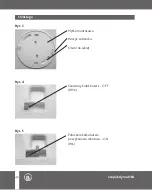
3.  Alla fornitura, la spina rossa della batteria si trova in posizione OFF (spento) come indicato

in fig. 4. Per attivare il rilevatore di fumo, spingere la spina rossa della batteria facendola
entrare nell’intaccatura (fig. 5). La spina deve chiudere a filo l’intaccatura. Inserire il rileva-
tore di fumo nella piastra di montaggio e ruotare il rilevatore in senso orario finché i ganci
non si innestano assicurandosi che il rilevatore sia ben fissato alla piastra di montaggio.

4.1. Test di funzionamento 

Una volta installato il rilevatore occorre verificare il suo funzionamento. Per ese-
guire questo test, premere il pulsante Test. L'apparecchio funziona correttamente
se, il LED rosso lampeggia a brevi intervalli con emissione di un segnale acustico. Il
rilevatore di fumo è pronto al servizio e passa automaticamente alla modalità
"Bassa sensibilità” per circa 9 minuti. Quindi il rilevatore esce dalla modalità a
"Bassa sensibilità" tornando alla modalità di rilevazione normale.

4.2. Modalità operativa "bassa sensibilità" (modalità silenziamento)

1. Esporre il rilevatore a una piccola quantità di fumo per attivare l'allarme sonoro. Quindi

premere il pulsante Test per silenziare il rilevatore. Il rilevatore passa alla modalità
"Bassa sensibilità" e l'allarme sonoro si disattiva. Dopo 9 minuti l’apparecchio passa di
nuovo alla modalità di rilevazione normale e l’allarme scatterà in futuro solo al rilevare
di una concentrazione di fumo / di monossido di carbonio più importante nell’aria.

2. Premere nuovamente il pulsante Test / Silenziamento per cancellare la rilevazione

a "bassa sensibilità” per cancellare la programmazione. Il rilevatore di fumo torna
alla normale modalità di funzionamento emettendo un allarme sonoro non ap-
pena l'apparecchio individua la presenza di fumo.

5. Memoria degli allarmi

Nella memoria degli allarmi vengono registrati tutti gli allarmi attivati. Il LED verde lam-
peggia durante 43 secondi tre volte consecutive con un intervallo di 1,3 secondi. In que-
sto modo l'utente viene informato che l'avviso sonoro è scattato durante la sua assenza
senza che fosse stato riscontrato l’allarme. Questo avviso (LED) si spegne automatica-
mente dopo 24 ore. Per riscontrare/cancellare questo avviso, premere 1 volta il pulsante
si silenziamento. Premendo un’altra volta il pulsante di silenziamento, l’apparecchio
torna alla modalità di funzionamento normale. 

Rilevatore di fumo OEG

IT

39

Summary of Contents for 305 120 090

Page 1: ...iebsanleitung D Rilevatore di fumo OEG Istruzioni per l uso IT OEG Rookmelder Gebruiksaanwijzing NL D tecteur de fum e OEG Mode d emploi FR OEG Smoke Detector Operating Manual GB Czujnik dymu OEG Inst...

Page 2: ...lektrische Erfassungsvorrichtung Hohe Empfindlichkeit Alarm Speicher Ausf hrung mit Betriebsart normalempfindlich und niedrig empfindlich Stummschaltmodus Fest eingebaute 3 Volt Lithium Mangan Batteri...

Page 3: ...matisch nach ca 9 Min ausgeschaltet Alarm Memory LED gr n blinkt 3 x in Folge alle 43 Sek und erlischt 24 Std sp ter ganz Beim ersten Mal dr cken der Test bzw Stummschalttaste wird der Rauchmelder akt...

Page 4: ...3 Technische Daten Draufsicht Abb 1 LM 107A 4 Abmessungen OEG Rauchmelder D 4...

Page 5: ...5 Bedienung Anzeigeleuchte Rote LED Lautsprecher Anzeigeleuchte Alarm Memory Gr ne LED Test Taste Rastkerbe Batteriestift rot Abbildung 1 Abbildung 2 Batteriestift Kerbe rot OEG Rauchmelder D 5...

Page 6: ...5 Bedienung Abbildung 3 Roter Batteriestift OFF AUS Abbildung 4 Batteriestift Lage nach erfolgter Montage ON EIN Abbildung 5 Montageplatte Rasthaken Schraubenloch OEG Rauchmelder D 6...

Page 7: ...sch in den berwachungsbetrieb Normalbetrieb 4 2 Betriebsart niedrige Empfindlichkeit einstellen Stummschaltmodus 1 Setzen Sie das Ger t einer kleinen Menge Rauch aus um den Signalton auszul sen Dr cke...

Page 8: ...lifizierten Elektriker Das Ger t darf nicht vom Endanwender auseinander gebaut werden 7 Fehlerbehebung Fehler Ursache Ma name zur Behebung Keine Reaktion nach dem Der rote Batteriestift ist in Batteri...

Page 9: ...r LED jederzeit gew hrleistet ist und der Signalton berall zu h ren ist 3 Die Batterie ist nicht austauschbar 9 Entsorgung 1 Das Verpackungsmaterial ist recyclingf hig Das Recycling ist der finalen En...

Page 10: ...detection High sensitivity Local smoke alarm memory Offers both normal detection mode and low sensitivity detection mode mute Integrated lithium manganese battery cannot be replaced with 10 year servi...

Page 11: ...tched off automatically after 9 min Alarm memory LED green flashes 3 times every 43 sec and turns off 24 hours later The smoke detector is activated by the first press of the test or mute button If th...

Page 12: ...3 Technical parameters Plan view Fig 1 LM 107A 4 Dimensions OEG Smoke Detector GB 12...

Page 13: ...5 Operation Alarm indicator light red LED Buzzer Alarm memory indicator light green LED Test button Slot Battery pin red Fig 1 Fig 2 Battery pin groove red OEG Smoke Detector GB 13...

Page 14: ...5 Operation Fig 3 Red battery pin OFF Fig 4 Battery pin position after installation ON Fig 5 Mounting plate Hook Screw hole OEG Smoke Detector GB 14...

Page 15: ...inutes After that the detector automatically switches to detection mode normal operation 4 2 Set low sensitivity detection mode mute 1 Use a small amount of smoke to trigger the alarm Then press the t...

Page 16: ...n The device must not be disassembled by the end user 7 Troubleshooting Problem Cause Remedy No response after The red battery pin is in Move the battery pin pressing test mute button the OFF position...

Page 17: ...or that could prevent people from seeing the LED light or hearing the alarm 3 The battery is not replaceable 9 Disposal 1 The packaging is made of recyclable materials Recycling is preferable to final...

Page 18: ...moire d alarme locale Mode de fonctionnement sensibilit normale et sensibilit r duite mode silence Pile int gr e base de lithium mangan se de 3 V non rempla able d une dur e de vie de 10 ans Avertisse...

Page 19: ...matiquement d sactiv apr s environ 9 minutes Fonction m moire d alarme T moin LED vert clignote 3 fois de suite toutes les 43 secondes et s teint compl tement apr s 24 heures En appuyant le bouton de...

Page 20: ...3 Caract ristiques techniques Vue de dessus Fig 1 LM 107A 4 Dimensions 20 D tecteur de fum e OEG FR...

Page 21: ...n T moin lumineux LED rouge Haut parleur T moin lumineux M moire d alarme LED vert Bouton de test Encoche Goupille de pile rouge Figure 1 Figure 2 Encoche pour goupille de pile rouge 21 D tecteur de f...

Page 22: ...5 Utilisation Figure 3 Goupille de pile rouge OFF ARRET Figure 4 Position de la goupille de pile apr s montage ON MARCHE Figure 5 Plaque de montage Crochet Trou pour vis 22 D tecteur de fum e OEG FR...

Page 23: ...sur le bouton de test Le t moin LED rouge se mettra clignoter dans de brefs intervalles et un signal sonore s met Le d tecteur de fum e est op rationnel et se met automatiquement dans le mode sensibil...

Page 24: ...de fum e ne doit pas tre d sassembl par l utilisateur final 5 Utilisation 5 Fonction m moire d alarme La fonction m moire d alarme permet d enregistrer les alarmes qui ont t d clen ch es Le t moin LED...

Page 25: ...pas en position OFF position ON MARCHE ARRET Le d tecteur de fum e n est pas activ Pile d fectueuse Circuit Adressez vous au fabricant d fectueux ou un lectricien qualifi Le signal sonore se La tensio...

Page 26: ...ge gevoeligheid Lokaal alarmgeheugen Type met normale gevoeligheid en lage gevoeligheid modus mute modus Ingebouwde lithiummangaan batterij van 3 volt niet uitwisselbaar Met een levensduur van 10 jaar...

Page 27: ...d na ca 9 minuten Alarm geheugen LED groen knippert 3 keer achter elkaar elke 43 seconden en gaat 24 uur later uit De eerste keer dat op de test of mute knop wordt gedrukt wordt de rookmelder geactive...

Page 28: ...3 Parameters Bovenaanzicht Afb 1 LM 107A 4 Afmetingen OEG Rookmelder NL 28...

Page 29: ...5 Bediening Indicatielampje rode LED Luidspreker Indicatielampje Alarm geheugen groene LED Testknop Vergrendeling Batterijclip rood Afb 1 Afb 2 Batterijclip rood OEG Rookmelder NL 29...

Page 30: ...5 Bediening Afb 3 Rode batterijclip OFF UIT Afb 4 Batterijclip positie na opstarten ON AAN Afb 5 Montageplaat Vergrendeling Schroefopening OEG Rookmelder NL 30...

Page 31: ...ingsmodus normale werking 4 2 De lage gevoeligheid modus instellen mute modus 1 Stel het apparaat bloot aan een kleine hoeveelheid rook om de signaaltoon te activeren Druk vervolgens op de testknop om...

Page 32: ...lektricien Het apparaat mag niet door de eindgebruiker worden gedemonteerd 7 Probleem oplossen Fout Oorzaak Maatregel om te verhelpen Geen reactie na het De rode batterijclip staat Schuif de batterijc...

Page 33: ...de is gegarandeerd en dat overal het geluidssignaal te horen is 3 De batterij kan niet worden vervangen 9 Verwijdering 1 Het verpakkingsmateriaal is recyclebaar Recycling heeft de voorkeur boven defin...

Page 34: ...co Elevata sensibilit Memoria degli allarmi Versione con modalit operativa a sensibilit normale e a bassa sensibilit modalit silenziamento La batteria litio manganese da 3 volt integrata non sostituib...

Page 35: ...disattiva automaticamente dopo 9 minuti circa Memoria degli allarmi LED verde lampeggia per 3 volte consecutive ogni 43 se condi per poi spegnersi del tutto dopo 24 ore Il rilevatore di fumo si attiva...

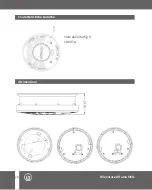
Page 36: ...3 Caratteristiche tecniche 4 Dimensioni Rilevatore di fumo OEG IT 36 Vista dall alto fig 1 LM 107A...

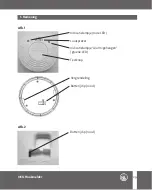
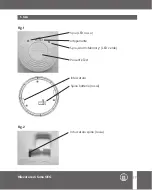
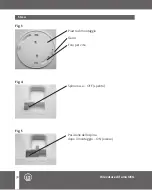
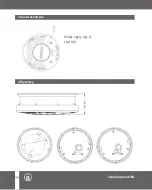
Page 37: ...5 Uso Spia LED rosso altoparlante Spia Alarm Memory LED verde Pulsante Test Intaccatura Spina batteria rossa Fig 1 Fig 2 Intaccatura spina rossa Rilevatore di fumo OEG IT 37...

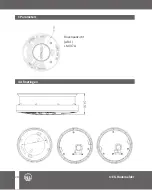
Page 38: ...5 Uso Fig 3 Spina rossa OFF spento Fig 4 Posizione della spina dopo il montaggio ON acceso Fig 5 Piastra di montaggio Ganci Foro per vite Rilevatore di fumo OEG IT 38...

Page 39: ...ibilit tornando alla modalit di rilevazione normale 4 2 Modalit operativa bassa sensibilit modalit silenziamento 1 Esporre il rilevatore a una piccola quantit di fumo per attivare l allarme sonoro Qui...

Page 40: ...un elettricista qualificato L apparecchio non deve essere smontato dall utente finale 7 Ricerca e risoluzione dei guasti Guasto Causa Rimedio Nessuna reazione dopo La spina rossa in posizione Spostar...

Page 41: ...e sia sempre ben vi sibile e l avviso acustico ben udibile 3 La batteria non pu essere sostituita 9 Smaltimento 1 Il materiale usato per l imballo riciclabile Il riciclaggio da preferire allo smalti m...

Page 42: ...ny uk ad czujnika Wysoka czu o Lokalna pami alarm w Wersja z trybem pracy normalna czu o i niska czu o tryb pracy cichej Wbudowana na sta e bateria litowo manganowa niewymienna o ywotno ci 10 lat D wi...

Page 43: ...po up ywie ok 9 minut Pami alarm w Dioda LED zielona miga kolejno 3 razy co 43 sekundy i po up ywie 24 godzin ga nie ca kowicie Przy pierwszym naci ni ciu przycisku testowego wzgl przycisku pracy w t...

Page 44: ...3 Dane techniczne Widok z g ry rys 1 LM 107A 4 Wymiary 44 Czujnik dymu OEG PL...

Page 45: ...lka wietlna czerwona dioda LED G o nik Kontrolka wietlna Pami alarm w zielona dioda LED Przycisk testowy Wyci cie zatrzasku Ko ek baterii czerwony Rys 1 Rys 2 Wyci cie na ko ek baterii czerwony 45 Czu...

Page 46: ...5 Obs uga Rys 3 Czerwony ko ek baterii OFF WY Rys 4 Po o enie ko ka baterii po wykonaniu monta u ON W Rys 5 P ytka monta owa Haczyk zatrzasku Otw r na wkr t 46 Czujnik dymu OEG PL...
Page 47: ...ej pracy 4 2 Ustawi tryb pracy niska czu o tryb pracy cichej 1 Wystawi urz dzenie na dzia anie niewielkiej ilo ci dymu by wyzwoli sygna d wi kowy Nast pnie nacisn przycisk testowy by wyciszy czujnik d...

Page 48: ...ka U ytkownikom nie wolno samodzielnie rozmontowywa urz dzenia 7 Usuwanie usterek B d Przyczyna rodki zaradcze Brak reakcji po naci ni ciu Czerwony ko ek baterii jest Przesu ko ek baterii do przycisku...

Page 49: ...i sygna akustyczny by s yszalny 3 Bateria jest niewymienna 9 Utylizacja 1 Materia z opakowania nadaje si do ponownego wykorzystania Recykling ma pierwsze stwo przed oddaniem na sk adowisko odpad w lu...

Page 50: ...F r Ihre Notizen Notes Pour vos notes Voor uw aantekeningen Spazio per prendere appunti Miejsce na notatki 50...

Page 51: ...51 F r Ihre Notizen Notes Pour vos notes Voor uw aantekeningen Spazio per prendere appunti Miejsce na notatki...

Page 52: ...tuits T l 00800 63436624 Fax 00800 63432924 Bezp atna infolinia do sk adania zam wie i serwisowa telefon 00 800 63436624 faks 00 800 63432924 D GB FR OEG GmbH Industriestra e 1 D 31840 Hess Oldendorf...

Reviews: