4
Operating Instructions and Parts Manual
24552
3/19
2019 OEMTOOLS
™
THERMAL IMAGING CAMERA
CONTACT US
3580 E. Raines Road, Suite 3, Memphis, TN 38118
Tel: 1-866-458-2472
www.oem-tools.com
OEMTOOLS™ ONE YEAR WARRANTY
For up to one year from the date of purchase of this OEMTOOLS™ product, if you find any defect in material or workmanship (through normal usage),
return it to the place of purchase or to OEMTOOLS™ for repair or replacement at our discretion. In order to obtain this service, send the product and
proof of purchase (transportation pre-paid) to:
OEMTOOLS™ Q.A. Dept, 3580 E. Raines Road #3, Memphis, TN 38118.
We will not be responsible for lost or damaged goods during transportation; please insure your package. If our inspection verifies the defect, we will
either repair or replace the product, or we may elect to refund the purchase price if we cannot readily and quickly provide you with a replacement. We
will return repaired products at our expense, but if we determine there is no defect, or that the defect resulted from causes not within the scope of our
warranty, then you must bear the cost of returning the product.
OEMTOOLS™ does not provide warranty for products labeled other than OEM® or OEMTOOLS™. OEMTOOLS™ will not provide any warranty
for products subjected to abnormal use. Abnormal use includes (but is not limited to) abuse, accident, alteration, neglect, and unauthorized or
unreasonable use or repairs. This warranty does not cover bits, blades, files, batteries, or calibration. We recommend that you maintain your tools and
sharpen or replace blades, bits, files, and batteries as necessary. OEMTOOLS™ reserves the right to make any changes in construction or design at
any time without any obligation in incorporating such changes to tools or equipment previously sold.
OEMTOOLS™ makes every effort to ensure that its products meet high quality and durability standards, and warrants to the original purchaser that
this product is free from defects in materials and workmanship for the period of one year from the date of purchase. This warranty does not apply
to damage due directly or indirectly to misuse, abuse, negligence or accidents, repairs or alterations outside our facilities, criminal activity, improper
installation, normal wear and tear, or to lack of maintenance.
We shall in no event be liable for death, injuries to persons or property, or for incidental, contingent, special or consequential damages arising from the
use of our product. Some states do not allow the exclusion or limitation of incidental or consequential damages, so the above limitation of exclusion
may not apply to you. THIS WARRANTY IS EXPRESSLY IN LIEU OF ALL OTHER WARRANTIES, EXPRESS OR IMPLIED, INCLUDING THE WARRANTIES OF
MERCHANTABILITY AND FITNESS. This warranty gives you specific legal rights, and you may also have other rights, which vary from state to state.
Don’t forget to register your new OEMTOOLS™ product at www.oem-tools.com.
OPERATION
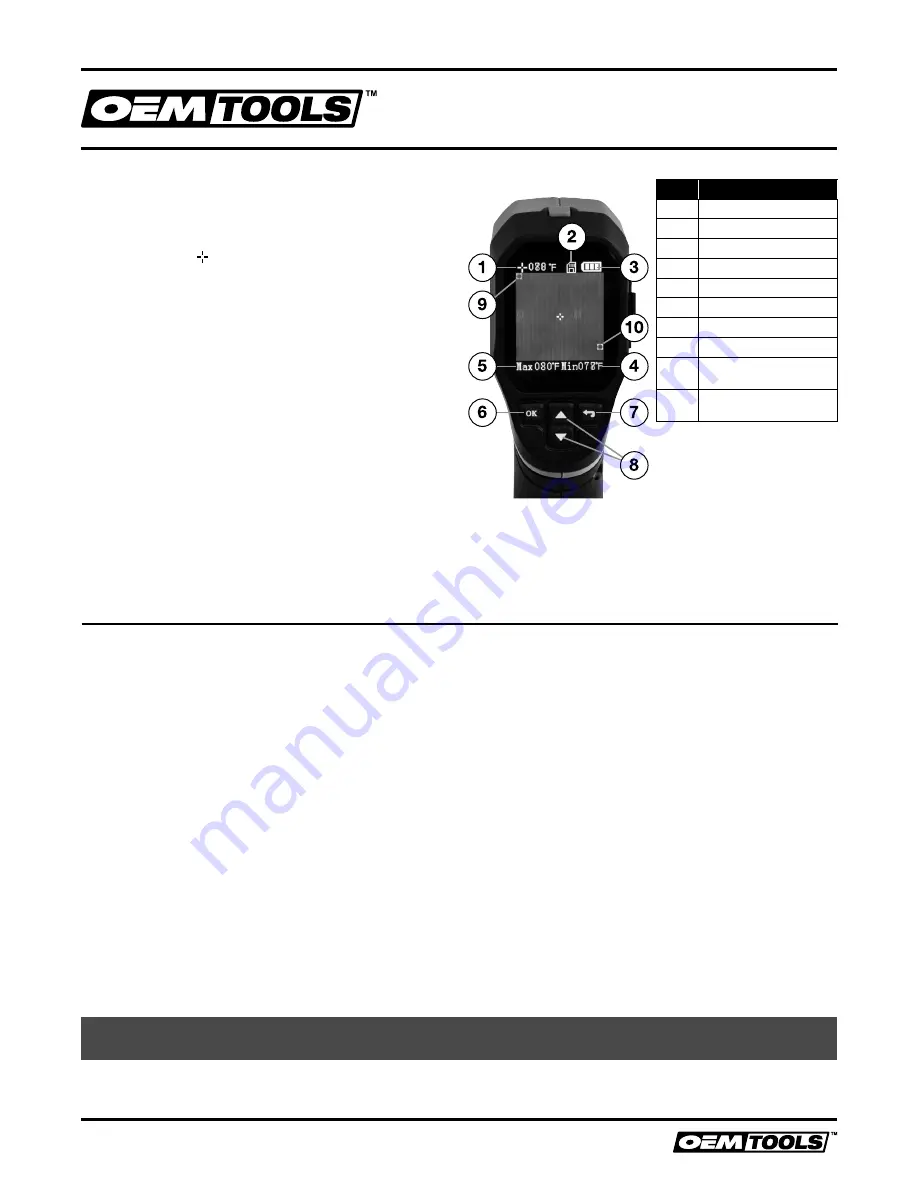
1. To use the Thermal Imaging Camera, simply point at the object you
want to check and view the LCD screen. You will see Maximum
temperature indicated by a small red box as well as Minimum
temperature indicated by a small green box. These values will display
along the bottom of the LCD screen at all times. The Center of View
is indicated by the located on the screen. The temperature at the
Center of View is displayed along the top left corner of the LCD screen.
2. A battery power indicator is displayed when the thermal image is
viewed.
3. To capture images, you must first install a microSD card into the slot.
Once the microSD card is installed simply pull the trigger to capture
thermal images. These can be reviewed later by accessing the
memory card menu.
4. To turn OFF the unit, press and hold the power button until the display
is off.
CARE
Use only a clean, soft cloth to clean the unit. A soft cloth dampened with
warm water and mild detergent may be used on the grip and housing of the
camera if necessary.
DO NOT splash water onto the Thermal Imaging Camera or submerge.
DO NOT use solvents or harsh chemicals to clean the infrared lens. This can
cause damage to the lens and prevent the camera from operating properly.
STORAGE
Store the Thermal Imaging Camera in the included storage pouch to
ensure product longevity and accuracy. It is recommended to remove the
batteries when stored for extended periods of time.
Figure Description
1
Center Temperature
2
Storage Card
3
Battery Indicator
4
Minimum Temperature Value
5
Maximum Temperature Value
6
OK Key to Select Settings
7
Return Key
8
Menu Control Keys
9
Green Box – Minimum
Temperature Location
10
Red Box – Maximum
Temperature Location


