4
Operating Instructions and Parts Manual
25822
3 PIECE HVLP
SPRAY GUN KIT
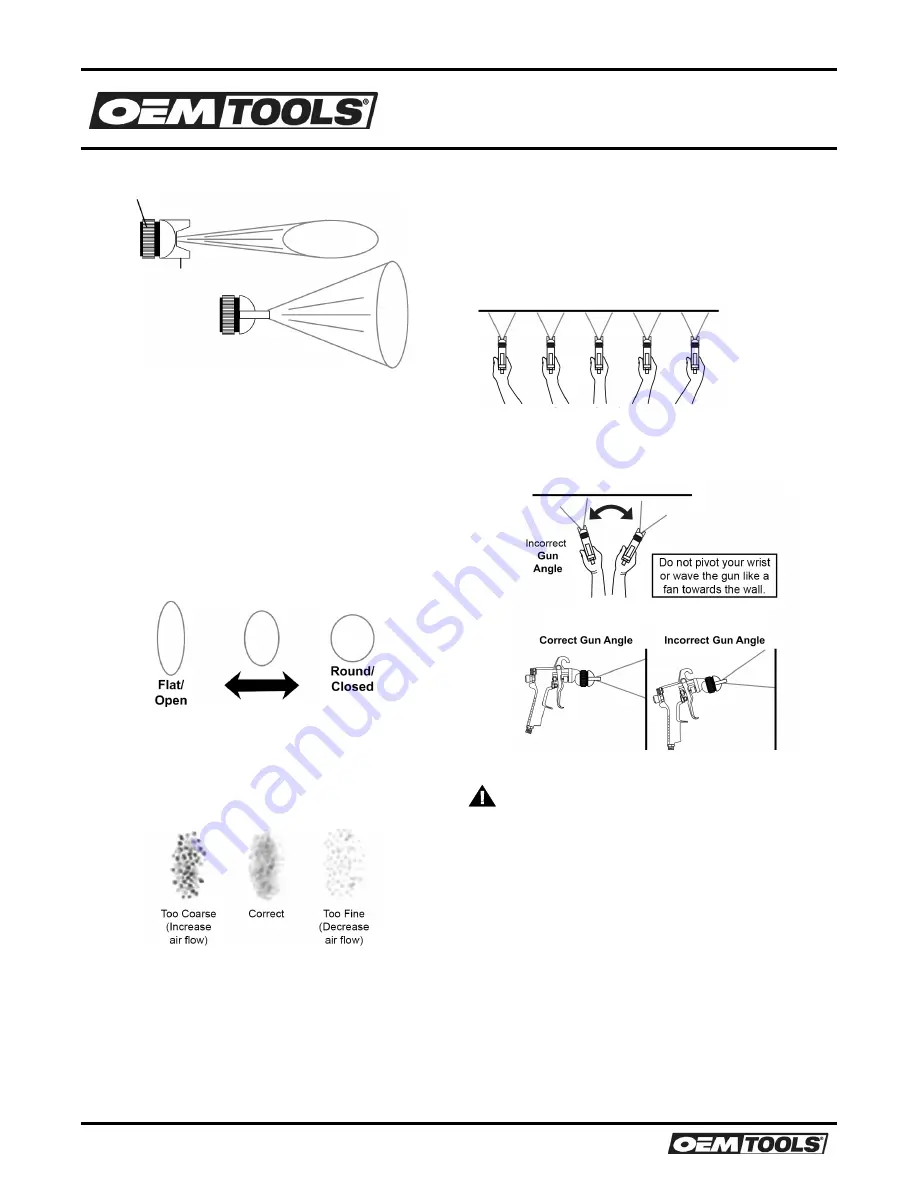
FAN DIRECTION
1. To change the direction of the fan from horizontal to vertical, loosen
the Lock Ring and turn the Nozzle 90°.
2. After the adjustment, tighten the Lock Ring by hand.
PATTERN ADJUSTMENT
1. Adjust the air supply pressure during operation with the Trigger fully
depressed and the Air Knob fully open. If reducing air pressure for
specific areas, use the Air Knob.
2. Use the Pattern Knob to adjust the spray pattern. Turn Pattern Knob
counterclockwise (all the way open) to flatten the spray pattern.
Turn it clockwise for a round spray pattern - see Figure E: Pattern
Adjustment.
FLUID ADJUSTMENT
1. Turn the Fluid Knob clockwise until it is fully closed.
2. After setting up a piece of test material, squeeze the Trigger in short
bursts while turning the Fluid Knob counterclockwise to set the
amount of fluid - see Figure F: Fluid Adjustment.
If spray is too fine:
Reduce the air pressure or allow more paint to come
out by opening the Fluid Knob.
If spray is too thick
(globs of paint)
:
Close the Fluid Knob slowly,
checking the pattern after each adjustment.
SPRAYING TECHNIQUE
IMPORTANT: Proper spraying technique is ESSENTIAL to achieve good
results.
1. First, prepare the HVLP Spray Gun according to the instructions
under HVLP Spray Gun Setup on page 3.
2. Keep the HVLP Spray Gun upright and at a right angle to the
workpiece- See Figures G and H.
3. Using two hands, one to steady the Cup and the other to operate the
HVLP Spray Gun, aim the Nozzle at the workpiece.
CAUTION
DO NOT STOP WHEN SPRAYING. Spraying materials will start to set
and dry as soon as they come in contact with the air. They will cause a
permanent clog if not cleared immediately. If discontinuing spraying for
more than half an hour, turn off the air supply, disconnect Cup from Gun
Body and thoroughly rinse Cup and Gun Body with fresh, clean water.
4. Pull Trigger slowly and move the HVLP Spray Gun in parallel strokes
to the workpiece. Keep the distance from the workpiece at about
6” to 9”, depending on the flow adjustment and the paint.
5. To avoid paint build up, start moving the HVLP Spray Gun before
squeezing the Trigger. When finished with the stroke, release the
Trigger while still moving the HVLP Spray Gun. Doing this will
produce a smoother finish. If the HVLP Spray Gun stops even briefly
while spraying the paint will build up and run down the workpiece.
Lock Ring
Nozzle
Horizontal Fan
Vertical Fan
Figure D: Fan Direction
Figure E: Pattern Adjustment
Figure F: Fluid Adjustment
Move your arm,
not just your wrist.
Point gun directly
towards the surface
and maintain an
even, steady distance
and speed.
Correct Gun Angle
Figure G: Spray Gun Angle - top view
Figure H: Spray Gun Angle - side view


