41
Multi-Zone
Multi-Zone Operation
Multi-Zone Operation
Independent sources can be played simultaneously on the unit. For example, the
AM/FM
tuner can
be selected for the front zone, while the
DVD
video is selected for the Mult-Zone source (for headrest
monitors, overhead monitors, etc.)
Multi-Zone Menu Access
The
MAIN
menu can be access by pressing the
MENU
button on the remote or by touching the
Area A
(upper left hand side) on the monitor.
Press and hole the
REAR
button on the front panel to turn the Multi-Zone on.
Press the desired source from the
REAR
zone menu.
Selecting a Front Zone source
Press the
MENU
button, then touch the desired front zone source.
Press
MODE
on the main remote to select desired front zone source.
Front Zone Standby
To conserve the
LCD
backlight lifespan or to eliminate glare while night driving, press
STANDBY
.
The monitor screen will black out, however all other operations continue to operate. Press any button
except
VOLUME
or touch the screen again to return to normal viewing.
1.
2.
3.
1.
2.
12
11
7
10
9
8
3
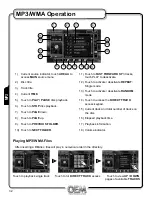
Touch Access Buttons
Touch to access
SD
Card.
Touch to access
CD/DVD
mode,
CD/DVD
must be inserted
Touch to set
CAMERA
mode as Multi-Zone
mode, if optional camera isn't connected
then 'No Video Signal" will display. (off).
Touch to set
AUXILIARY A/V INPUT
mode
as the Multi-Zone.
1)
2)
3)
4)
Touch to set Mulit-Zone mode into
STANDBY
Touch to access
MAIN source menu
.
Touch to access Multi-Zone source menu
Touch to access
ASP
configuration.
Touch to access
CD/DVD SETUP
menu.
(
CD/DVD
must be inserted to function)
Touch to access
GENERAL SETUP
menu.
Touch to access
SCREEN SETUP
menu.
Touch to return to previous screen.
5)
6)
7)
8)
9)
10)
11)
12)
AM/FM
tuner,
XM
Radio and iPod models will change to a "blue-screen" background when any
optical mode (
DVD, CD, MP3/WMA
) is selected as the Mulit-Zone source.
Notes
:
4
2
1
5
6


