background image

39

OFF IS A BRAND OF INDELB

ES

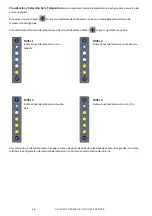
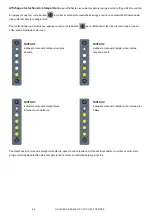
Función ECO:

 La función ECO sirve para acumular energía refrigerante durante la fase de carga de la batería con motor 

encendido o cargador de batería en marcha.
Cuando está activo el modo ECO, el aparato funcionará a una temperatura de 2 niveles por encima de la establecida.
Por ejemplo, si la temperatura está establecida en el nivel 1, con el modo ECO activo el aparato funcionará como si estuviese 
establecida en el nivel 3.
En cualquier caso, con el modo ECO establecido, la temperatura no puede superar el nivel 4.

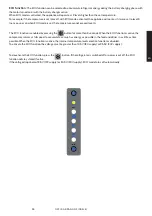
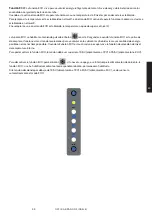
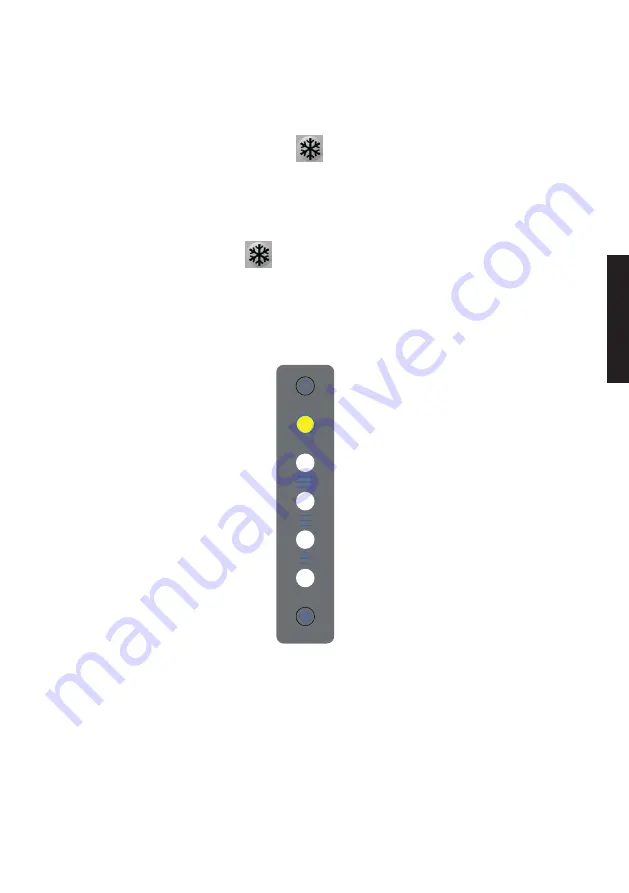
La función ECO se habilita manteniendo pulsado el botón 

 más de 3 segundos, cuando la función ECO está activada 

el compresor funciona al máximo de revoluciones para acumular en los alimentos y bebidas la mayor cantidad de energía 
posible en el menor tiempo posible. Cuando la Función ECO está activada no es operativa la función de selección del nivel 
de temperatura interna.
Para poder activar la función ECO, la tensión debe ser superior a 13,5 V (alimentación a 12 V) ó 25,5 V (alimentación a 24 V).

Para desactivar la función ECO, pulse el botón 

 , si la nevera se apaga o se interrumpe la alimentación de corriente, la 

función ECO, si se ha habilitado mediante el correspondiente botón, permanecerá habilitada.
Si la tensión desciende por debajo de 12,5 V (alimentación a 12 V) ó 24,5 V (alimentación a 24 V), se desactivará 
automáticamente el modo ECO.

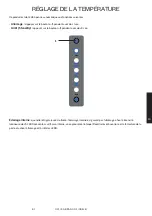
MIN

MAX

ECO

Summary of Contents for CRUISE 49 DRAWER 2.0

Page 1: ...CRUISE 49 DRAWER 2 0 ISTRUZIONI PER L USO INSTRUCTIONS FOR USE INSTRUCCIONES DE USO INSTRUCTIONS D UTILISATION BEDIENUNGSANLEITUNG...

Page 2: ......

Page 3: ...ITALIANO ENGLISH ESPA OL FRAN AIS DEUTSCH 3 15 17 29 31 43 45 57 59 71 CRUISE 49 DRAWER 2 0...

Page 4: ......

Page 5: ...3 OFF IS A BRAND OF INDELB ISTRUZIONI PER L USO...

Page 6: ...n propellente infiammabile Rischio di incendio o di scossa elettrica Non lasciare che oggetti caldi tocchino le parti in plastica dell apparecchiatura Non conservare gas e liquidi infiammabili all int...

Page 7: ...igorifero pulito e asciutto Rimuovere l eventuale acqua di condensa che potrebbe raccogliersi sulla vaschetta sotto il compartimento freezer Tenere la porta del frigorifero leggermente aperta in modo...

Page 8: ...6 CRUISE 49 DRAWER 2 0_ DC _IM_20220125 Evitare di installare il frigorifero in prossimit di fonti di calore permanenti es riscaldamento portatile CRUISE 49 DRAWER 2 0 1 2 1 FREEZER 2 CESTELLO...

Page 9: ...apposita flangia di fissaggio Per questa installazione occorre lasciare 10 mm di spazio tra il frigorifero e il mobile per tutto lo spessore della porta permettendo cos il movimento libero della stess...

Page 10: ...V 9 5 V 11 V 24 V 21 V 23 V COLLEGAMENTI ELETTRICI Collegando il frigorifero importante che i seguenti punti vengano considerati Eseguire le linee di alimentazione con cavi di sezione adeguata vedi ta...

Page 11: ...lmeno 1 sec Spegnimento Stand By premere il pulsante 1 per almeno 3 sec Illuminazione Interna quando il frigorifero acceso l illuminazione interna viene assicurata dall accensione ad alta intensit lum...

Page 12: ...amente il pulsante per selezionare i livelli di temperatura in sequenza come segue LIVELLO 1 indica il livello di temperatura pi calda LIVELLO 2 indica il livello di temperatura interna medio alta LIV...

Page 13: ...e ECO si abilita tenendo premuto il pulsante per oltre 3 secondi quando la funzione ECO attiva il compressore ruoter al massimo dei giri per accumulare pi energia possibile nel cibo e bevande nel mino...

Page 14: ...e cibi e bevande in un luogo fresco Non usare oggetti di metallo appuntiti per rimuovere ghiaccio o brina Non riavviare il frigorifero fino a quando non completamente sbrinato e asciutto Svuotare anch...

Page 15: ...te Riaccendere il frigorifero solo dopo averlo sbrinato pulito e asciugato con cura Estrarre svuotare e asciugare la vaschetta di sgocciolamento sotto l evaporatore All occorrenza durante la sbrinatur...

Page 16: ...sostituirli con cavi nuovi Controllare la condizione della batteria 2 Ventilatore in cortocircuito la ventola assorbe pi di 1A dalla centralina elettronica Sostituire la ventola 3 Errore di partenza m...

Page 17: ...cchio contrassegnato in conformit alla Direttiva Europea 2012 19 EU WEEE Il simbolo sul prodotto indica che questo prodotto non deve essere trattato come rifiuto domestico Garantire che questo prodott...

Page 18: ......

Page 19: ...17 OFF IS A BRAND OF INDELB INSTRUCTIONS FOR USE...

Page 20: ...ubstances such as aerosol cans with a flammable propellant in this appliance Risk of re and electrical shock or re Do not let hot items to touch the plastic parts of the appliance Do not store flammab...

Page 21: ...water which might gather in the tray under the freezer compartment Keep the door of the refrigerator slightly open in order to air it out if you do not use it for a long time for example in winter Thi...

Page 22: ...20 CRUISE 49 DRAWER 2 0_ DC _IM_20220125 Do not install the refrigerator near heat sources ex portable heater CRUISE 49 DRAWER 2 0 1 2 1 FREEZER 2 BASKET...

Page 23: ...ting flange For this installation you must leave 10 mm of space between the refrigerator and the furniture unit at least for the entire thickness of the door thus ensuring its free movement It is very...

Page 24: ...CONNECTIONS When you connect the refrigerator you must remember the following Use cables having the proper cross section see the table to make the feeding lines If possible such cables should be witho...

Page 25: ...witching on Press button 1 for at least 1 sec Shut down Stand By press button 1 for at least 3 sec Internal Lighting when the refrigerator is on internal lighting is assured by high intensity lighting...

Page 26: ...secutively to select the temperature levels in sequence as follows LEVEL 1 indicates the hottest temperature level LEVEL 2 indicates the medium to high internal temperature level LEVEL 3 indicates the...

Page 27: ...el 4 The ECO function is enabled by pressing the button for more than 3 seconds When the ECO function is active the compressor rotates at full speed to accumulate as much as energy as possible in the...

Page 28: ...efrosting keep food and beverages in a cool place Do not use any sharp metal object to remove the ice or frost Do not start the refrigerator up again until it is completely defrosted and dry Also empt...

Page 29: ...ld damage it and result in leaks Only turn the refrigerator back on once it has been defrosted cleaned and thoroughly dried Remove empty and dry the drip tray beneath the evaporator A towel can be pla...

Page 30: ...th new cables if necessary Check battery conditions 2 Fan short circuited the fan absorbs more than 1A from the electronic control unit Replace the fan 3 Motor starting error the rotor is blocked or p...

Page 31: ...s appliance is marked according to the European Directive 2012 19 EU WEEE The symbol on the product indicates that this product should not be treated as household waste Ensure that this product is not...

Page 32: ......

Page 33: ...31 OFF IS A BRAND OF INDELB INSTRUCCIONES DE USO...

Page 34: ...latas de aerosol con un propelente inflamable Riesgo de incendio o de descarga el ctrica No permita que haya objetos calientes en contacto con las partes de pl stico del aparato No almacene gases y l...

Page 35: ...enga el interior del refrigerador limpio y seco Elimine el agua de la condensaci n que se acumula en la cubeta situada debajo del compartimiento congelador Mantenga la puerta del refrigerador abierta...

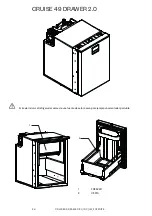
Page 36: ...34 CRUISE 49 DRAWER 2 0_ DC _IM_20220125 Evite de instalar el refrigerador cerca de una fuente de calor como por ejemplo un calentador portable CRUISE 49 DRAWER 2 0 1 2 1 FREEZER 2 CESTA...

Page 37: ...icha instalaci n es necesario dejar 10 mm de espacio entre la nevera y el mueble por lo menos en todo el espesor de la puerta permitiendo as el movimiento libre de la misma Es muy importante para la u...

Page 38: ...23 V CONEXIONES EL CTRICAS La conexi n del frigor fico precisa la observaci n de las normas siguientes Realizar las l neas de alimentaci n con cables que tengan una secci n adecuada v ase la tabla y...

Page 39: ...el bot n n 1 como m nimo 1 s Apagado Stand By pulsar el bot n n 1 como m nimo3 s Iluminaci n Interna cuando la nevera est encendida la iluminaci n interna se realiza mediante el encendido de alta inte...

Page 40: ...el de temperatura pulsar repetidamente el bot n seg n la siguiente secuencia NIVEL 1 indica el nivel de temperatura m s caliente NIVEL 2 indica el nivel de temperatura medio alta NIVEL 3 indica el niv...

Page 41: ...bot n m s de 3 segundos cuando la funci n ECO est activada el compresor funciona al m ximo de revoluciones para acumular en los alimentos y bebidas la mayor cantidad de energ a posible en el menor tie...

Page 42: ...el termostato a la posici n OFF Mientras que descongele mantenga los alimentos y bebidas en un lugar fresco No utilice ning n objeto met lico puntiagudo para retirar el hielo o la escarcha No empiece...

Page 43: ...da arse provocando la p rdida de refrigeraci n Volver a encender la nevera solamente despu s de haberla desescarchado limpiado y secado con cuidado Extraer vaciar y secar la cubeta de goteo debajo de...

Page 44: ...rio cambiarlos por otros nuevos Revisar la bater a 2 Ventilador en cortocircuito el ventilador absorbe m s de 1A de la centralita electr nica Sustituir el ventilador 3 Error en arranque del motor el r...

Page 45: ...ado en conformidad con la Directiva Europea 2012 19 EU WEEE El s mbolo presente en el producto indica que este ltimo no debe ser tratado como un residuo dom stico Este producto debe ser tratado como u...

Page 46: ......

Page 47: ...45 OFF IS A BRAND OF INDELB INSTRUCTIONS D UTILISATION...

Page 48: ...enant un gaz inflammable Risque d incendie ou de d charge lectrique Veiller viter tout contact entre des objets chauds et les parties en plastique de l appareil Ne pas conserver de gaz ni de liquides...

Page 49: ...ller ce que la partie interne du r frig rateur soit bien propre et s che liminer l ventuelle eau de condensation s accumulant dans le bac situ sous le compartiment cong lateur Dans le cas o le r frig...

Page 50: ...48 CRUISE 49 DRAWER 2 0_ DC _IM_20220125 viter d installer le r frig rateur proximit d une source de chaleur non fixe chauffage portable par exemple CRUISE 49 DRAWER 2 0 1 2 1 FREEZER 2 PANIER...

Page 51: ...on Pour cette installation laisser 10 mm d espace entre le r frig rateur et le meuble pour le moins sur toute l paisseur de la porte permettant le mouvement de cette derni re Il est tr s important que...

Page 52: ...est important de veiller tenir compte des informations et instructions suivantes R aliser les lignes d alimentation l aide de c bles de section appropri e voir tableau ci dessous si possible sans jon...

Page 53: ...1 pendant au moins 1 sec Arr t Stand By appuyer sur le bouton n 1 pendant au moins 3 sec clairage interne quand le r frig rateur est allum l clairage interne est garanti par l allumage haute intensit...

Page 54: ...r s lectionner les niveaux de temp rature la suite comme indiqu ci dessous NIVEAU 1 indique le niveau de temp rature plus chaude NIVEAU 2 indique le niveau de temp rature interne moyenne haute NIVEAU...

Page 55: ...e en maintenant la touche press e pendant plus de 3 secondes quand la fonction ECO est activ e le compresseur effectuera un nombre maximal de tours pour accumuler le plus d nergie possible dans les a...

Page 56: ...s et boissons dans un lieu frais Ne pas faire usage d ustensiles m talliques pointus pour liminer la glace ou le givre Ne pas remettre en marche le r frig rateur avant qu il ne soit totalement d givr...

Page 57: ...rig rateur seulement apr s l avoir d givr nettoy et s ch soigneusement Extraire vider et s cher le bac d gouttement sous l vaporateur Le cas ch ant durant le d givrage placer une serviette la base du...

Page 58: ...lacer par de nouveaux c bles Contr ler la condition de la batterie 2 Ventilateur en court circuit le ventilateur absorbe plus de 1A de la centrale lectronique Remplacer le ventilateur 3 Erreur d part...

Page 59: ...Le produit est marqu conform ment la Directive Europ enne 2012 19 EU WEEE Le symbole figurant sur le produit indique qu il ne doit pas tre trait comme d chet domestique Veiller ce que ce produit ne s...

Page 60: ......

Page 61: ...59 OFF IS A BRAND OF INDELB BEDIENUNGSANLEITUNG...

Page 62: ...laggefahr Darauf achten dass keine hei en Gegenst nde mit den Kunststoffteilen des Ger tes in Ber hrung kommen Keine brennbaren Gase und Fl ssigkeiten im Ger t aufbewahren Keine brennbaren Produkte od...

Page 63: ...lquerschnitte und der Sicherrungen HaltenSiedasInneredesK hlschrankssauberundtrocken EntfernenSiedasKondenswasserwassichinderSchaleunter dem Gefrierfach sammeln k nnte Wenn Sie den K hlschrank f r l n...

Page 64: ...62 CRUISE 49 DRAWER 2 0_ DC _IM_20220125 Installieren sie nicht den k hlschrank in der n he von w rmequellen zb ein mobiles heizger t CRUISE 49 DRAWER 2 0 1 2 1 GEFRIERFACH 2 KORB...

Page 65: ...dass die T r b ndig mit dem M bel abschlie t F r diese Installation lassen Sie 10 mm Platz zwischen dem K hlschrank und dem M bel wenigstens entlang der ganzen St rke der T r damit sich diese frei bew...

Page 66: ...ranks ist es wichtig folgende Punkte zu beachten Die Versorgungsleitungen mit Kabeln von geeignetem Querschnitt siehe Tabelle ausf hren nach M glichkeit ohne Verbindungen an den Leitern die einen Span...

Page 67: ...tens 1 Sekunde lang dr cken Ausschalten Standby Taste Nr 1 mindestens 3 Sekunde lang dr cken Innenbeleuchtung bei eingeschaltetem K hlschrank wird die Innenbeleuchtung durch Einschalten der 5 LED mit...

Page 68: ...nderen Stufe dr cken Sie wiederholt die Taste um folgende Temperaturstufen auszuw hlen STUFE 1 Zeigt die h chste Temperaturstufe an STUFE 2 Zeigt die mittel hohe Innentemperaturstufe an STUFE 3 Zeigt...

Page 69: ...ten Die ECO Funktion wird durch Gedr ckthalten der Taste f r mehr als 3 Sekunden aktiviert bei aktivierter ECO Funktion l uft der Kompresor auf h chster Drehzahl um in m glichst kurzer Zeit m glichst...

Page 70: ...n und Getr nke an einem k hlen Ort Verwenden Sie keine scharfen Metallgegenstand um das Eis oder Reif zu entfernen Starten Sie nicht den K hlschrank bis er vollst ndig abgetaut und trocken ist Leeren...

Page 71: ...ner sorgf ltigen Reinigung und Trocknung wieder einschalten Auffangbeh lter unter dem Gefrierfach des K hlschranks herausnehmen leeren und trocknen Ggf w hrend des Abtauvorgangs unten im K hlschrank e...

Page 72: ...ls mit neuen Kabeln austauschen Den Zustand der Batterie berpr fen 2 Kurzschluss des L fters das Gebl se nimmt ber 1 A von der elektronischen Steuereinheit auf L fter auswechseln 3 Fehler beim Anlaufe...

Page 73: ...hen die gleichen Funktionen wie das neue Ger t erf llt am Ort der Abgabe oder in unmittelbarer N he unentgeltlich zur ckzunehmen Das gilt auch f r Vertreiber von Lebensmitteln mit einer Gesamtverkaufs...

Page 74: ...te 27 47866 Sant Agata Feltria RN Italia T 0541 848 711 F 0541 848 741 info indelb com For sales and service in USA Indel B North America 100 Triport Circle Georgetown KY 40324 Ph 502 863 0373 infoUS...

Reviews: