OFFICE FURNITURE
MODEL NO. PL213
OFFICESOURCE.COM
Last Updated: 6/2022
ASSEMBLY INSTRUCTIONS
ASSEMBLY INSTRUCTIONS
MODEL: PL213
2 of 2.
!
ATTENTION
!
Place all wooden parts on a clean, smooth surface to prevent them from being scratched.
Check to be sure that you have all parts and hardware. Remove all wrapping materials, including staples and packing straps before
you start to assemble. Do not tighten all screws/bolts until all completely assembled. Keep all hardware parts out of reach of children.
If any parts are missing, broken, damaged or worn, stop use of product until repairs have been made using factory authorized parts.
Failure to follow these warnings may result in injury.
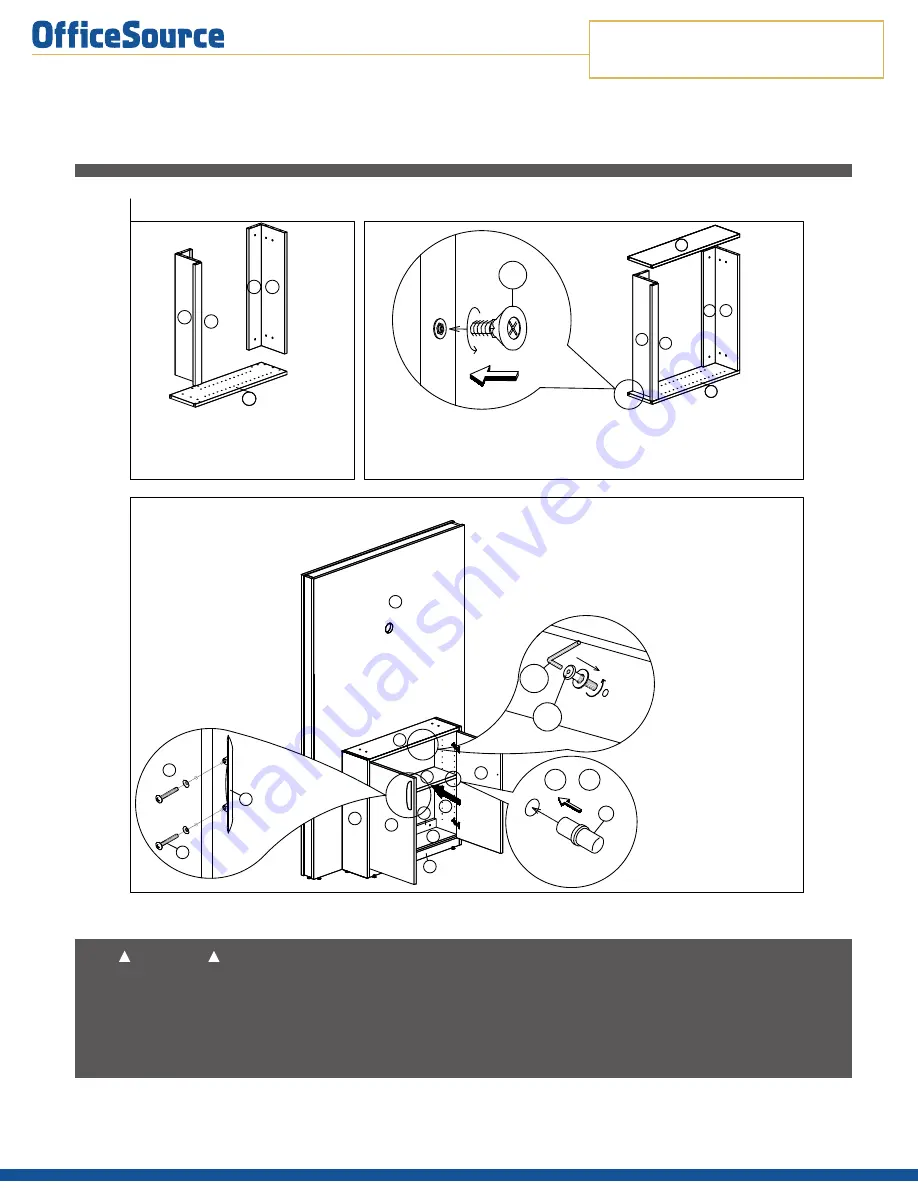
Attach Side Panels (A) to
assembled part with Cam
Lock (1) and Klix Cam (2).
Attach Bottom Panel (D),Bottom
Rail(E),Back Rail(G) & Top
Panel(A) to Side Panel(B) with
Cam Lock (1) and Klix Cam (2).
D
A
G
E
B
B
A E
A
G
A
Screw Adjustable
Glides (5) into Side
Panel(A)&(B).
5
2 OF 2
Before assembly, please remove all parts from carton, verifying that you have the correct quantities, and read all the instructions.
INSTRUCTION:
!
ATTENTION
!
Place all wooden parts on a clean, smooth surface to prevent them from being scratched.
Check to be sure that you have all parts and hardware. Remove all wrapping materials, including staples and packing straps before
you start to assemble. Do not tighten all screws/bolts until all completely assembled. Keep all hardware parts out of reach of children.
If any parts are missing, broken, damaged or worn, stop use of product until repairs have been made using factory authorized parts.
Failure to follow these warnings may result in injury.
1
2
3
MODEL: PL213
C
G
I
9
4
Attach PL213 to
PL214(I) by usingJCBC
Screw & Flat
Washer(9).
A
B
G
E
D
F
H
6
A
7
Attach Support
Pin(6) then
insert Shelf(H)
as shown.
B
&
Attach Handle
with Screw(7)
to Door(G).
7
G
INSTRUCTIONS:
®


