background image

17

Officine Gullo

INSTALLATION


The appliance must be installed in accordance with the ANS Z83.11a CSA 1.8a-(2001) Food Service Equipment,

• 

The operations for installing, conversions for use with other types of gas and starting up must be done only 

by qualified personnel whose qualifications comply with the norms in force.

• 

Gas installations, the electrical connections and the rooms in which the appliances are installed must comply 

with the norms in force in the Country in which the installation is carried out; above all, the appliance must 

be installed in a well ventilated room, preferably under an extractor hood, so as to ensure the complete 

extraction of gas emissions which are formed during combustion. The air necessary for combustion is 70.6 

CbtF /h per 3412BTu's (2m3 /h per kW) of power installed.

VENTILATION

Proper ventilation is highly important for good operation. This appliance must be installed under a properly designed 

canopy hood. A strong exhaust fan can create a vacuum in the room. For proper air balance, work with your 

contactor to properly size the air inlet.

IMPORTANT 

ALL GAS BURNERS NEED SUFFICIENT AIR TO OPERATE AND LARGE OBJECTS SHOULD NOT BE PLACED IN 

FRONT OF THIS APPLIANCE WHICH WOULD OBSTRUCT THE AIR FLOW THROUGH THE FRONT. OBJECTS 

SHOULD NOT BE PLACED ON THE REAR BACKGUARD WHILE IN USE. 

THIS COULD OBSTRUCT THE VENTING SYSTEM OF THE OVEN’S FLUE PRODUCT

S.

Ensure that the air outlets in the place of work are sufficient to guarantee the necessary air exchange.The appliance 

may be installed as a single element or in series with other appliances of our production. It is necessary to observe a 

minimum distance of 4" (10 cm) from the appliance to prevent contact with walls of inflammable material; adequate 

measures must also be taken to ensure thermal insulation of inflammable parts, such as the installation of a protection 

against radiation; particular attention must be paid in installing the appliances adequately and safely. The feet are 

adjustable in height so that differences in level can be avoided.

The machine must be place in conditions of optimal ventilation: the area for the combustion of the item comes captured 

from the bottom of the same one.

The minimal necessary area for the combustion is given from the minimal height of the feet mounted on the machine, 

therefore the machine cannot be installed without the adjustable feet.

In case of wood cabinetry placed on the side of the range, the cabinetry has to be mounted on top of feet in order 

to grant a correct ventilation to the machine.

PIPE FOR GAS CONNECTION

The gas connection must be done with steel pipes, or otherwise with flexible steel pipes in compliance with the 

national norms, if any exist. Each appliance must be provided with a cut-off cock for rapid interruption of the gas 

supply. Once the appliance has been installed, it is necessary to check for gas leaks for the pipe fittings; do not 

use a flame for this purpose but a non-corrosive substance such as soapy water or foamy substances as contained 

in leak-finder sprays. All our appliances undergo careful testing: the type of gas, the operating pressure and the 

category are indicated on the data plate.

NB: 

The year of the appliance manufacture is shown in item “N” on the data plate. The first two numbers (e.g. 08...) 

represent the year of manufacture.

Summary of Contents for GES8MPU

Page 1: ...INSTRUCTIONS FOR INSTALLATION AND USE GES8MPU GAS RANGE WITH ELECTRIC OVEN FOR RESIDENTIAL AND PROFESSIONAL USE...

Page 2: ...Officine Gullo 2...

Page 3: ...N 17 IMPORTANT 17 PIPE FOR GAS CONNECTION 17 CHECKING HEAT OUTPUT 18 ADJUSTMENTS IN MAIN BURNERS 19 BURNERS TECHNICAL DATA TABLE ADJUSTMENT VALUES 19 RULES FOR CONVERTING AND INSTALLING FOR OTHER TYPE...

Page 4: ...r its intended purpose as described in this manual To ensure proper and safe operation Appliance must be properly installed and grounded by a qualified technician DO NOT attempt to adjust repair servi...

Page 5: ...E OBSERVE THE FOLLOWING a SMOTHER FLAMES with a close fitting lid cookie sheet or metal tray then turn off the burner BE CAREFUL TO PREVENT BURNS If the flames do not go out immediately EVACUATE AND C...

Page 6: ...c shock If the appliance is defective immediately turn the appliance off and discontinue use Disconnect the range from the gas and power supply and contact the assistance If the range is installed beh...

Page 7: ...urface cooking operation unattended especially when using a high heat setting or when deep fat frying Boilovers cause smoking and greasy spillovers may ignite Clean up greasy spills as soon as possibl...

Page 8: ...heet When using an electrical appliance e g a hand mixer near the cooktop make sure that the power cable does not come into contact with the hot cooktop The cable s insulation could become damaged Coo...

Page 9: ...ching or cleaning them DO NOT touch the burner grates or surrounding areas until they have had sufficient time to cool Clean appliance with caution Use care to avoid steam burns if a wet sponge or clo...

Page 10: ...o Backofen Bypass By pass four Oven by pass By pass horno FIG F PC GP CF GP FUOCHI FLAMME FEUX COOKING RINGS FUEGOS 562047300M00P00 1 2 3 4 1 Iniettore fuochi Einspritzventil flamme Injecteur feux Inj...

Page 11: ...codes In the absence of local codes the installation must conform to the latest level of the National Electric Code ANSI NFPA 70 If the electrical supply is not turned on or is interrupted the applian...

Page 12: ...ion box Tablero de bornes 4 Resistenza Widerstand R sistance Element Resistencia 5 Spia bianca wei e Kontroll Leuchte T moin blanc White light Luz indicadora blanca 6 Spia verde gr ne Kontroll Leuchte...

Page 13: ...mproper or incorrect installation alterations maintenance or use of the appliance as in all the other cases considered in the items of our sales conditions GAS PRESSURE REGULATOR Must be installed Eac...

Page 14: ...gas regulator 1 Unscrew the hex nut 2 Choose the proper gas regulator NAT natural gas LP LPG NAT set for natural gas LP set for LPG 3 Insert the gas regulator in the chosen side in the hex cap 4 Put...

Page 15: ...for a variety of reasons Under no circumstances should the factory supplied regulator be removed or by passed 8 The factory supplied pressure regulator will withstand an input pressure of PSI 13 iwc...

Page 16: ...le mm GES8MPU 80x70x90h 5 21 74 110 110V 50 60 Hz 3 x 2 5 MODEL DIMENSIONS cm NOMINAL BURNER CAPACITY TOT NOM CAPACITY Gas coupling NPT Nr Open ring 11 942 BTU h Nr Open ring 18 767 BTU h Nr Open ring...

Page 17: ...with other appliances of our production It is necessary to observe a minimum distance of 4 10 cm from the appliance to prevent contact with walls of inflammable material adequate measures must also b...

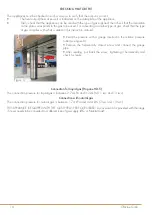
Page 18: ...Figure A Read the pressure with a gauge inserted in the relative pressure outlet see figure A Remove the hermetically closed screw and connect the gauge pipe After reading put back the screw tightenin...

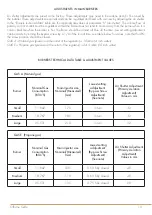
Page 19: ...lues note that for LPG the screw position should be closed GAS A Natural gas pressure at the outlet of the regulator 10 mbar 4 inch water GAS E Propane gas pressure at the outlet of the regulator 24 9...

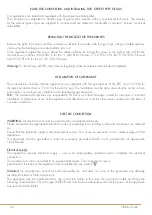
Page 20: ...ilation and discharging gas emissions N B The manufacturer declines any responsibility for direct or indirect damage caused by improper or incorrect installation maintenance or use of the appliance an...

Page 21: ...r than the others so that if the cable blocker should break for any reason it will disconnect after the hot wires The installation of this appliance must conform with all applicable local codes In the...

Page 22: ...JUSTING THE ELECTRIC OVEN Before turning the oven on make sure the oven racks are in the desired position Turn the control knob to the right and set the temperature wanted To turn the oven on turn the...

Page 23: ...ce metal polishes are abrasive and it will take away some of the chrome plating with each use Cleaning burnished brass surfaces The antiquing finish of the surface Burnished Brass is the result of nat...

Page 24: ...fact our brushed stainless steel finish is accomplished by millions of little scratches But in the event that you have a deep scratch that you want to care for the surfaces can always be re brushed u...

Page 25: ...25 Officine Gullo...

Page 26: ...Officine Gullo 26...

Page 27: ...27 Officine Gullo...

Page 28: ...Tel 39 055 656 0324 info officinegullo com Via Della Torricella 29 Antella Bagno a Ripoli 50012 Florence Italy OFFICINEGULLO COM us V 2 7 12 20...

Reviews: