background image

11

Officine Gullo

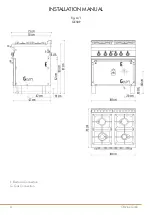
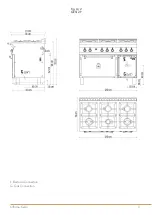
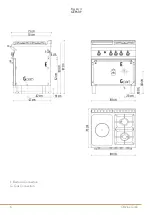
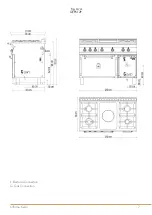
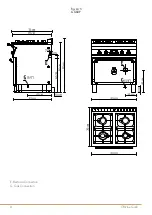
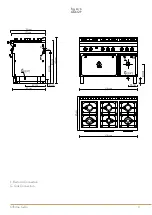
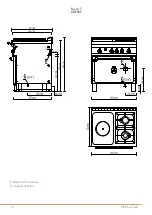
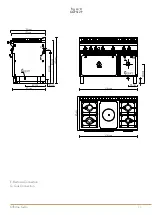
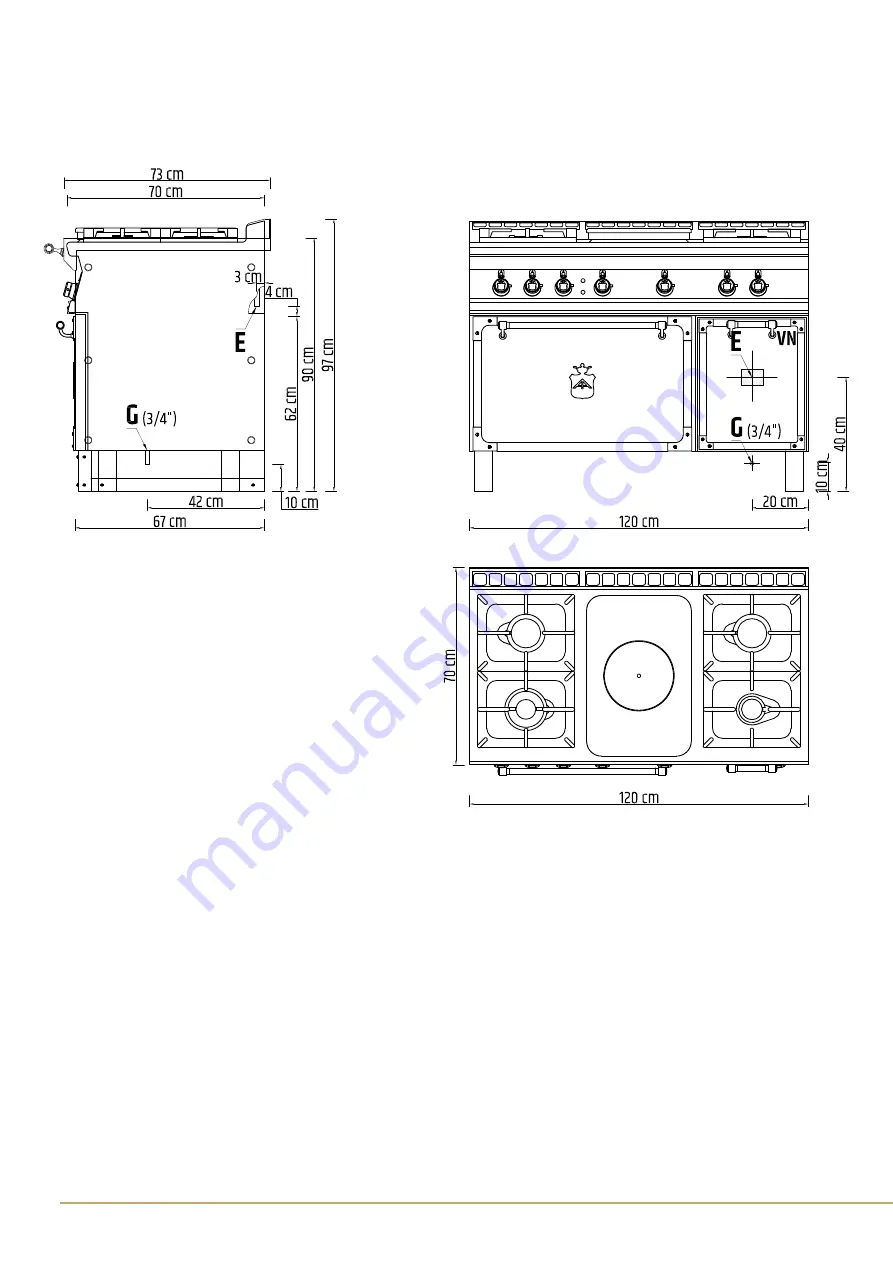
E.Electrical Connection

G. Gas Connection

Fig. A/8

GGPS12P

Summary of Contents for GGS8P

Page 1: ...INSTRUCTIONS FOR INSTALLATION AND USE GGS8P GGS12P GGPS8P GGPS12P GES8P GES12P GEPS8P GEPS12P RANGE WITH OVEN FOR RESIDENTIAL AND PROFESSIONAL USE ...

Page 2: ......

Page 3: ...LES 23 SUBSTITUTING THE NOZZLE IN THE OVEN BURNER 23 SUBSTITUTING THE NOZZLE IN THE COUP DE FEU BURNER 23 CHECKING FUNCTIONING 24 MAINTENANCE 24 SPARE PARTS 24 USER MANUAL INSTRUCTIONS FOR USE 25 LIGHTING AND ADJUSTING THE BURNERS 25 LIGHTING AND ADJUSTING THE COUP DE FEU 25 LIGHTING AND REGULATING GAS OVEN BURNER 26 LIGHTING AND REGULATING THE ELECTRIC OVEN 26 CLEANING AND MAINTENANCE 27 WHAT TO ...

Page 4: ...Officine Gullo 4 E Electrical Connection G Gas Connection INSTALLATION MANUAL Fig A 1 GES8P ...

Page 5: ...5 Officine Gullo E Electrical Connection G Gas Connection Fig A 2 GES12P ...

Page 6: ...Officine Gullo 6 E Electrical Connection G Gas Connection Fig A 3 GEPS8P ...

Page 7: ...7 Officine Gullo E Electrical Connection G Gas Connection Fig A 4 GEPS12P ...

Page 8: ...Officine Gullo 8 E Electrical Connection G Gas Connection Fig A 5 GGS8P ...

Page 9: ...9 Officine Gullo E Electrical Connection G Gas Connection Fig A 6 GGS12P ...

Page 10: ...Officine Gullo 10 E Electrical Connection G Gas Connection Fig A 7 GGPS8P ...

Page 11: ...11 Officine Gullo E Electrical Connection G Gas Connection Fig A 8 GGPS12P ...

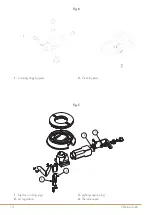
Page 12: ... Backofen Bypass By pass four Oven by pass By pass horno FIG F PC GP CF GP FUOCHI FLAMME FEUX COOKING RINGS FUEGOS 562047300M00P00 1 2 3 4 1 Iniettore fuochi Einspritzventil flamme Injecteur feux Injector cooking rings Inyector fuegos 2 Regolazione aria Luftregelung Réglage d air Air regulation Regulación aire 3 Candela accensione Zündkerze Bougie d allumage Lighting spark plug Candela encendido 4...

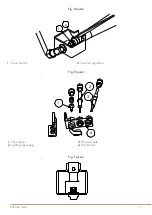
Page 13: ...pilota Einspritzv ZündBrenner Injecteur veilleuse Pilot Injector Inyector piloto 2 Candela accensione Zündkerze Bougie d allumage Lighting spark plug Candela encendido 3 Termocoppia Thermoelement Thermocouple Thermocouple Termopar 4 Staffa pilota Bügel Leitflamme Bride veilleuse Pilot bracket Brida del piloto FIG J FORNO FOUR BACKOFEN OVEN HORNO 1 2 1 2 3 4 H 1 Oven injector 2 Oven air regulation ...

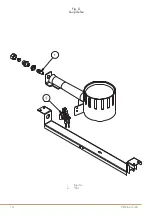
Page 14: ...Officine Gullo 14 Fig G Coup de feu 1 Injector 2 Pilot ...

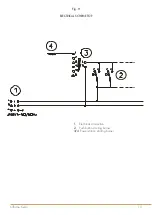
Page 15: ...15 Officine Gullo ELECTRICAL SCHEME TOP 1 Electrical connection 2 Push button starting burner 3 4 Power station starting burner Fig H ...

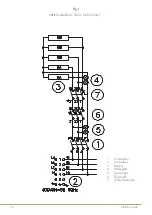
Page 16: ...Officine Gullo 16 WIRING DIAGRAM STATIC OVEN GN2 1 1 Commutator 2 Junction box 3 Element 4 White light 5 Green light 6 Thermostat 7 Safety thermostat Fig I ...

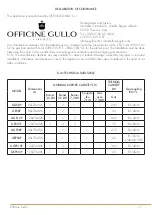
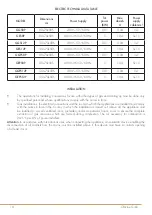
Page 17: ...ischarging gas emissions N B The manufacturer declines any responsibility for direct or indirect damage caused by improper or incorrect installation alterations maintenance or use of the appliance as in all the other cases considered in the items of our sales conditions GAS TECHNICAL DATA TABLE MODEL Dimensions cm NOMINAL BURNER CAPACITY kW TOT NOM CAPACITY kW Gas coupling ISO 7 1 Burner 3 5 kW Bu...

Page 18: ...arting up must be done only by qualified personnel whose qualifications comply with the norms in force Gas installations the electrical connections and the rooms in which the appliances are installed must comply with the norms in force in the Country in which the installation is carried out above all the appliance must be installed in a well ventilated room preferably under an extractor hood so as...

Page 19: ...ances for professional kitchens as well as removal due to malfunction and the supply of gas may be made only by means of a maintenance contract stipulated with an authorized sales office and in observance of technical regulations The appliance can be installed by itself or in a series side by side with appliances produced by us There must be a minimum distance of at least 10 cm between the applian...

Page 20: ... not compliant with the instructions CHECKING HEAT OUTPUT The appliances must be checked in such a way as to verify that the heat output is correct The heat output thermal power is indicated on the data plate of the appliance Firstly check that the appliance can be used with the type of gas supplied then check that the indication on the plate corresponds to the gas to be used For converting to ano...

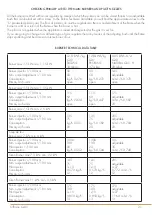
Page 21: ...justment 1 100 mm Consumption Primary air h mm 90 50 kg h 0 276 open 90 50 kg h 0 272 open 145 adjustable m3 st h 0 370 open Burner max 5 5 kW min 1 55 kW Burner injector 1 100 mm Min output adjustment 1 100 mm Consumption Primary air h mm 115 60 kg h 0 434 open 115 60 kg h 0 427 open 175 adjustable m3 st h 0 582 20 Burner max 7 5 kW min 2 5 kW Burner injector 1 100 mm Min output adjustment 1 100 ...

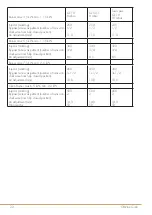
Page 22: ...stment number of turns anti clockwise from fully closed position Air adjustment mm 340 3 4 8 5 340 3 4 8 5 320 3 4 8 5 Burner max 7 5 kW min 2 5 kW Injector marking By pass screw asjustment number of turns anti clockwise from fully closed position Air adjustment mm 450 1 1 2 10 0 450 1 1 2 10 0 390 3 1 2 10 0 Oven Burner max 6 5 kW min 2 2 kW Injector marking By pass screw asjustment number of tur...

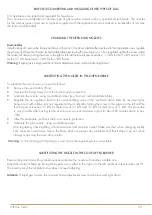
Page 23: ... a suitable spanner see burners technical data table Regulate the air regulation bush to the corresponding value in the technical data table by unscrewing the fixing screw with relative jam nut regulate minimum output by turning the screw to the right or to the left until the thermal power reaches 2 2 kW for the burner of 7 3 kW and 3 5 kW for the burner of 11 kW this procedure is only possible af...

Page 24: ...mend drawing up a contract for after sales service Maintenance must be done only by specialized personnel observing the norms in force and our indications SPARE PARTS Coup de feu It is possible to substitute the spark plug cock thermocouple and burner after having removed the front panel Open rings The cocks can be changed by removing the front panel to change the thermocouples and burners you hav...

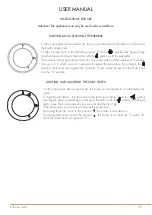
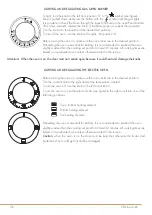
Page 25: ...peat the procedure By turning to the position the burner is brought to the minimum To put out the burner turn the knob back into the 0 position LIGHTING AND ADJUSTING THE COUP DE FEU On the front panel above each knob the burner it corresponds to is indicated by the index To light the pilot flame turn the knob to the left from position 0 to the symbol see figure keep it pushed down and press the b...

Page 26: ...ased on a preheated oven unless otherwise stated in the recipe Attention When the oven is on the door must not remain open because it could heat and damage the knobs LIGHTING AND REGULATING THE ELECTRIC OVEN Before turning the oven on make sure the oven racks are in the desired position Turn the control knob to the right and set the temperature wanted To turn the oven off turn the knob to the left...

Page 27: ...ure until the desired effect is achieved The brass details should then be dried Do not use polish as this is suitable for maintaining the gloss but not the antique finish and could result in an effect that is not compliant with our products Any spots that may appear over time on the burnished brass surfaces should be considered as a desirable and particular characteristic of our craft metal workin...

Page 28: ...ible manually NATURAL DISCHARGE FORCED DISCHARGE 1 Extractor hood 1 Extractor hood 2 Interlocking Fig 1 Fig 2 WHAT TO DO IN THE EVENT OF A BREAKDOWN Turn off the gas tap and notify the after sales service PROCEDURE TO FOLLOW IF THE APPLIANCE IS NOT GOING TO BE USED FOR SOME TIME Turn off the gas tap and clean the appliance as specified above MAINTENANCE only for qualified personnel Any kind of mai...

Page 29: ...s below the values prescribed by item 4 3 by the UNI CIG norm 8723 The relesase of gas to the appliance must be possible only manually In the event of installation the end part of the discharge pipe of the appliance must be at least 1 8 m from the surface on which the appliance is placed ground The section of the discharge pipe outlet must be placed inside the perimeter Fig 3 Fig 4 NATURAL DISCHAR...

Page 30: ...Officine Gullo 30 ...

Page 31: ...31 Officine Gullo ...

Page 32: ...Tel 39 055 656 0324 info officinegullo com Via Della Torricella 29 Antella Bagno a Ripoli 50012 Florence Italy OFFICINEGULLO COM en international V 1 3 8 18 ...

Reviews: