background image

Officine Gullo

4

INSTALLATION MANUAL

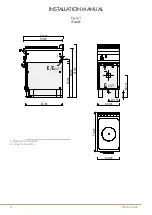
Fig. A/1

TPS4GP

70 cm

73 cm

67 cm

97 cm

90 cm

3 cm

4 cm

62 cm

40 cm

70 cm

G

 (1/2")

E

10 cm

40 cm

40 cm

20 cm

E

/

G

 (1/2")

E

LEGEND

Electric connection/Connessione lettrica

G Gas connection/Connessione Gas

E.Electrical Connection

G. Gas Connection

5

Officine Gullo

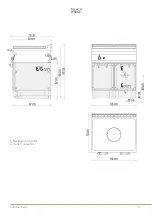
Fig. A/2

TPS8GP

E.Electrical Connection

G. Gas Connection

E.Electrical Connection

G. Gas Connection

Summary of Contents for TPS4GP

Page 1: ...INSTRUCTIONS FOR INSTALLATION AND USE TPS4GP TPS8GP GAS COUP DE FEU FOR RESIDENTIAL AND PROFESSIONAL USE...

Page 2: ...le the appliance s maximum power consumption The use of adapters multiple power boards and extension cords is not recommended 8 When not in use switch off the general power supply to the appliance and...

Page 3: ...PILOT NOZZLES 11 BURNERS TECHNICAL DATA TABLE 11 RULES FOR CONVERTING AND INSTALLING OTHER TYPES OF GAS 11 SUBSTITUTING THE NOZZLE IN THE COUP DE FEU BURNER 11 CHECKING FUNCTIONING 12 MAINTENANCE 12 S...

Page 4: ...Fig A 1 TPS4GP 70 cm 73 cm 67 cm 97 cm 90 cm 3 cm 4 cm 62 cm 40 cm 70 cm G 1 2 E 10 cm 40 cm 40 cm 20 cm E G 1 2 E LEGEND Electric connection Connessione lettrica G Gas connection Connessione Gas E El...

Page 5: ...5 Officine Gullo Fig A 2 TPS8GP E Electrical Connection G Gas Connection E Electrical Connection G Gas Connection...

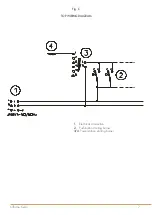
Page 6: ...Officine Gullo 6 Fig B COUP DE FEU 1 Injector 2 Pilot...

Page 7: ...7 Officine Gullo TOP WIRING DIAGRAM 1 Electrical connection 2 Push button starting burner 3 4 Power station starting burner Fig C...

Page 8: ...n force particularly concerning room ventilation and discharging gas emissions N B The manufacturer declines any responsibility for direct or indirect damage caused by improper or incorrect installati...

Page 9: ...ion of fire and panic Connection and installation of appliance ventilation and exhaust removal systems shall be done according to the Manufacturer s instructions and by qualified technicians and accor...

Page 10: ...nce see technical data table EQUIPOTENTIAL The appliance must be connected to an equipotential system The connection screw is positioned at the back of the appliance and is identified by the symbol At...

Page 11: ...Injector 1 100 mm Min output adjustment 1 100 mm Pilot Injector 1 100 mm Consumption 130A 100 20 kg h 0 552 130A 100 20 kg h 0 544 195 adjustable 35 m3 st h 0 740 TPS8G Burner max 12 kW min 7 kW Burne...

Page 12: ...emoved the front panel Open rings The cocks can be changed by removing the front panel to change the thermocouples and burners you have to remove the rungs and trays USER MANUAL INSTRUCTIONS FOR USE A...

Page 13: ...re until the desired effect is achieved The brass details should then be dried Do not use polish as this is suitable for maintaining the gloss but not the antique finish and could result in an effect...

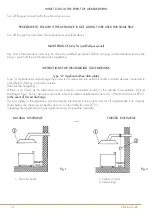
Page 14: ...ble manually NATURAL DISCHARGE FORCED DISCHARGE 1 Extractor hood 1 Extractor hood 2 Interlocking Fig 1 Fig 2 WHAT TO DO IN THE EVENT OF A BREAKDOWN Turn off the gas tap and notify the after sales serv...

Page 15: ...below the values prescribed by item 4 3 by the UNI CIG norm 8723 The relesase of gas to the appliance must be possible only manually In the event of installation the end part of the discharge pipe of...

Page 16: ...Tel 39 055 656 0324 info officinegullo com Via Della Torricella 29 Antella Bagno a Ripoli 50012 Florence Italy OFFICINEGULLO COM en international V 1 2 9 20...

Reviews: