background image

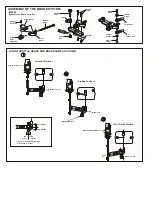
ASSEMBLY OF THE BRAKE SYSTEM

3X3mm
Set Screw 

A-80B
2mm 
Adjust Nut

Servo Mount

2x25mm
Screw

#30800

Brake System Plastic Parts Set

Adjust 
  Mount

3mm
Nut

Slider

3x12mm
Screw

2x8mm
Screw 

2mm Nut

2mm
Tie-Rod End

2mm
Tie-Rod End

2x6mm
Washer

2x6mm
Washer

2x4mm
Screw

2x4mm
Screw

Screw 

Cement

 ALIGN THROTTLE SERVO AND BRAKE SAME AS SHOWN

Brake is not on

Engine at idle

( Neutral Position )

Brake is on

Brake Adjust Nut 

( Braking Position )

Brake is not on

Engine at full throttle

( Full Throttle Position )

Less Brake

More Brake

Tighten

Loose

* Tighten or loose the adjuster nut 
   will change the brake.

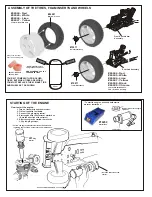
STARTING OF THE ENGINE

How to start the engine:


 1. Turn on  transmitter and then receiver.

             2. Fill fuel tank with fuel bottle.
             3. Connect 1.2V glow plug starter.
             4. Start engine with 12V starter or starter box
                 ( Note the direction of the starter.)
             5. After the engine be started, remove the 
                 1.2V glow plug starter.

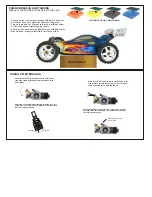
1.2V
Glow Plug
Starter

* Follow  the engine manufacturer instruction manuals
  regarding engine set-up, carburetor and  maintenance.      

Connect with 12V battery

* Note the direction of the
  starter.

Rubber wheel turns engine
flywheel.

12V Starter 

* To start the engine, use hand held starter
motor or starter box.
     

#10250

Starter Box

ASSEMBLY OF THE TIRES, FOAM INSERTS AND WHEELS

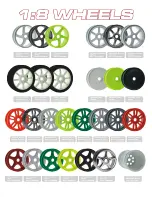
#86044 - Red
#86045 - White
#86046 - Lime
#86047 - Yellow

17mm 5-Star Wheels

#86091

Mini XX- Pin Tire

#15071

17mm Wheel Nuts

#15071

17mm Wheel Nuts

* Apply instant glue into
  the groove of the wheel.

WE RECOMMEND CA GLUE
FOR RUBBER TIRES.

IN

ST

AN

T


GL

UE

INST

AN

T

    G

LU

E

R R

Front Knuckle Arm 
Assembly

Rear Hub Assembly

YOUR KIT COMES WITH PRE-GLUED 
TIRES, BUT WHEN TIRES ARE WORN 
YOU MUST REPLACE THEM.  MAKE TIRE 
AND WHEEL SET AS SHOWN

Always use tire foam 
donut when building tires.

#81091 - Med/soft
#81092 - Med.

Foam

Foam

#86044 - Red
#86045 - White
#86046 - Lime
#86047 - Yellow

17mm 5-Star Wheels,
Two (2) Pairs per bag.

#86048 - Black
#86049 - Chrome

Summary of Contents for 9.5 RTR

Page 1: ...PURE COMPETITION OFNA Racing 22692 Granite Way Ste B Laguna Hills Ca 92653 949 586 2910 Www ofna com PRE ASSEMBLED ASSEMBLED CHASSIS WITH RADIO AND ENGINE RTR Instruction Manual...

Page 2: ...s Radio TX needs 8 eight AA batteries Car needs 4 four AA batteries Recommendation You may want to upgrade the car battery pack to a Ni Mh 5 cell Flat type This will give more run time You will need t...

Page 3: ...te the car indoors Engine exhaust is not off Fuel contains Methanol and Nitro Methane and is healthy flammable and poisonous Glow Fuel Store fuel in cool ventilated location Refer the glow fuel Glow f...

Page 4: ...ke rods pull brake levers Full throttle arm position Spring rod pulls throttle barrel open and brake rods release pressure on brake cams IMPORTANT CHECK RADIO THROTTLE AND STEERING SWITCHES BEFORE RUN...

Page 5: ...ES ABOVE Notes Non Pull Start Engines Alum Washer behind the flywheel is not needed when using Force engines or similar types O S Engines will require washer spacer To check place the brass corn 10330...

Page 6: ...2mm Tie Rod End 2mm Tie Rod End 2x6mm Washer 2x6mm Washer 2x4mm Screw 2x4mm Screw Screw Cement ALIGN THROTTLE SERVO AND BRAKE SAME AS SHOWN Brake is not on Engine at idle Neutral Position Brake is on...

Page 7: ...r To start the engine use hand held starter motor or starter box 10250 Starter Box ASSEMBLY OF THE TIRES FOAM INSERTS AND WHEELS 86044 Red 86045 White 86046 Lime 86047 Yellow 17mm 5 Star Wheels 86091...

Page 8: ...ine When started let engine fast idle for two tanks of fuel Close master needle by turning clockwise until it stops Then open needle by turning counterclockwise 3 turns rich setting When running car a...

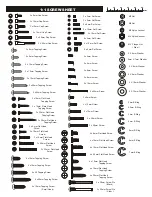
Page 9: ...ead Tapping Screw 4 x 10mm Flat Head Tapping Screw 4 x 20 mm Flat Head Screw 4 x 15mm Flat Head Screw 4 x 10mm Flat Head Screw 4 x 6mm Flat Head Screw 3 X 8mm Washer M3 Nut 5 X 9mm Washer 5 X 10mm Was...

Page 10: ......

Page 11: ......

Page 12: ......

Page 13: ......

Page 14: ......

Reviews: