background image

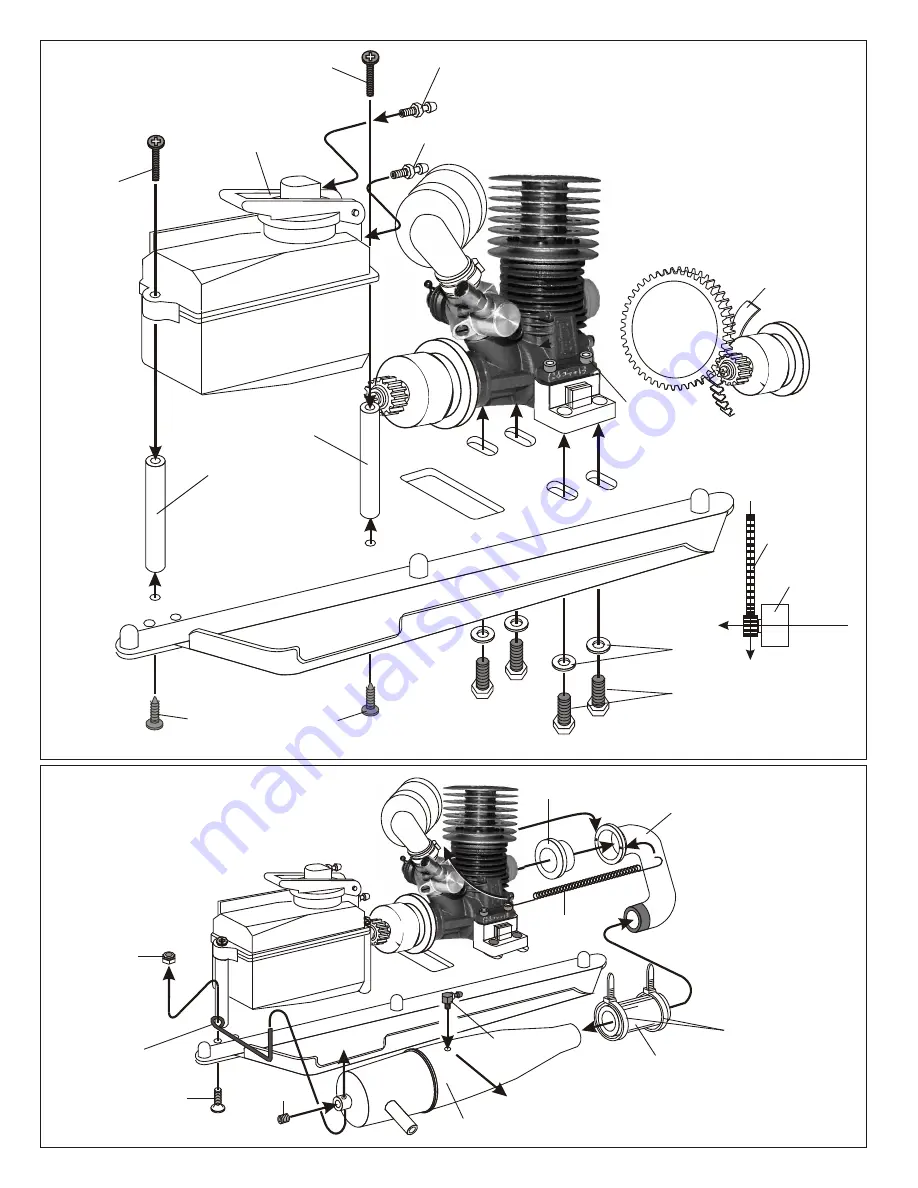
ASSEMBLY OF THE FUEL TUBE

* Connect to   
      fuel nipple.

* Connect to 
         carbulater.

 * Connect to fuel tank
    pessure nipple.

3 x 10mm 
Tapping Screw

3 x 10mm 
Tapping Screw

#10273

Servo Post Mounts

#10273

Servo Post Mounts

Throttle Servo

Steering Servo

3 x 10mm 
Screw

3 x 10mm 
Screw

#30520

Radio Tray
Post, Alum.

#36770

Radio Tray

#10178 - Yellow
#10179 - Lt. Blue

Silicone Fuel Tubing, 3ft.

* Take the radio tray post and 
   servo post from receiver box 
   plastic parts.

In U.S. Kits, the post are
CNC Alum. Instead of Plastic
Use Machine Screw instead of Tapping as shown.

ASSEMBLY OF THE RADIO TRAY AND SERVO

* Connect to 
      press nipple.

3 x 10mm 
Tapping Screw

ASSEMBLY OF THE BRAKE SYSTEM

3X3mm
Set Screw 

A-80B
2mm 
Adjust Nut

Servo Mount

2x25mm
Screw

#30800

Brake System Plastic Parts Set

Adjust 
  Mount

3mm
Nut

Slider

3x12mm
Screw

2x8mm
Screw 

2mm Nut

2mm
Tie-Rod End

2mm
Tie-Rod End

2x6mm
Washer

2x6mm
Washer

2x4mm
Screw

2x4mm
Screw

Screw 

Cement

#10273

Servo Post Mounts

INSTALLATION OF THE FUEL TANK
AND ENGINE ONTO CHASSIS

Note Book Paper

*

Use note book paper to set

 gear backlash between spur gear
 and clutch bell gear.
 If the space is not correct the  spur gear
 will be damaged.  

3 X 20mm
Cap Screw

Spur Gear

Clutch Bell

* Loose or tighten  3x20mm cap screw 
   and 5x10mm hex screw to align 
   spur gear and clutch bell same
   as shown. 

5x12mm
Washer
( 4 pcs )

5x10mm
Hex Screw
( 4 pcs )

3 x 10mm
Tapping Screw

3 x 10mm
Tapping Screw

Plastic Post

Plastic Post

3 x 15mm
Screw

3 x 15mm
Screw

Pressure  Nipple

Fuel Nipple

*Tighten the strap 
  and cut off the excess.

#10180

Silicone Tube


#10069

Manifold Adapter
( Red Silicone )

#10120

 Manifold
Spring 

5x5mm
Set Screw 

4x1omm
Flat Head
Screw 

#30491

Muffler Mount
Wire
You must bend wire as
shown,

4mm
Nylon 
Locknut

ASSEMBLY OF THE MANIFOLD AND
MUFFLER

Nylon Strap
( Large )

#10060

Manifold

#10111

Motor Mount Screw set

#10079

Alum. CNC
Pressure Nipple

#30490

Muffler

* Drill a hole (Size 3.5mm)
   in the place and align as shown.
   Use a two part high temp. epoxy glue to
   fully seal the nipple base. 

#30280

Fuel Tank

* Take the plastic post 
   from the receiver box 
   plastic parts.

3 x 10mm Screw 

3 x 10 mm Flat Head 
                  Screw

Summary of Contents for Ultra II

Page 1: ...cale Gas Powered Off Road Buggy PURE COMPETITION INSTRUCTION MANUAL The body shown is slightly different in the U S kits OFNA Racing 22692 Granite Way Ste B Laguna Hills Ca 92653 949 586 2910 Www ofna...

Page 2: ...ansmitter Turn on the switch Receiver Make sure the servos are in command When the operation stick is in neutral servo horns must be in neutral as will Adjustment can be made by re installing the serv...

Page 3: ...Post Servo Mount Radio Tray Post 36820 Chassis Stone Guards 30270 Rear Wing Support set7 36740 Servo Saver setr 30800 Linkage throttle 98 Plastic Collar Plastic Bearing 36700 Steering Ball Ends 7mm 3...

Page 4: ...bber Oil Seal Fit into groove 2mm Washer 1mm Washer 7mm E Ring E Ring must fit into groove as shown Short shaft for front 32051 6mm Ball End Plastic parts bag Long shaft for rear 2 6mm Nut Push 6mm ba...

Page 5: ...straight holes are for front rear 5 x 5mm Set Screw 3 x 5mm Screw Push 3mm tubes into holes of the diff Case Screw Cement Screw Cement Fill the diff Case to approx 80 with grease Building Notes Set g...

Page 6: ...661 Brake Pad Packing Apply instant cement to glue brake pad and packing 36650 Brake Disk Stainless 3 x 20mm Screw Installing Quad Brakes requires an 3x20mm screws 3 x 20mm Screw Screw Cement Screw Ce...

Page 7: ...SSEMBLY OF THE GEAR BOX Assemble two gear boxes for front and rear 5 x 5mm Set Screw 30630 6 x 13 x 5mm Ball Bearing 30630 6 x 13 x 5mm Ball Bearing Insert two ball bearings as shown 36730 Cap Joint 3...

Page 8: ...ock Tower 30340 Anti roll Bar Kit Insert front stabilizer before assembly shock tower 4 x 10mm Tapping Screw 36670 Alum Blue Front Upper Arm Holder 3 x 20mm Flat Head Tapping Screw 4 x 10mm Tapping Sc...

Page 9: ...6904 14mm Alum Nut R 36053 8x16mm Ball Bearing 36053 8x16mm Ball Bearing 36052 CVA Constant Velocity Axle 8mm Adjusr alum Nut to keep steering ball smoot Note the R mark are for rightside 36903 13 8mm...

Page 10: ...ight and left hand side are the same 4 x 10 mm Set Screw 5 x 5mm Set Screw 5 x 5mm Set Screw A 4 x 10mm set screw is used to adjust the ride height Approx 3mm R 36055 2 5 x 17mm Pin 36054 Wheel Hub Al...

Page 11: ...ea as shown Assembly of the right and left hand side are the same Step 4 36640 Upper arm Shaft 3 x 3mm Set Screw 30340 6mm Stabilizer Ball End 3mm E Ring 3mm E Ring 30102 Front Body Post 3x8mm Tapping...

Page 12: ...ng 2 5mm E Ring 36170 3mm Rear Arm Shaft ASSEMBLY OF THE FRONT SUSPENSION ARMS K STYLE Assembly of the right and left hand side are the same Assembly of the right and left hand side are the same 3 x 2...

Page 13: ...crew 30340 6mm Stabilizer Ball End Assembly of the right and left hand side are the same ASSEMBLY OF THE FRONT LOWER ARMS ONTO THE GEAR BOX K STLYLE 4 x 10mm Tapping Screw 0 1 R R Insert drive shaft b...

Page 14: ...Joint 30411 6mm Ball Joint 3mm Nylon Locknut Insert shocks ball end into arms Assembly of the right and left hand side are the same Assembly of the right and left hand side are the same 3 x 15mm Screw...

Page 15: ...Arms K Style 36902 Rear Lower Arms M Style Don t over tighten tapping screw will cause bending 36810 Rear Shock Tower 30340 Anti roll Bar Kitr Insert stabilizer before assembly of the shock stay ASSEM...

Page 16: ...5 x 17mm Pin 36054 Wheel Hub Alum 36054 Rear Hub K or M Style Builds two upper Rods for left and right side 36690 Arm Ball End 36690 Arm Ball End 36880 5x60mm Turnbuckle 36850 7mm Ball 0 10 20 30 40...

Page 17: ...t and left hand side are the same 3 x 15mm Screw 3 x 25mm Cap Screw 3 X 25mm Cap Screw 30402 3 X 30mm Tie Rod 30411 6mm Ball Joint 30401 6mm Stabilizer Ball End 30401 6mm Stabilizer Ball End 3 x 15mm...

Page 18: ...OF THE REAR SHOCKS ONTO THE SHOCK TOWER ASSEMBLY OF THE WING STAY 3 x25mm Tapping Screw 3 x25mm Tapping Screw 3 x 20mm Tapping screw 3 x 20mm Tapping screw 30270 Wing Stay Right 30270 Wing Stay Left 3...

Page 19: ...36743 6mm E Ring 36743 6mm E Ring 36740 Servo Saver Kit 36740 Servo Saver Kit 36740 Servo Saver Kit 36740 Servo Saver Kit 36740 Servo Saver Kit 36741 Servo Saver Spring 36744 Saver Saver Post 36744 S...

Page 20: ...Flat Head Screw 3 x 15mm Screw 3 x 25mm Screw 3mm Flange Nut Steel 36700 Steering Ball End 36700 Steering Ball End 36700 Steering Ball End 36700 Steering Ball End 36850 7mm Ball 36850 7mm Ball 36790...

Page 21: ...NTO THE FRONT GEAR BOX 0 0 1 1 R R Insert the front bumper before assembly 30240 Front Bumper 36840 Chassis Hard Coated 4 x 16mm Flat Head Tapping Screw 4 x 16mm Flat Head Tapping Screw 3 x 10mm Flat...

Page 22: ...0 0 1 1 R R 4 x 16mm Flat Head Tapping Screw 4 x 16mm Flat Head Tapping Screw 36110 Center Drive Shaft 4 x 16mm Flat Head Tapping Screw 3 x 25mm Flat Head Tapping Screw Insert drive shaft into cap jo...

Page 23: ...SEMBLY OF THE STONE GUARD 36700 Steering Ball End 36700 Steering Ball End 36790 4 x 46mm Turnbuckle 36850 7mm Ball Anticlockwise mark ASSEMBLY OF THE REAR TORQUE ROD REAR 0 10 20 30 40 50 mm 36710 Rea...

Page 24: ...0mm Tapping Screw M3 Flange Nut 3 x 10mm Tapping Screw Rear Body Supporter Assembly ASSEMBLY OF THE REAR BODY SUPPORTER ONTO REAR GEAR BOX 4 x 10mm Tapping Screw 3 x 10mm Tapping Screw 3 x 25mm Flat H...

Page 25: ...Bearing 34110 5x10x4mm Ball Bearing 10040 stock 3 Pin Flywheel Taper 10041 3 Pin Flywheel Hole 10091 Clutch Nut screw type 3 x 5mm Screw 10330 Brass Corn big hole 10329 Brass Corn sml hole 3mm Nylon...

Page 26: ...ic Post Plastic Post 3 x 15mm Screw 3 x 15mm Screw Pressure Nipple Fuel Nipple Tighten the strap and cut off the excess 10180 Silicone Tube 10069 Manifold Adapter Red Silicone 10120 Manifold Spring 5x...

Page 27: ...t and servo post from receiver box plastic parts In U S Kits the post are CNC Alum Instead of Plastic Use Machine Screw instead of Tapping as shown ASSEMBLY OF THE RADIO TRAY AND SERVO Connect to pres...

Page 28: ...rew provided with your radio Use the horn screw provided with your radio 3x10mm Tapping Screw 2mm Rod ASSEMBLY OF THE RADIO TRAY ONTO RECEIVER BOX Insert Into Receiver Box and connect to receiver Rece...

Page 29: ...m Set Screw 3X3mm Set Screw Plastic Collar Take the plastic collar from brake system plastic parts P n 30800 Throttle Spring 10300 Alum Stopper 30800 Throttle and Brake Linkage Parts Plastic and all H...

Page 30: ...Antenna Tube 3x10mm Tapping Screw 3 x 10mm Tapping Screw ASSEMBLY OF THE THROTTLE LINKAGE SYSTEM 3X3mm Set Screw 3X3mm Set Screw 3X3mm Set Screw Plastic Collar Take the plastic collar from brake syste...

Page 31: ...steering servo as shown 20mm 3 x 12mm Screw 30410 6mm Ball Socket End 30410 6mm Ball Socket End 30410 6mm Ball Socket End Both throttle and steering servo arms are not included in kit and are found w...

Page 32: ...ckle Arm Assembly Rear Hub Assembly STARTING OF THE ENGINE How to start the engine 1 Turn on transmitter and then receiver 2 Fill fuel tank with fuel bottle 3 Connect 1 2V glow plug starter 4 Start en...

Page 33: ...dges Paint the inside of the body Use a spray color suitable for polycarbonate Paint the darkest color first Allow the paint to dry for at least an hour Remove the masking tape and protection film fro...

Page 34: ...ead Tapping Screw 4 x 10mm Flat Head Tapping Screw 4 x 20 mm Flat Head Screw 4 x 15mm Flat Head Screw 4 x 10mm Flat Head Screw 4 x 6mm Flat Head Screw 3 X 8mm Washer M3 Nut 5 X 9mm Washer 5 X 10mm Was...

Page 35: ......

Reviews: