background image

34041

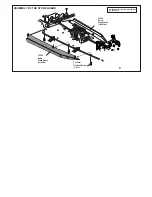
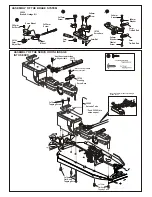
Chassis

5 Degree Kickup

Hard Coated

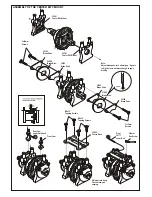
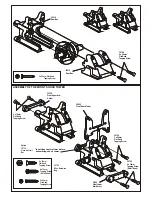
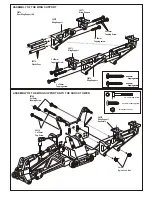
ASSEMBLY OF THE GEAR BOX ONTO
CHASSIS

3 x 10 mm 
Flat Head 
Screw

4 x 16mm
Flat Head
Tapping Screw 

* Insert the front bumper
  before assembly.

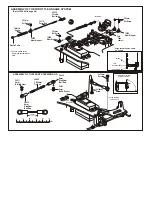
30240

Front Bumper

4 x 16mm

Flat Head 

Tapping Screw

3 x 10mm

Flat  Head

Screw

* A 3 x 10mm  

  flat head screw are 

  use for servo post.

4 x 16mm

Flat Head

Tapping Screw

* Insert drive shaft into 
   cap joint.

3 x 25mm

Flat Head

Tapping Screw 

Center Diff.

Assembly

4 x 16mm

Flat Head

Tapping Screw 4 x 16mm

Flat Head

Tapping Screw

36100

Center Drive 

Shaft (Front)

36100

Center Drive 

Shaft (Rear)

3 x 25mm 
Flat Head 
Tapping Screw 

Summary of Contents for Ultra LX Pro

Page 1: ...1 8 SCALE GAS POWERED OFF ROAD BUGGY PLEASE READ INSTRUCTIONS CAREFULLY BEFOREASSEMBLING THIS MODEL KEEP THIS MANUAL FOR PARTS NUMBERS WHEN ORDERING...

Page 2: ...Alkaline type batteries will work but braking will be reduced The best is to use a 5 cell hump pack for increased voltage Recommended Option You may want to upgrade the car battery pack to a Ni Cad o...

Page 3: ...healthy off Fuel contains Methanol and Nitro Methane and is flammable and poisonous Glow Fuel Glow fuel is poisonous Store fuel in cool ventilated location Refer the glow fuel Glow fuel is flammable...

Page 4: ...vo same as shown A B C Full brake arm position Spring compresses forward and brake rods pull brake levers Full throttle arm position Spring rod pulls throttle barrel open and brake rods release pressu...

Page 5: ...e Battery life is short when using Alkaline batteries For safety we recommend checking Alkaline batteries after 30 minutes Battery strength affects radio range If voltage drops while running the car y...

Page 6: ...eful not to damage shock shaft or over tighten threads Short shaft for front 4 Assembly the dust cover 40060 2 5mm Nylon Nut 32235 Shock Piston 40076 Front Shock Body 40077 Rear Shock Body 40090 1mm W...

Page 7: ...uilds two differentials for front and rear 5 x 5mm Set Screw 3 x 5mm Screw Fill the diff Case to approx 70 with grease Note Always use shims as shown 30773 4mm Cross Pin 30773 4mm Cross Pin 30771 Diff...

Page 8: ...ke Disc 30620 7x19x5mm Ball Bearing 30620 7x19x5mm Ball Bearing 30620 7x19x5mm Ball Bearing 30711 Misc Hex Screw Bag 30711 Misc Hex Screw Bag 30701 Misc Hex Screw Bag Tighten hex screw on flat of shaf...

Page 9: ...0180 Brake Pads 30180 Brake Pads 30180 Brake Pads 30180 Brake Pads Note Adjust brake pads for a o 5mm gap If gap is to big the lever not move enough to apply braking Rear Cam Lower Hole Used Front Cam...

Page 10: ...0130 Pinion Gear Harden Steel Screw Cement 1 2 30010 Gear Box Screw Cement Screw Cement ASSEMBLY OF THE BEVEL GEAR 30121 Mounting Hardware 30121 Mounting Hardware 30121 Mounting Hardware insert tubes...

Page 11: ...4 x 16mm Flat Head Tapping Screw 30700 3 x 20mm Flat Head Tapping Screw 30160 Front Lower Arm Holder 30700 4 x 15mm Tapping Screw Small Head 0 1 4 x 15mm Tapping Screw Small Head 3 x 20mm Flat Head T...

Page 12: ...X10mm Tapping Screw Leave 1 5mm Assembly of the right and left hand side are the same Assembly of the right and left hand side are the same 36870 4x10mm Set Screw A 4 x 10mm set screw is used to adjus...

Page 13: ...m Tapping Screw 90021 3mm E Ring 90021 3mm E Ring 90021 3mm E Ring 90021 3mm E Ring 30151 4mm Upper Arm Rod 30061 4x25mm Flat Head Screw 30061 4x25mm Flat Head Screw ASSEMBLY OF THE FRONT ARMS INTO GE...

Page 14: ...ark 35mm Settled screw on D cut ASSEMBLY OF THE REAR UPPER RIGHT 30290 Rear Upper Right 30630 6x13mm Ball Bearing 30630 6x13mm Ball Bearing 30051 Wheel Hub Blue 30300 Rear Wheel Shaft ASSEMBLY OF THE...

Page 15: ...er 1 Degree 1 5 Degree Set triangle marks in the direction shown in Fig 1 Fig 1 Don t over tighten tapping screw 36810 Rear Shock Tower Insert stabilizer before assembly of the shock stay ASSEMBLY OF...

Page 16: ...90018 3 x 25mm Cap Screw 90019 3 X 25mm Cap Screw 3 x 15mm Screw 35314 M3 Nylon Lock Nut 35314 M3 Nylon Lock Nut 30402 3 X 30mm Tie Rod 30401 6mm Ball Joint 30401 6mm Stabilizer Ball End 30401 6mm St...

Page 17: ...ort 30270 Wing Support 30270 Plastic Post 3 x 25mm Tapping Screw 3 x 20mm Tapping Screw 3 x 25mm Tapping Screw 3 x 20mm Tapping Screw ASSEMBLY OF THE WING SUPPORT ONTO THE SHOCK TOWER 90019 3 x 25mm C...

Page 18: ...Servo Saver Horn A 36740 Servo Saver Horn B 36740 Servo Saver Horn A 36740 Servo Saver Top Adapter 36741 Servo Saver Spring 36740 Servo Saver Shaft Brass 36740 Servo Saver Shaft Brass 36740 Plastic T...

Page 19: ...ing Rod Right Front Steering Rod Left 34049 Center Chassis Brace Front 3x12mm Screw ASSEMBLY OF THE FRONT PLATE AND STEERING ROD 3 x 10mm Tapping Screw 3 x 15mm Flat Head Screw 3 x 15mm Flat Head Scre...

Page 20: ...mper 4 x 16mm Flat Head Tapping Screw 3 x 10mm Flat Head Screw A 3 x 10mm flat head screw are use for servo post 4 x 16mm Flat Head Tapping Screw Insert drive shaft into cap joint 3 x 25mm Flat Head T...

Page 21: ...3 x 10mm Flat Head Screw 3 Pcs 34080 Nylon Stone Guard Left Side 34080 Nylon Stone Guard Left Side ASSEMBLY OF THE STONE GUARD Assembly of the right and left hand side are the same...

Page 22: ...arge hole 10329 Brass Corn sml hole 30481 3 x 20mm Hex Screw 30481 3 x 20mm Hex Screw 30481 3 x 20mm Hex Screw 30480 Engine Mount 10398 12T 10399 13T 10400 14T stock 10401 15T 10402 16T 10403 17T 1040...

Page 23: ...INSTALLATION OF THE FUEL TANK AND ENGINE ONTO CHASSIS 30280 Fuel Tank 125cc 30287 Tank Mount Posts 10114 Flat Head Engine Mount Screws...

Page 24: ...at Head Screw 30491 Muffler Wire 4mm Nylon Lock Nut Nylon Strap middle 10060 Manifold 10079 Pressure Nipple 30490 Muffler Drill a hole Size 3 5mm in the place and align as shown Use a two part epoxy g...

Page 25: ...TIFFENER 34070 Rear Stiffener 2 6x10 Tapping Screw 2 6x10 Tapping Screw Use the small strap tp secure the servo wire 3 x 10mm Tapping Screw 3 x 10mm Tapping Screw 34020 Servo Mount 34020 Servo Mount T...

Page 26: ...Tapping Screw Insert the 2mm brakerod through brake lever Antenna Post 3x10mm Flat Head TappingScrew 3x10mm Flat Head Tapping Screw ASSEMBLY OF THE BRAKE SYSTEM 3X3mm Set Screw 36140 2mm Adjust Nut Se...

Page 27: ...20 30 40 50 mm 17mm Align the steering servo as shown ASSEMBLY OF THE THROTTLE LINKAGE SYSTEM Take the plastic collar from brake system plastic parts 3X3mm Set Screw 10300 Alum Stopper Fuel Tube 6mm S...

Page 28: ...ake is not on Engine at idle Neutral Position Brake is on Brake Adjust Nut Braking Position Brake is not on Engine at full throttle Full Throttle Position Less Brake More Brake Tighten Loose Tighten o...

Page 29: ...2051 Plastic Bushing 32051 Plastic Bushing Take the plastic bushing from the shock plastic parts tree 3mm Nylon Lock Nut 25mm 25mm 0 5 10 15 20 25 5 10 15 20 25 26 26 ASSEMBLY OF THE WING Drill two 7m...

Page 30: ...ine When started let engine HIGH idle for two tanks of fuel Close master needle by turning clockwise until it stops Then open needle by turning counterclockwise 3 turns rich setting When running car a...

Page 31: ......

Page 32: ...APPENDIX PAGES...

Reviews: