background image

OGAL-466A ASSEMBLY INSTRUCTIONS  |     6

www.kshbrands.com               support@kshbrands.com                  1.888.965.3331

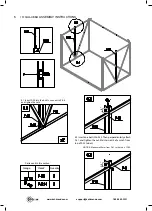
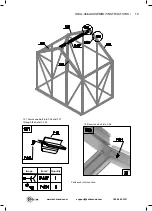
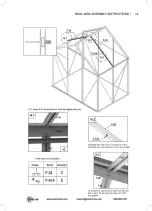
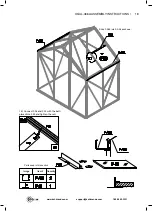
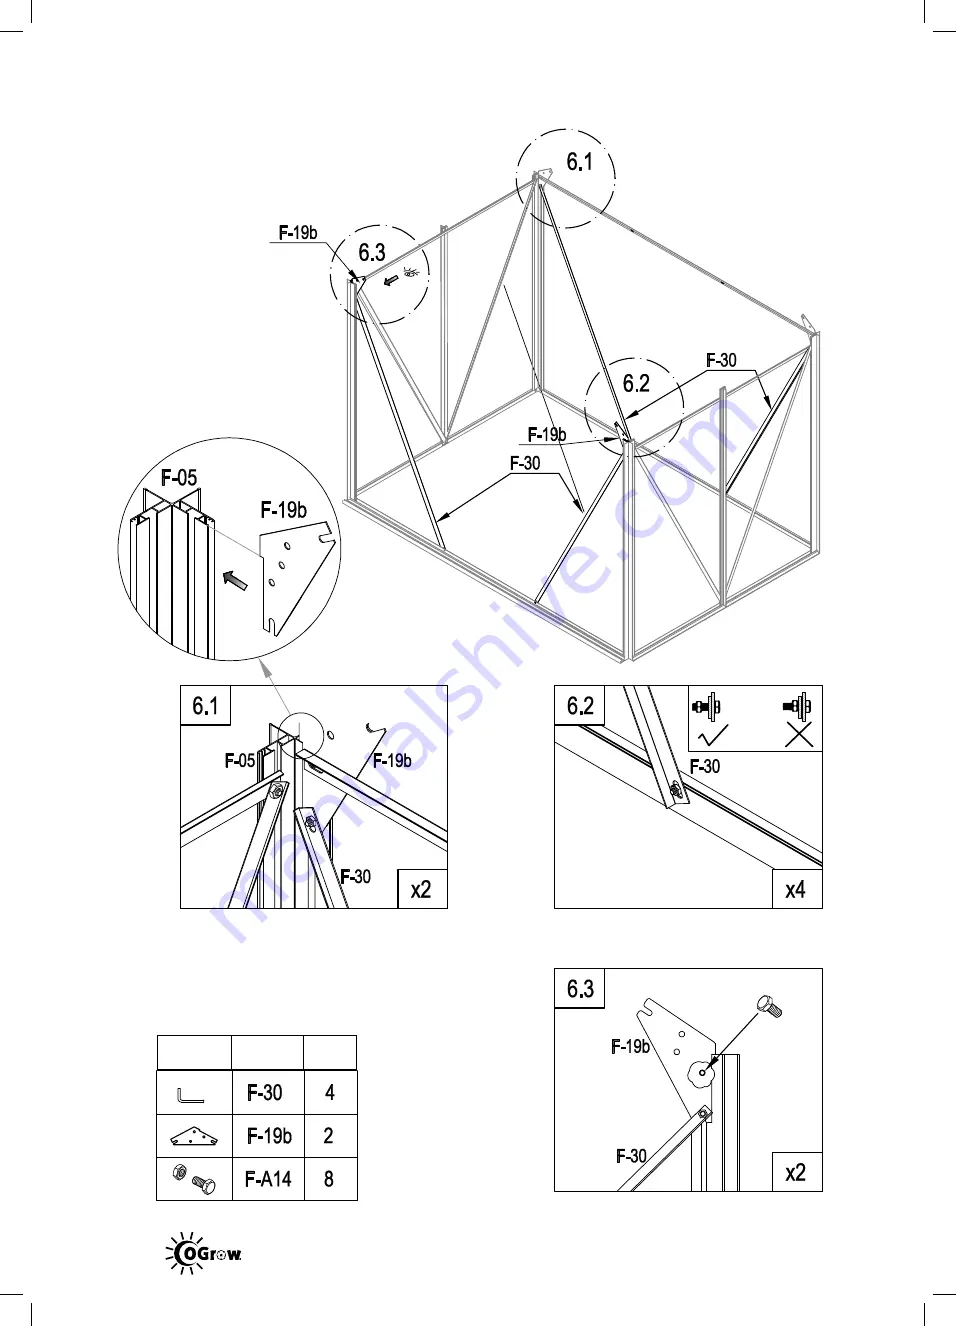
6.1 Connect F-30 and F-05 to the lowest

 notch of F-19b with bolts and nuts.

NOTICE: The notch of F-19b MUST be aligned

 with the top of F-05.

Parts used in this section.

6.2 Connect F-30 and F-04 with bolts and nuts.

NOTICE: DON'T TIGHTEN NUTS. 

6.3 Place two bolts into F-05, connect F-30

and F-05 to the lowest notch of F-19b using

the lowest bolt and nut. Insert the top bolt 

through the lower hole of F-19b.

Image        Item#    

Quantity

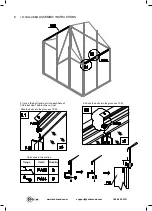
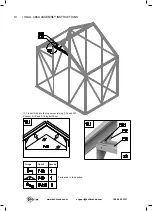
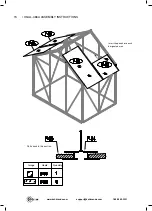
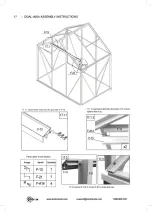
5.1 Insert F-23 into the bolt to connect to F-04

and tighten the nuts.

NOTICE: Make sure 20mm from F-41 to the top  of F-23.

Parts used in this section.

3/4"

3/4"

5.2 Insert one bolt into F-23. Then perpendicularly attach 

F-41, and tighten the nut. Maintain a 3/4 of an inch from 

top of F-23 to bolt.

Image        Item#      

Quantity

Summary of Contents for OGAL-466A

Page 1: ...OGAL 466A GREENHOUSE ASSEMBLY www kshbrands com support www kshbrands com 1 888 965 3331 INSTRUCTIONS...

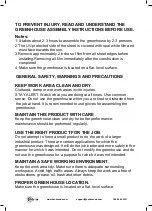
Page 2: ...use when you are tired or distracted from the job at hand It is recommended to use gloves for assembling the greenhouse MAINTAIN THIS PRODUCT WITH CARE Keep the greenhouse clean and dry for better per...

Page 3: ...www kshbrands com support kshbrands com 1 888 965 3331 OGAL 466A 77 inches x 72 inches x 48 inches...

Page 4: ...www kshbrands com support kshbrands com 1 888 965 3331...

Page 5: ...www kshbrands com support kshbrands com 1 888 965 3331...

Page 6: ...1 OGAL 466A ASSEMBLY INSTRUCTIONS www kshbrands com support kshbrands com 1 888 965 3331...

Page 7: ...TIONS 2 www kshbrands com support kshbrands com 1 888 965 3331 2 1 1 Insert the bolts F B14 into the holes 2 1 2 Insert F 05 into the bolts Parts used in this section Image Item Quantity 2 1 3 2 1 4 S...

Page 8: ...C o n n e c t F 0 5 F 1 9 b F 1 8b y t h eu p p e r b o l t O n c et h en o t c ho nF 1 9 bi s a l i g n e dw i t ht h et o po f F 0 5 y o uc a ns c r e wt h en u t t i g h t o nt h eb o l t...

Page 9: ...888 965 3331 NOTICE DON T TIGHTEN NUTS Parts used in this section 4 1 Connect F 41 F 29 to F 05 with bolts and nuts Maintain a 3 4 of an inch distance between the bolt and top of F 05 4 2 Connect F 29...

Page 10: ...F 23 into the bolt to connect to F 04 and tighten the nuts NOTICE Make sure 20mm from F 41 to the top of F 23 Parts used in this section 3 4 3 4 5 2 Insert one bolt into F 23 Then perpendicularly att...

Page 11: ...and nuts NOTICE The notch of F 19b MUST be aligned with the top of F 05 Parts used in this section 6 2 Connect F 30 and F 04 with bolts and nuts NOTICE DON T TIGHTEN NUTS 6 3 Place two bolts into F 0...

Page 12: ...9 10 11 into the bolt and tighten the nuts Parts used in this section 7 2 Insert one bolt into F 08 09 connect F 18 and F 08 09 with the bolt nut and tighten 7 3 Insert bolt into F 10 11 connect F 17...

Page 13: ...OGAL 466A ASSEMBLY INSTRUCTIONS 8 www kshbrands com support kshbrands com 1 888 965 3331 Parts used in this section Insert the panels into each designated area Image Item Quantity...

Page 14: ...upport kshbrands com 1 888 965 3331 Slide the bolts into the grooves of F 05 9 2 Slide the bolts into the grooves of F 23 Parts used in this section 9 1 Insert the bolts and nuts into each hole of F A...

Page 15: ...kshbrands com 1 888 965 3331 Parts used in this section 10 2 Insert two bolts into F 08 09 10 11 10 1 Insert the bolts and nuts into each hole of F A06 but don t tighten the nuts yet 10 3 Insert bolts...

Page 16: ...1 888 965 3331 11 1 Insert F 06 07 through the bolts in F 19b and F A06 Tighten the nuts Parts used in this section 11 2 11 3 Insert two bolts into the grooves of F06 and F07 Then attach F 19 perpend...

Page 17: ...LY INSTRUCTIONS 12 www kshbrands com support kshbrands com 1 888 965 3331 12 2 Insert one bolt into F 06 Parts used in this section 12 1 Secure one bolt into F 06 and F 07 through the hole in F A7 Ima...

Page 18: ...SSEMBLY INSTRUCTIONS www kshbrands com support kshbrands com 1 888 965 3331 13 1 Insert F 40 into the top corner joining F 06 and F07 Connect F 12 and F 19 by bolt nut Parts used in this section Image...

Page 19: ...c hi s i nt h e r i g h t s i d ea n do n eb o l t i n t oF 2 4i nt h el e f t s i d e 1 4 3 I n s e r t t h eu p p e r b o l t i nr i g h t F 2 4a n dt h e b o l t i nl e f t F 2 4t h r o u g ht h e...

Page 20: ...6A ASSEMBLY INSTRUCTIONS www kshbrands com support kshbrands com 1 888 965 3331 n o i t c e s s i h t n i d e s u s t r a P Inser i s l e n a p e h t t nt h c a e o i s e d gnat a d e r a e Image Item...

Page 21: ...UCTIONS 16 www kshbrands com support kshbrands com 1 888 965 3331 Slide F A05 into F A06 as shown Parts used in this section 16 1 Connect F 28 and F 24 with the bolts placed into F 24 and tighten the...

Page 22: ...1 7 1 1I n s e r t t h r e eb o l t s i n t ot h eg r o o v e s o f F 1 3 1 7 1 2...

Page 23: ...his section Image Item Quantity 18 1 Slide two units F 26 over the sides of the F 37 window panel 18 2 Slide F 27 over the bottom of the F 37 window panel 18 3 Attach F 20 to F 27 using two F C16 scre...

Page 24: ...19 OGAL 466A ASSEMBLY INSTRUCTIONS www kshbrands com support kshbrands com 1 888 965 3331 19 1 Slide the window into F A07 according to the diagram...

Page 25: ...A p a n e l p a n e l s...

Page 26: ...shbrands com 1 888 965 3331 21 3 Secure door frame with nuts and bolts at bottom corners Parts used in this section Image Item Quantity 21 1 21 2 Slide the assembled door ensuring the pulley wheels al...

Page 27: ...rands com support kshbrands com 1 888 965 3331 22 1 22 2 Insert four G P1 units into the corners of front and back walls of the greenhouse by sliding the rectangular section into each F C05a panel Par...

Page 28: ...port kshbrands com 1 888 965 3331 23 2 23 3 Cap off F 13 with G P3L at the left end and G P3R at the right end Secure with nuts and bolts 23 1 Slide the two G P2 connectors into where F A07 joins F 06...

Page 29: ...OGAL 466A ASSEMBLY INSTRUCTIONS 24 www kshbrands com support kshbrands com 1 888 965 3331 I II III IV When the window is closed the handle of F 20 could be rotated to the right and fixed in place...

Page 30: ...25 OGAL 466A ASSEMBLY INSTRUCTIONS www kshbrands com support kshbrands com 1 888 965 3331...

Reviews: