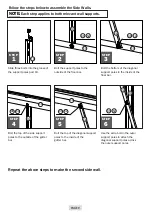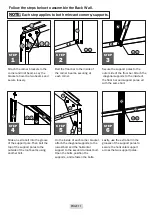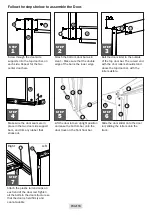
Slide the vent top bar into the vent
side bars, just over the outermost
layer. The top bar should be
positioned in the lower groove of
the side bars.
STEP
1
Insert bolts into the bottom of the
two vent side bars, securing loosely.
Slide polycarbonate panel E into
the slot between the two narrow
sheets of the bars, after removing
the protective film on both sides.
STEP
2
Attach the vent bottom bar to the
outside of the vent side bars, using
the bolts inserted in the previous
step. The top lip of the bottom bar
should slide over the polycarbonate
panel, securing it in place.
STEP
3
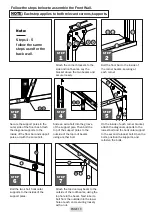
Check that the vent is square by
measuring that the diagonals are
the same, and then tighten the
bolts in each corner. Slide the
completed vent into the top roof bar
to the space between the two roof
support poles.
Turn the vent over and attach the
brace to the vent bottom bar,
screwing it into the pre-drilled
holes.
STEP
4
Attach the two vent stoppers to the
vent support bar, screwing into the
pre-drilled holes. Attach the stoppers
so that the projecting piece will stick
up into the space of the vent.
STEP
5
Attach the vent support bar under
the vent, using the extra bolts in the
roof support poles. Check that the
bar is flush with the vent before
securing.
STEP
6
S TEP
7
Follow the steps below to assemble the Vents.
Repeat the above
steps for the second
greenhouse vent.
PAGE 20
33
30
30
32
33
30
15
03
30
32
30
33
51
32
30
33
30
30
E
30
35
33
45
18
15
45
E
E
11

