background image

CHAPTER 1  

GETTING STARTED


1.5  HARDWARE SETUP OR DISASSEMBLY 

Both the T31P and T31XW connect to a scale base through a Load Cell Cable that connects to 
the Indicator’s Main Printed Circuit Board (PCB).  When supplied as part of a scale, each model 
has a mounting bracket that attaches to the column bracket of the base scale.  To remove the 
mounting bracket, remove the threaded knobs, holding the Indicator by hand. 

CAUTION

:


ELECTRICAL SHOCK HAZARD. REMOVE ALL POWER CONNECTIONS TO THE 
INDICATOR BEFORE SERVICING OR MAKING INTERNAL CONNECTIONS. 

The process of opening the Housing varies slightly for each model: 

T31P: 

1.  Remove the four Phillips head screws 

from the rear housing. 

2.  Open the housing, being careful not to 

disturb the internal connections. 

T31XW: 

1.  Remove the four hex head screws from 

the rear housing. 

2.  Open the housing by carefully pulling 

the top of the front housing forward.


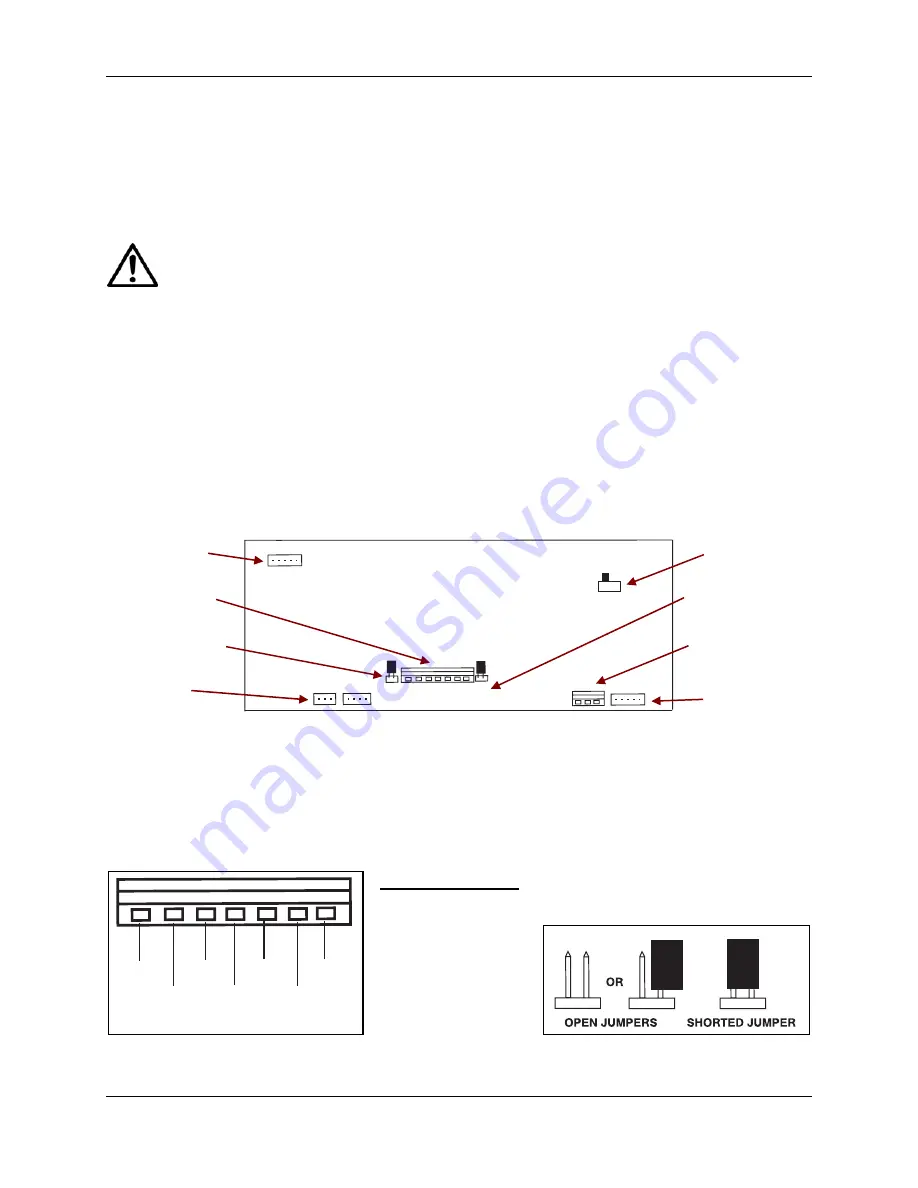
Below is a diagram of the T31’s Main PCB, with connectors, jumpers, terminals and switches 
indicated.  The Load Cell Cable connects to Terminal Block J5. 

OFF

ON

J7           J6

J5

W1                           W2

J4


Membrane Switch 

connector 

(T31XW only) 

RS232 

Terminal J7 

(T31XW only) 

Sense 

Jumper W2 

LFT On/Off 

Switch 

Sense 

Jumper W1 

Load Cell 

Terminal J5 

RS232 

Terminal J6 
(T31P only) 

Figure 1-1.  Printed Circuit Board (PCB), T31 Indicator 

Battery 

connector 

(T31P only) 

1.5.1 Jumper 

Connections 

For a 4-wire load cell with no sense wires, short Jumpers W2 and W3. 

For a 6-wire load cell that includes sense wires, open Jumpers W2 and W3. 

For load cells with an extra ground shield wire, connect the shield to the center position (GND).


+EXC      +SIG     -SIG     -EXC
      +SENS    GND     -SENS


Figure 1-2.  Load Cell wiring. 

Pin     Connection 

J5-1     +Excitation 
J5-2     +Sense 
J5-3     +Signal 
J5-4     GND 
J5-5     –Signal 
J5-6     –Sense 
J5-7     –Excitation 
 

Figure 1-3.  Open/shorted jumpers. 

Ohaus Corporation  www.ohaus.com 

1-4 

3000 Series T31 Indicator Service Manual 

Summary of Contents for 3000 Series T31P

Page 1: ...SERVICE MANUAL 3000 Series T31 Indicators T31P T31XW Ohaus Corporation 19A Chapin Road P O Box 2033 Pine Brook NJ 07058 2033 973 377 9000...

Page 2: ......

Page 3: ...ate at the time of publication but Ohaus Corporation assumes no liability arising from the use or misuse of this material Reproduction of this material is strictly prohibited Material in this manual i...

Page 4: ......

Page 5: ...erface Commands 1 12 1 9 3 Output Format 1 12 1 10 Legal For Trade LFT 1 13 CHAPTER 2 TROUBLESHOOTING 2 1 Introduction 2 1 2 2 Visual Inspection 2 1 2 3 Diagnostic Guide 2 2 2 2 1 Diagnosis 2 2 CHAPTE...

Page 6: ...easing Decreasing Load Test 4 2 5 1 T31P Indicator Housing Internal Parts 5 3 5 2 T31XW Indicator Housing Internal Parts 5 5 A 1 Setup Calibration Values A 1 B 1 Geographical Adjustment Values B 1 LIS...

Page 7: ...and adjustments Chapter 5 Drawings and Parts Lists Contains exploded views of T31 Indicators identifying all serviceable components Before servicing the indicator you should be familiar with the Instr...

Page 8: ...Load Cell Simulator optional 3 Computer with RS232 Interface for testing the RS232 communications 4 RS232 Interface cable 5 Data Printer for use with RS232 communications 6 ESD work station or mat 1 3...

Page 9: ...5V DC Load Cell Drive Up to 4 x 350 ohm load cells Load Cell Input Sensitivity Up to 3mV V Stabilization Time Within 2 seconds Auto Zero Tracking Off 0 5 1 or 3 divisions Zeroing Range 2 or 100 of ca...

Page 10: ...housing by carefully pulling the top of the front housing forward Below is a diagram of the T31 s Main PCB with connectors jumpers terminals and switches indicated The Load Cell Cable connects to Term...

Page 11: ...to terminal block J7 See Figure 1 1 Re tighten the strain relief to ensure a water tight seal Strain Relief for RS232 cable Figure 1 4 Rear panel T31XW The RS232 wiring on the T31XW s Terminal J7 is...

Page 12: ...g the charging process The battery is protected against over charging and the Indicator can remain connected to the AC power line Connect AC power to the indicator and allow it to charge While the bat...

Page 13: ...r menu Menu Function Short Press Yes Accepts the current setting on the display No Advances to the next menu or menu item Rejects the current setting on the display and advances to the next available...

Page 14: ...isplayed menu Accepts the displayed setting and advances to the next menu item No Skips by the displayed menu Rejects the displayed setting or menu item and advances to the next available item Back Mo...

Page 15: ...ximately five minutes after stabilizing to room temperature 6 To abort calibration press the Exit button anytime during the calibration process 1 8 1 Geographical Adjustment Factor The Geographical Ad...

Page 16: ...displays the actual weight value 1 8 3 Linearity Calibration Linearity calibration uses three calibration points the first with no weight on the scale the second at approximately half capacity the thi...

Page 17: ...ing PAritY appears again Press No 6 StOP appears Press Yes The default Stop Bit setting 1 appears To change the setting press No 7 The menu toggles to the next setting each time you press No first 1 t...

Page 18: ...print name software revision and LFT ON if LFT is set ON Esc R Global reset to reset all menu settings to the original factory defaults NOTES Commands sent to the Indicator must be terminated with a c...

Page 19: ...E t U P appears Press Yes 3 rESEt appears Press No 4 LFt appears Press Yes 5 OFF appears Press Yes 6 LFt appears again Press No Continue to press No until END appears Press Yes Or simply press Exit a...

Page 20: ...CHAPTER 1 GETTING STARTED Ohaus Corporation www ohaus com 1 14 3000 Series T31 Indicator Service Manual...

Page 21: ...base damage from liquids cracks on corners which may suggest the unit was dropped 2 Open the Indicator by removing the four screws in the rear housing Be careful not to stretch the cables that connect...

Page 22: ...nts 2 2 1 Diagnosis 1 Isolate and identify the symptom 2 Refer to Table 2 1 Diagnostic Guide and locate the symptom 3 Follow the suggested remedies in the order they appear 4 Perform the indicated che...

Page 23: ...te Unstable environment Incorrect calibration mass Lock Calibration Menu set to On Lock switch on PCB is on LFT menu set to On Move the scale to suitable location Use correct calibration mass Set Lock...

Page 24: ...CB CAL E Calibration Error Calibration value outside allowable limits Repeat calibration using correct calibration weights LOW rEF In Pieces mode the average piece weight of the parts is small warning...

Page 25: ...e using a cloth dampened with a mild detergent 3 For the T31XW use approved cleaning solutions for the stainless steel Indicator housing and rinse with water CAUTION DO NOT USE CHEMICAL CLEANERS OR SO...

Page 26: ...al Block J7 See Figure 1 1 5 On the T31P Disconnect the battery Pull the horizontal white tab plug connecting the RS232 Interface to the PCB s Terminal J6 See Figure 1 1 6 On both models Pull the whit...

Page 27: ...using and disconnect the plastic ribbon cable that connects the Membrane Switch to the PCB 2 Carefully remove the old Function Label or Membrane Switch It is held in place with a strong adhesive 3 Cle...

Page 28: ...y s base 15 Lift out the Power Supply 16 Position the replacement Power Supply with the screw holes aligned 17 Position the grounding wire over the screw hold on the right side insert the screw and ti...

Page 29: ...acket that holds the Battery in place 7 Position the replacement Battery in the place of the old one 8 Reposition the bracket that holds the Battery in place and insert the four screws each with a was...

Page 30: ...CHAPTER 3 MAINTENANCE PROCEDURES Ohaus Corporation www ohaus com 3 6 3000 Series T31 Indicators Service Manual...

Page 31: ...t it to the Indicator power plug For the T31XW check that the power cord is not damaged 2 Plug the AC Adapter or power cord into a suitable power source 3 With the Indicator connected to an appropriat...

Page 32: ...n the Indicator Perform a Span Calibration with zero at the simulator s zero setting and 100 capacity at the simulator s 2 0 milli volt setting 2 Following calibration check that the Indicator s displ...

Page 33: ...hly checked after the replacement is made The balance MUST meet the parameters of all applicable specifications in this manual If further technical information is needed please contact your local Ohau...

Page 34: ...ARTS LISTS DIAGRAMS 5 1 3000 SERIES T31P INDICATOR HOUSING INTERNAL PARTS Figure 5 1 Series 3000 T31P Indicator Housing Internal Parts Ohaus Corporation www ohaus com 5 2 3000 Series T31 Indicator Ser...

Page 35: ...ability Label 2 Function Label 3 Top Housing 5 LCD Display with backlight 7 Main PCB 8 Battery Bracket Kit 9 Rechargeable Lead Acid Battery 10 Bottom Housing 11 Knobs Set of 2 12 Wall Mount Kit 13 Rub...

Page 36: ...RTS LISTS DIAGRAMS 5 2 3000 SERIES T31XW INDICATOR HOUSING INTERNAL PARTS Figure 5 1 Series 3000 T31XW Indicator Housing Internal Parts Ohaus Corporation www ohaus com 5 4 3000 Series T31 Indicator Se...

Page 37: ...with Gasket 5 LCD Display with backlight 7 Main PCB 10 Bottom Housing 11 Knobs with seals Set of 2 12 Wall Mount Kit 14 Cable Kit 15 Power Supply PCB 16 Power Supply Cover 17 Cable Fitting for AC Powe...

Page 38: ...CHAPTER 5 PARTS LISTS DIAGRAMS Ohaus Corporation www ohaus com 5 6 3000 Series T31 Indicator Service Manual...

Page 39: ...75 100 120 150 75 150 200 0 01 0 02 0 05 0 1 0 2 0 05 0 1 0 2 5 10 15 20 25 30 40 50 60 75 100 120 150 200 100 200 250 0 05 0 1 0 2 0 05 0 1 0 2 5 10 15 20 25 30 40 50 60 75 100 120 150 200 250 120 2...

Page 40: ...6000 2500 5000 7500 0 5 1 2 5 2 5 5 10 15 20 25 30 40 50 60 75 100 120 150 200 250 300 400 500 600 750 1000 1200 1500 2000 2500 3000 5000 6000 7500 3000 7500 10000 0 5 1 2 5 10 2 5 10 5 10 15 20 25 30...

Page 41: ...17 17 18 18 19 19 20 20 21 21 22 22 04 05 05 06 06 07 07 08 08 09 09 10 10 11 11 12 12 13 13 14 14 15 15 16 16 17 17 18 18 19 19 20 20 21 21 22 04 04 05 05 06 06 07 07 08 08 09 09 10 10 11 11 12 12 13...

Page 42: ...66 24 67 57 67 57 69 35 69 35 71 21 71 21 73 16 73 16 75 24 75 24 77 52 77 52 80 56 80 56 85 45 85 45 90 00 23 23 24 24 25 25 26 26 27 27 28 28 29 29 30 30 31 22 23 23 24 24 25 25 26 26 27 27 28 28 2...

Page 43: ......

Page 44: ...80252598 P N 80252598 SERVICE MANUAL 3000 SERIES T31 INDICATORS...

Reviews: