background image

13

CALIBRATION WEIGHTS

CALIBRATION WEIGHTS

CALIBRATION WEIGHTS

CALIBRATION WEIGHTS

CALIBRATION WEIGHTS

LINEARITY

LINEARITY

LINEARITY

LINEARITY

LINEARITY

SPAN ONLY

SPAN ONLY

SPAN ONLY

SPAN ONLY

SPAN ONLY

MODEL

MODEL

MODEL

MODEL

MODEL

WEIGHTS

WEIGHTS

WEIGHTS

WEIGHTS

WEIGHTS

WEIGHT

WEIGHT

WEIGHT

WEIGHT

WEIGHT

JR120

50g, 100g

100g

JR200

100g, 200g

200g

JR400

200g, 400g

400g

JR400D

50g, 400g

400g

JR600

200g, 500g

500g

JR4K

2kg, 4kg

4kg

JR2K

1kg, 2kg

2kg

JR4KD

500g, 4kg

4kg

It is recommended that masses must
meet or exceed ASTM Class 1 Toler-
ance. Calibration masses are available
as accessories.

CALIBRATION MENU

CALIBRATION MENU

CALIBRATION MENU

CALIBRATION MENU

CALIBRATION MENU

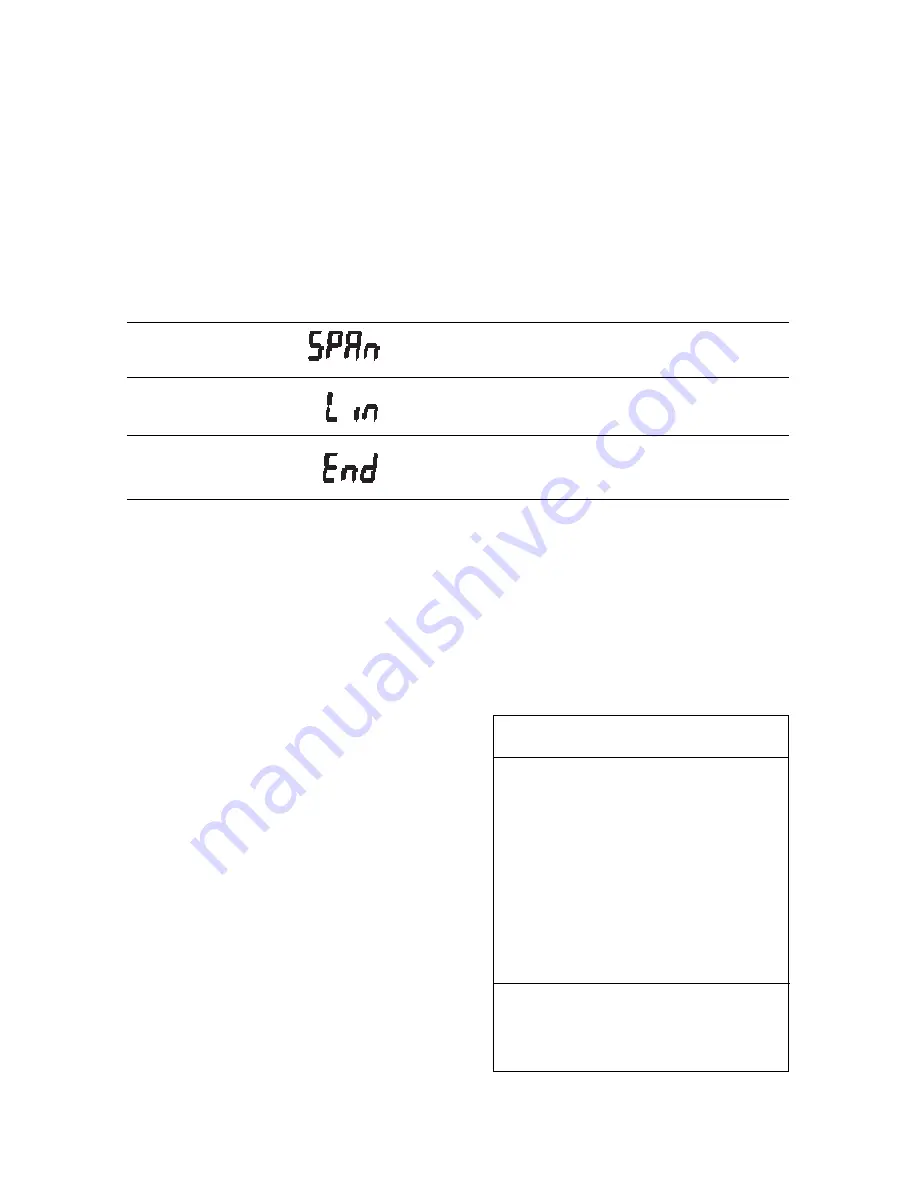
Precision Standard  balances can be calibrated in two ways: Span calibration or
Linearity calibration.  Span calibration resets the balance’s weighing range using two
weight values: zero and a weight value at or near the balance’s capacity.  Linearity
calibration minimizes deviation between actual and displayed weights within the
balance’s weighing range. Three weight values are used: zero, a weight value within
the balances weighing range, and a weight value at or near the balance’s specified
capacity.  The following table shows the sequence in which submenus appear on the
Calibration menu.

Calibration Weights

Calibration Weights

Calibration Weights

Calibration Weights

Calibration Weights

Before beginning calibration, make sure
weights are on hand.  If you begin calibra-
tion and realize weights are not available,
either turn the balance off, or go through
the procedure without weights. The bal-
ance will use previously stored calibration
data.  Calibration should be performed as
necessary to ensure accurate weighing.
Weights required to perform the proce-
dures are listed in the adjacent table.

Calibration Menu Protection

Calibration Menu Protection

Calibration Menu Protection

Calibration Menu Protection

Calibration Menu Protection

The calibration menu may be locked out to
prevent unauthorized personnel from
changing calibration. To lock out the cali-
bration menu, refer to section titled Menu
Lock-Out Protection.

NOTE

NOTE

NOTE

NOTE

NOTE: If calibration has been locked out,
you will not be able to access it.

CALIBRATION MENU TABLE

CALIBRATION MENU TABLE

CALIBRATION MENU TABLE

CALIBRATION MENU TABLE

CALIBRATION MENU TABLE

Selects span calibration.

Selects linearity calibration.

Used to exit the Calibration menu.

Summary of Contents for JR120

Page 1: ...Instruction Manual PRECISION Standard Electronic Balances JR Series Ohaus Corporation 29 Hanover Road Florham Park NJ 07932 0900 ...

Page 2: ... THIS EQUIPMENT IN A RESIDENTIAL AREA IS LIKELY TO CAUSE HARMFUL INTERFERENCE IN WHICH CASE THE USER WILL BE REQUIRED TO CORRECT THE INTERFERENCE AT HIS OWN EXPENSE THIS DIGITAL APPARATUS DOES NOT EXCEED THE CLASS A LIM ITS FOR RADIO NOISE EMISSIONS FROM DIGITAL APPARATUS AS SET OUT IN THE INTERFERENCE CAUSING EQUIPMENT STAN DARD ENTITLED DIGITAL APPARATUS ICES 003 OF THE DEPARTMENT OF COMMUNICATI...

Page 3: ... 8 OPERATION 9 Turning the Balance ON 9 Stabilization 9 Auto Range Models 9 Checking Calibration 10 Weighing 10 Taring 11 USING MENUS TO CONFIGURE THE BALANCE 12 CALIBRATION MENU 13 Calibration Menu Protection 13 Calibration Weights 13 Span Calibration 14 Linearity Calibration 15 End 16 USER MENU 17 User Menu Protection 17 Reset to Factory Defaults 18 Averaging Level 19 Stability Range 20 Auto Zer...

Page 4: ...Unit Selection 23 Lock Switch 24 End 25 MENU LOCK OUT PROTECTION 25 CARE AND MAINTENANCE 26 TROUBLESHOOTING 26 Error Codes 27 SERVICE INFORMATION 28 SPECIFICATIONS 29 PARTS INFORMATION 30 REPLACEMENT PARTS 30 ACCESSORIES 30 LIMITED WARRANTY 31 ...

Page 5: ...s contains a one piece solid state precision electronics PC board a seven digit LCD display which is 0 6 inches in height All Precision Standard series balances are factory set to measure in grams Each balance operates through a series of menus which enable precise calibration and linearity along with various other parameters which enhances operation A built in lock switch prevents preset settings...

Page 6: ...ncludes draft shield and snap clamp this instruction manual your warranty card It is recommended to save the carton and packing material for storing transporting the balance or returning it for service Round Pan Square Pan Pan Support AC Adapter Pan Support Precision Standard Balance Square pan and support for Models JR2K JR4K and JR4KD Round pan and support for Models JR120 JR200 JR400 JR600 and ...

Page 7: ...ment that generates magnetic fields On an unlevel work surface Draft Shield JR120 JR200 and JR400D Draft Shield JR120 JR200 and JR400D Draft Shield JR120 JR200 and JR400D Draft Shield JR120 JR200 and JR400D Draft Shield JR120 JR200 and JR400D To install the draft shield 1 Position the draft shield on top of the balance as shown Make sure the rib at the front of the draft shield base butts up again...

Page 8: ... Place the pan on the support making sure the guide pin is in serted in the hole in the pan support AC Adapter AC Adapter AC Adapter AC Adapter AC Adapter Plug the molded connector of the adapter into the receptacle at the rear of the bal ance Plug the adapter into a convenient AC outlet When power is applied to the balance it will begin a self test cycle During this time the display will count do...

Page 9: ...00D and JR4KD JR400D and JR4KD JR400D and JR4KD JR400D and JR4KD JR400D and JR4KD Auto range balances offer both a fine range lower capacity higher readability and a coarse range higher capacity lower readability When first turned on the bal ance is in the fine range It remains in this range until the weight on the pan exceeds the fine range capacity When weight on the pan is greater than the fine...

Page 10: ...libration shouldbechecked Thebalancehasbeen calibrated before shipment however it could be influenced by factors such as Variations in the earths gravitational field at different latitudes of the world Rough handling Changes in work location Height above sea level To check the balance s calibration place aknownmassonthecenterofthepanand read the displayed weight If the displayed weight differs fro...

Page 11: ... Its weight will be displayed 2 Press The display will show zero and the container s weight will be stored in memory 3 Add material to the container As ma terial is added its net weight will be displayed 4 Removing the container and material from the pan will cause the balance to display the container s weight as a negative number Tared weight remains in balance memory until is pressed again ON ON...

Page 12: ...splay menus which enable you to calibrate and configure the balance for your specific operating requirements Calibration Menu Calibration Menu Calibration Menu Calibration Menu Calibration Menu Used to calibrate the balance for span or linearity User Menu User Menu User Menu User Menu User Menu Used to adapt balance to environmental condtions Setup Menu Setup Menu Setup Menu Setup Menu Setup Menu ...

Page 13: ...es weighing range and a weight value at or near the balance s specified capacity The following table shows the sequence in which submenus appear on the Calibration menu Calibration Weights Calibration Weights Calibration Weights Calibration Weights Calibration Weights Before beginning calibration make sure weights are on hand If you begin calibra tion and realize weights are not available either t...

Page 14: ...ed on the pan NOTE NOTE NOTE NOTE NOTE Do not disturb the balance when C is displayed Disturbances will result in improper calibration 5 Place the required weight on the pan and press The display will show C while the balance recali brates 6 When the weight on the pan is dis played along with the current unit indicator the balance is recalibrated ON ON ON ON ON TARE TARE TARE TARE TARE ON ON ON ON...

Page 15: ... start the Linearity Cali bration Procedure When the is released C 0g will be displayed indicating that no weight should be in the pan 4 Press The display will show C followedbythevalueoftheweight which must be placed on the pan 5 Place the required weight on the pan ON ON ON ON ON TARE TARE TARE TARE TARE ON ON ON ON ON TARE TARE TARE TARE TARE OFF OFF OFF OFF OFF MODE MODE MODE MODE MODE ON ON O...

Page 16: ... followed by the next weight to be placed on the pan Do not disturb the balance when C is displayed Disturbances will result in improper calibration 7 Place the required weight on the pan then press The display will show C while the balance recali brates When the weight on the pan is displayed along with the current indi cator the balance is recalibrated ON ON ON ON ON TARE TARE TARE TARE TARE ON ...

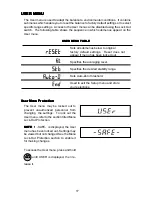
Page 17: ... menu has been locked out Specifies the averaging level Specifies the desired stability range Sets Auto Zero threshold Used to exit the Setup menu and store your selections User Menu Protection User Menu Protection User Menu Protection User Menu Protection User Menu Protection The User menu may be locked out to prevent unauthorized personnel from changing the settings To lock out the User menu ref...

Page 18: ...access a submenu 1 Repeatedly press until the de sired submenu is displayed 2 Press to select the displayed submenu NOTE NOTE NOTE NOTE NOTE You must use END to store any changes you make to the User menu The following sections describe each item on the User menu in detail OFF OFF OFF OFF OFF MODE MODE MODE MODE MODE ON ON ON ON ON TARE TARE TARE TARE TARE USER MENU USER MENU USER MENU USER MENU U...

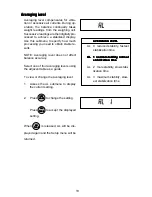
Page 19: ... submenu to display the current setting 2 Press to change the setting Press to accept the displayed setting When is released AL will be dis played again and the Setup menu will be returned AVERAGING LEVEL AVERAGING LEVEL AVERAGING LEVEL AVERAGING LEVEL AVERAGING LEVEL AL 0 reduced stability fastest stabilization time AL AL AL AL AL 1 normal stability normal 1 normal stability normal 1 normal stabi...

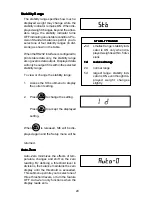
Page 20: ...isplayed setting When is released Stb will be dis played again and the Setup menu will be STABILITY RANGE STABILITY RANGE STABILITY RANGE STABILITY RANGE STABILITY RANGE 5d smallest range stability indi cator is ON only when dis playedweightiswithin 5divi sions 1d 1d 1d 1d 1d reduced range reduced range reduced range reduced range reduced range 2d normal range 5d largest range stability indi cator...

Page 21: ...memory if you use are only stored in memory if you use are only stored in memory if you use END END END END END To exit the User menu and store your settings press when End is dis played When is released the balance will be returned to normal weighing opera tions ON ON ON ON ON TARE TARE TARE TARE TARE AUTO ZERO AUTO ZERO AUTO ZERO AUTO ZERO AUTO ZERO OFF turns Auto Zero OFF 5d 5d 5d 5d 5d sets th...

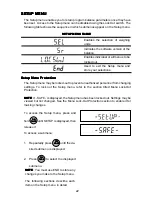
Page 22: ...o lock out the Setup menu refer to the section titled Menu Lock Out Protection NOTE NOTE NOTE NOTE NOTE If SAFE is displayed the Setup menu has been locked out Settings may be viewed but not changed See the Menu Lock Out Protection section to enable it for making changes To access a submenu 1 Repeatedly press until the de sired submenu is displayed 2 Press to select the displayed submenu ON ON ON ...

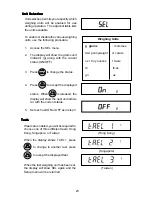
Page 23: ... accept the displayed status When is released the display will show the next unit indica tor with the current status 5 Set each unit ON or OFF as in step 3 Hong Kong Singapore Taiwan OFF OFF OFF OFF OFF MODE MODE MODE MODE MODE Taels Taels Taels Taels Taels If taels are enabled you will be required to choose one of three different taels Hong Kong Singapore or Taiwan When the display shows TAEL 1 p...

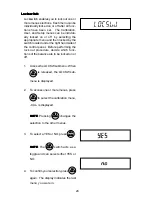
Page 24: ...or off 1 AccesstheLOCSWsubmenu When is released the LOCSW sub menu is displayed 2 To access one or more menus press to select the calibration menu CAL is displayed NOTE NOTE NOTE NOTE NOTE Pressing changes the selection to the other menus 3 To select a YES or NO press NOTE NOTE NOTE NOTE NOTE The switch acts as a toggle and can select either YES or NO 4 Toconfirmyourselection press again The displ...

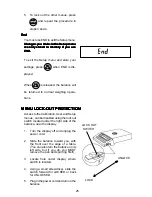
Page 25: ...n steps 3 and 4 OFF OFF OFF OFF OFF MODE MODE MODE MODE MODE ON ON ON ON ON TARE TARE TARE TARE TARE ON ON ON ON ON TARE TARE TARE TARE TARE MENU LOCK OUT PROTECTION MENU LOCK OUT PROTECTION MENU LOCK OUT PROTECTION MENU LOCK OUT PROTECTION MENU LOCK OUT PROTECTION AccesstotheCalibration User andSetup menus can be disabled using the lock out switch located under the right side of the balance near ...

Page 26: ...ngs not properly set up Cable connections Microprocessor lock up Lock set ON Vibration on table surface SYMPTOM Unit will not turn on Incorrect weight reading Unable to store menu settings changes RS232 interface not working when installed Random segments displayed or display locks up Unable to change settings Unstable readings Error message display REMEDY Check power adapter connections Press ON ...

Page 27: ...RS232 buffer is full if installed May occur if no printer or computer is connected to the interface To clear buffer turn balance off or enter Print menu and select END 4 5 Function is disabled by the Lock switch User Errors User Errors User Errors User Errors User Errors 7 2 Number outside of display capacity Over Under Load Errors Over Under Load Errors Over Under Load Errors Over Under Load Erro...

Page 28: ...ponent or in rare cases a severe static charge If error persists balance must be serviced 9 8 Hardware error causing invalid calibration data checksum Balance may need recalibration particularly linearity calibration If error persists balance must be serviced 9 9 Invalid temperature compensation checksum Balance will work with default temperature compensation data however error will occur each tim...

Page 29: ...07 0 001 0 007 0 01 0 07 0 01 0 07 Std dev g Linearity g 0 001 0 002 0 01 0 001 0 01 0 02 0 1 0 01 0 1 Tare range Full capacity by subtraction Stabilization time 2 5 seconds Sensitivity drift 10 30 C 10ppm C Operating temperature 50 to 104 F 10 to 40 C Calibration External digital calibration Display in cm LCD 0 6 1 5 high Power requirements AC adapter 100 120 220 240 V ac 50 60 Hz Platform size W...

Page 30: ...hase accessories please call Ohaus Corporation toll free at 800 526 0659 an Ohaus Product Parts Specialist will be available to help you ACCESSORIES ACCESSORIES ACCESSORIES ACCESSORIES ACCESSORIES OHAUS Part No In Service Cover 78211 02 Draft Shield Kit 76934 03 Chamber Size 6 0 W x 4 25 H x 6 375 D RS232 Interface Kit 77018 01 Cable for RS232 Interface AS020 17 Cable with PRINT switch for RS232 I...

Page 31: ...apply if the product has been damaged by accident or misuse exposed to radioactive or corrosive materials has foreign material penetrating to the inside of the product or as a result of service or modification by other than Ohaus In lieu of a properly returned warranty registration card the warranty period shall begin on the date of shipment to the authorized dealer No other express or implied war...

Page 32: ...Road ENGLAND Florham Park NJ 07932 USA Tel 44 0 1954 251343 Tel 973 377 9000 Fax 44 0 1954 250205 Fax 973 593 0359 With offices in Germany France Spain Italy Poland Canada Mexico and Japan P N 77331 05 R1197 Ohaus Corporation 1997 all rights reserved ...

Reviews: