background image

Ranger

 4000 Count Series                                                                                               EN 1 

1. INTRODUCTION 

This manual contains installation, operation and maintenance instructions for the 

Ranger™ 

Count 4000 Series. Please read the manual completely before using the scale. 
 

1.1  Definition of Signal Warnings and Symbols 

Safety notes are marked with signal words and warning symbols. These show safety issues and 
warnings. Ignoring the safety notes may lead to personal injury, damage to the instrument, 
malfunctions and false results. 

Signal Words  


WARNING 

For a hazardous situation with medium risk, possibly resulting in injuries or 


death if not avoided.


CAUTION 

for a hazardous situation with low risk, resulting in damage to the device or 


the property or in loss of data, or injuries if not avoided. 


Note 


(No symbol) 


For useful information about the product 

Warning Symbols   


General Hazard                                           Electrical Shock Hazard                   


Alternating Current 


1.2 Safety Precautions 

Please follow these safety precautions: 

  Verify that the AC input voltage printed on the data label matches the local AC power supply.  

  Only connect the power cord to a compatible grounded electrical outlet. 

  Do not position the scale such that it is difficult to disconnect the power cord from the power 

receptacle. 

  This scale is for indoor use only. 

  Use the scale in dry locations only. 

  Do not drop loads on the platform.  

  Make sure that the power cord does not pose a potential obstacle or tripping hazard. 

  Use only approved accessories and peripherals. 

  Operate the scale only under ambient conditions specified in these instructions. 

  Disconnect the scale from the power supply when cleaning. 

  Do not operate the scale in hazardous or unstable environments. 

  Do not immerse the scale in water or other liquids. 

  Do not place the scale upside down on the platform. 


Only use weights within the scale’s capacity as specified in these instructions. 


Service should be performed only by authorized personnel.


Summary of Contents for RC41M15-M

Page 1: ...Ranger 4000 Count Series Instruction Manual Manual_RC41_V1...

Page 2: ......

Page 3: ...azard Alternating Current 1 2 Safety Precautions Please follow these safety precautions Verify that the AC input voltage printed on the data label matches the local AC power supply Only connect the po...

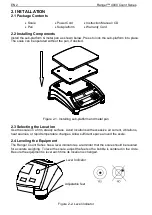
Page 4: ...al pan 2 3 Selecting the Location Use the scale on a firm steady surface Avoid locations with excessive air current vibrations heat sources or rapid temperature changes Allow sufficient space around t...

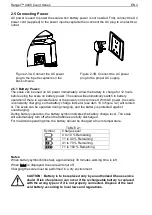
Page 5: ...eration the battery symbol indicates the battery charge level The scale will automatically turn off when the batteries are fully discharged For maximum operating time the battery should be charged at...

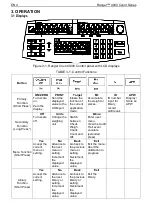
Page 6: ...s2 Off Turn scale off Units Change the weighing unit Switch between Check Weigh Check Count and Off Menu Enter user menu View the Audit Trail event counters extended press Menu Function Short Press Ye...

Page 7: ...ss and hold for more than 2 seconds TABLE 3 2 LCD Symbols Item Description Item Description 1 NET symbol 10 Low Sample Weight Symbol 2 Center of Zero symbol 11 Auto Optimization Symbol 3 Negative symb...

Page 8: ...active weighing mode To turn the scale off press and hold the On Zero Off button until OFF is displayed 3 3 Counting Ranger Count 4000 has three display areas Weight Piece Weight and Count informatio...

Page 9: ...teger 5 Press the Sample key will be displayed in both the piece window and the count window 6 The established APW and count will be displayed Entering a known APW 1 Press the APW key will be displaye...

Page 10: ...on the pan or in the container If the sample weight is under the target weight range the yellow LED will light If the sample is within the target weight range the green LED will light If the sample is...

Page 11: ...ly a different ID number may be selected using the keypad and then pressing the ID key Note Maximum 30 records from 0 to 29 Retrieving a record 1 Enter the ID number using the keypad and press the ID...

Page 12: ...nter the ID number using the keypad and press the ID key reCall and lib are displayed in the weight and piece weight windows respectively 2 Press the C key delete is displayed in the weight window Pre...

Page 13: ...o On Some units may not be available in all models When LEGAL FOR TRADE is set to ON LFT Switch in locked position the menu settings are affected as follows Calibration C A L menu is not accessible Du...

Page 14: ...te weighing results Before performing the calibration be sure to have the appropriate calibration weights as listed in table 4 1 Ensure that the LFT switch calibration lock is set to unlocked position...

Page 15: ...m 0 to 31 are available with 12 being the default Refer to table 4 2 to determine the GEO factor that corresponds to your location End Cal End Advance to the next menu or return to the top of the curr...

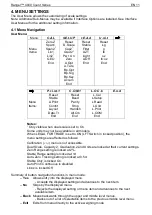
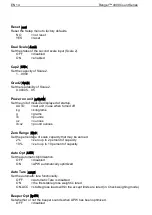
Page 16: ...f kg kilograms g grams lb pounds oz ounces lb oz pound ounces Zero Range ZErO Set the percentage of scale capacity that may be zeroed 2 zero up to 2 percent of capacity 10 zero up to 10 percent of cap...

Page 17: ...utton is pressed OFF no sound ON sound Accumulation aCCUmM Set the accumulation functionality OFF accumulation disabled AUTO automatic accumulation MAN manual accumulation End Setup End Advance to the...

Page 18: ...anges Auto off A OFF Set the automatic shut off functionality OFF disabled 1 powers off after 1 minute of no activity 5 powers off after 5 minute of no activity 10 powers off after 10 minute of no act...

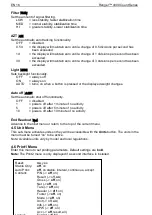
Page 19: ...time the stability criteria are met INTER printing occurs at the defined interval ACCEPT printing occurs continuously CONT printing occurs each time the display is within the Checkweigh accept range a...

Page 20: ...nted Info Set the status OFF disabled ON the reference information is printed APW Set the status OFF disabled ON enabled Accu Set the status OFF disabled RESULT the Accumulation result is printed ALL...

Page 21: ...l Notes For Windows 7 setup contact Ohaus If the weighing value is a negative number set the target cell in TEXT format Otherwise Excel will not distinguish it as a negative number Please do not use t...

Page 22: ...ng ON OFF XON XOFF software handshaking Alternate command Alt CmM Define command character for the Print Tare and Zero commands Print Set the alternate command character for Print A to Z Tare Set the...

Page 23: ...et the status OFF COM menu is not locked ON COM menu is locked End Lock End Advance to the next menu or return to the top of the current menu 4 9 End Menu Press Yes to advance to the Calibration menu...

Page 24: ...EN 22 Ranger 4000 Count Series Figure 4 1 Setup for the Weigh Below Hook Weigh Below Hook Access...

Page 25: ...2 11 42 19 43 26 17 16 16 15 15 14 14 13 13 12 12 43 26 44 32 17 17 16 16 15 15 14 14 13 13 12 44 32 45 38 18 17 17 16 16 15 15 14 14 13 13 45 38 46 45 18 18 17 17 16 16 15 15 14 14 13 46 45 47 51 19...

Page 26: ...s explained in Section 3 9 3 Set the switch to Locked See figure 5 1 The Menu Lock switch limits changes to the Cal Setup Readout Unit and Print menus The switch in type approved models may set some s...

Page 27: ...Ranger 4000 Count Series EN 25 Figure 5 1 Sealing Unlocked Locked with Paper Seal Locked with Wire Seal Paper Seal Wire Seal Lock Switch...

Page 28: ...wer On Error Weight reading below Power On Zero limit Err 8 3 Over Range Error Weight reading exceeds Overload limit Err 8 4 Under Range Error Weight reading below Underload limit Err 8 5 Tare out of...

Page 29: ...0 lb x 0 001 lb 480 ox x 0 02 oz 30 kg x 0 001 kg 30000 g x 1 g 60 lb x 0 002 lb 960 oz x 0 04 oz Maximum Displayed Resolution 1 30000 Minimum Recommended Sample Weight 2g 0 004lb 4g 0 01lb 10g 0 02lb...

Page 30: ...r unstable CP Continuous Print SP Print on Stability xS 0S Turn off Stable Only menu item and allow unstable print 1S Turn on Stable Only menu item and only print stable print xP Interval Print x Prin...

Page 31: ...he pin connections are as follows Active pins PIN 2 TXD PIN 3 RXD PIN 5 Ground Figure 7 2 RS232 Pins 7 4 Printouts The following sample print outs are generated by the Print button P Command or altern...

Page 32: ...iate left of most significant character if negative Unit Up to 5 characters left justified If the Unit in the Print Content menu was set to OFF the unit will be removed in the weight string and replac...

Page 33: ...turers work It comprises all tests according to the adopted European standard EN 45501 1992 paragraph 8 2 2 If national regulations limit the validity period of the verification the user of the weighi...

Page 34: ...e has been designed for safe removal of the batteries at end of life by a waste treatment facility Please dispose of this product in accordance with local regulations at the collecting point specified...

Page 35: ...has been damaged by accident or misuse exposed to radioactive or corrosive materials has foreign material penetrating to the inside of the product or as a result of service or modification by other th...

Page 36: ...edor del mundo Avec des bureaux dans le monde entier Weltweite Gesh ftsstellen Con uffici in tutto il mondo www ohaus com 30037454 P N 30037454A 2015 OHAUS Corporation all rights reserved todos los de...

Reviews: