background image


01/09/2006 


Page - 71 - 

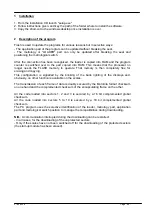
4  Updating an "application" file

 (without breaking the seal) 


4.1 Starting the Flash Loader program 
 

1- Connect the PC to the scales via the RS232 cable (000970540 RJ45/BD9pts F). 
2- Start the program by clicking on the FLASH icon. 
3- Choose the language at first.  
4- Choose the serial port of your PC. 
 

4.2 Connection

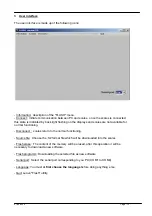
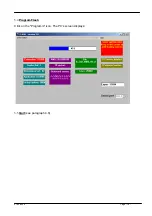
Click on "connect" icon to initiate communication between PC and scales . 
Back light display are then flashing. 
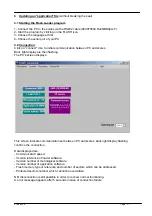
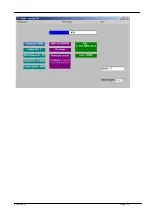
The PC's screen displays: 


This screen indicate communication set between PC and scales, back light display flashing 
confirms the connection. 
 
Data displayed are: 
- Communication speed. 
- Version reference of loader software. 
- Version number of metrological software. 
- Version number of appication software. 
- Flash memory type or reference and number of sectors which can be addressed. 
- Protected sectors number which cannot be overwritten.  
 
NB: disconnection is still possible in order to recover normal functioning. 
A error message appears after 5 seconds in case of connection failure. 

Summary of Contents for RI Series

Page 1: ...RI Series Maintenance manual Range 15 kg d 5g Range 6 kg d 2g...

Page 2: ...cell assembly on RI Series 28 8 2 Replacing the main board on RI Series 30 8 3 Replacing the switching power supply unit on RI Series 31 8 4 Replacing the flexible keyboard on RI Series 32 8 5 Replac...

Page 3: ...71208132 60 11 6 CPU front and rear displays cable ref 71207314 61 11 7 CPU board column display cable ref 71208142 62 11 8 Wired key cable ref 71207312 63 12 Networking 64 13 Error messages 65 14 Fla...

Page 4: ...l questions relating to the software are not treated in this manual but in the tutorial file HeliosEng chm This manual also lists the spare parts and sub assemblies available as standard from OHAUS in...

Page 5: ...y simple use 2 1 Metrological characteristics Only the weighing base is sealed an internal cable connects the sealed compartment to the main board Maximum range 15kg Minimum scale 5g Maximum tare 9 99...

Page 6: ...multiply non weighed articles 1 _ key Subtract 1 T key Tare request 1 ANN key Cancel an entry 1 PLU key Switch to PLU mode numerical inputs call up a PLU 1 PLU key Switch to Non PLU mode the numerical...

Page 7: ...s PLUs 12 function keys The direct PLU keys from 1 to 48 can be labelled Blank labels supplied with the scales fit into the areas delimited by the keys Programming keyboard on the opposite side of the...

Page 8: ...o an external battery 4 Check that there is a roll of thermal paper in the printer To do this swing the keyboard backwards Lift the keyboard assembly vertically and insert a roll of paper if necessary...

Page 9: ...Page 9 2 The keyboard membrane the keyboard grid the plate the casing and the display scales can be cleaned using a moist sponge and soap take care to switch off the machine before cleaning remove th...

Page 10: ...Maintenance manual RI Series 01 09 2006 Page 10 4 RI Series exploded views 4 1 Main shell equipped Ex Safety Metrology Approval Notice...

Page 11: ...ard to com board 71208130 10 Main board 71207283 12 Switching power supply 71207286 14 Display LCD 71207313 17 Cable battery pack to main board 71208144 18 Power switch 71208127 26 Complete printing m...

Page 12: ...01 09 2006 Page 12 4 3 Final assembly with rear display Marker Designation Article number 1 Top plate equipped 71207281 Ex Safety Metrology Approval Notice...

Page 13: ...01 09 2006 Page 13 4 4 Final assembly with tower display Marker Designation Article number 1 Top plate equipped 71207281 Ex Safety Metrology Approval Notice...

Page 14: ...6 Page 14 4 5 Fitted main shell Ex Safety Metrology Approval Notice Marker Designation Article number 1 Glass rear display Ohaus 72191975 3 128 x 128 LCD display 71207313 6 Cable front or rear display...

Page 15: ...006 Page 15 4 6 Fitted display column Ex Safety Metrology Approval Notice Marker Designation Article number 1 Glass rear display Ohaus 72191975 3 128 x 128 LCD display 71207313 4 Cable tower display 7...

Page 16: ...9 2006 Page 16 4 7 Motor support equipped Ex Safety Metrology Approval Notice Marker Designation Article number 3 Silicone roll 71208138 7 Paper IR sensor with cable 71208129 10 Rubber roll ring 71208...

Page 17: ...logy Approval Notice Marker Designation Article number 1 Equipped load cell support panel 2 Fitted load cell cross piece 3 Shim between load cell and plate support 4 Washer DEC M6 5 Screw TBHC M 6x40...

Page 18: ...Designation Article number 1 Keyboard silicone membrane 71207300 2 Intermediate sheet for keyboard nbr 1 71207302 2 Intermediate sheet for keyboard nbr 3 71208103 3 Foil film keyboard 71207301 4 Glass...

Page 19: ...01 09 2006 Page 19 4 10 Fitted adjustable foot Marker Designation Article number 1 Adjustable foot 71207299 2 Rubber pad 3 Self locking ring DIA22 4 Nut HM12...

Page 20: ...Page 20 4 11 Fitted electrical socket panel Marker Designation Article number 1 Mains filter 2 Bipolar switch 3 Electricity supply socket support panel 4 Screw TBHC M3X6 5 External battery 12v 24v fem...

Page 21: ...01 09 2006 Page 21 5 Seal...

Page 22: ...le 71208134 9 CPU board Internal battery cable 71208147 10 Battery switch cable 71208133 11 External battery socket cable 71208147 12 Power supply CPU board cable 71208132 31 Cash register cable 71208...

Page 23: ...w to check the main points Check list There are two possible cases The scales beep but nothing appears on the screen beeps after switching on the scales means the microprocessor starts the test proced...

Page 24: ...heck the place short circuited with an Ohmmeter Check the external battery power supply polarity reversed No Is the main board 71207283 faulty Yes Check that the power supply connectors J6 J17 J18 J21...

Page 25: ...tch is in calibration position No The scales displays the message UNKNOWN BASE Yes Yes Yes yes The scales displays the message METROLOG DIFFEREN The scales displays INCORR CALIB Non The scales display...

Page 26: ...g Check cable and connection print head CPU board Change the cable prnt head CPU board Vertical tracks black or white appears in the printing Yes Check connection CPU board pr head Change the c ble CP...

Page 27: ...ed Before you touch an electronic component you must discharge the static electricity from your body To do this touch something metallic connected to ground Organising the dismantling and reassembly C...

Page 28: ...e to the main shell Push the 2 load cell support feet 1 see drawing 29270077 upwards as indicated below Pull the load cell support and fitted cross piece assembly 5 see drawing 29270001 upwards and pl...

Page 29: ...lace the load cell A D board protector 3 see drawing 29270054 Tighten the three TBHC M3X6 screws 5 using the n 2 5 six sided spanner Replace the plate support cross piece 2 see drawing 29270077 and th...

Page 30: ...main board A D board cable in on the main board Replace the sensor support and fitted cross piece assembly 5 see drawing 29270001 Tighten the four TBHC M4X20 screws 6 see drawing 29270001 Tighten the...

Page 31: ...four EJOT PT WN1412 K30X10 screws Plug in the Power supply CPU board c ble and the mains cable Install the CPU board Tighten the four EJOT PT WN1412 K30X10 screws Plug in all the connectors thermal pr...

Page 32: ...drawing 29270000 Disconnect the keyboard membrane and remove it 4 see drawing 29270055 Assembly Clean the place for the flexible keyboard Carefully stick the new flexible keyboard 4 see drawing 29270...

Page 33: ...label them before you disconnect them Remove the thermal print head 2 see drawing 29270063 Assembly Install the new thermal print head 2 see drawing 29270063 Plug in the two cables connecting the ther...

Page 34: ...the CPU board J11 and J15 Remove the motor s power supply cable and the emitting cell cable Pull forwards on the two clips 7 see drawing 29270055 as indicated above Swing the fitted keyboard assembly...

Page 35: ...unit door 5 see drawing 29270051 Disconnect the Display unit main board connecting cable Assembly Plug the Display unit CPU board connecting cable into the new display unit Install the new display uni...

Page 36: ...d for calibration Press the Toggle Switch once in order to get the top position Install the fitted plate Switch on the scales The scales self test and after choosing menu 1 CALIBRATION display RANGE C...

Page 37: ...29270001 Press in the hole provided for calibration with the straightened paper clip once more in order to get the bottom position Stick on the sealing label 7 in drawing 29270077 Install the fitted p...

Page 38: ...LIBRATION 2 GEO CODE Choose 2 GEO CODE and then key the new GEO code according to the new destination of the scales validate by V key NB when GEO code is equal to zero it is impossible to modify it be...

Page 39: ...control signals P_Sect et P_Bat_Ext The battery pack is insulated by an electronic switch in order to save its energy Non interruptible power supply In case mains failure scales is automatically powe...

Page 40: ...01 09 2006 Page 40 On Off switch for internal and external batteries On Off switch for mains...

Page 41: ...ns and the New recharge option is YES and the batteries switch is in the ON position the internal battery pack recharges and the New recharge message changes to Recharge in progress If the batteries s...

Page 42: ...equency 47 440Hz EMI filter Protection against short circuits surges overloads Output voltage 15 20V by the SVR1 potentiometer Output current 3A The output voltage can be adjusted by the power supply...

Page 43: ...g calibration ST1 calibration switch calibration and updating of the protected sectors of the FLASH memory The A D board and the CPU board communicate using the SPI bus synchronous serial interface On...

Page 44: ...01 09 2006 Page 44 10 3 2 Electrical diagram 29120154...

Page 45: ...ored are customer totals Plu families header texts two level running totals Plu running totals family running totals seller running totals VAT running totals IC4 AM29LV800 512Kbytes X 16 is the FLASH...

Page 46: ...ture of the battery pack TP24 not used P_SECT mains voltage present P_BAT_EXT external battery voltage present IC24 IC26 and IC29 manage the keys on the keyboard All the logic circuits are supplied wi...

Page 47: ...ftware signal transmitted by the IC12 processor PULSECHARGE The average charging time is about 10 hours SAFT 11 elements 13 2V 2 8Ah The average charging current is 300mA R117 4 7Ohm The flashing of t...

Page 48: ...several electronic components serial output motor control etc It is created by the Q21 5V regulator LM2931 6 The 3 3V voltage VCC The 3 3V voltage supplies most of the microprocessor s logic circuits...

Page 49: ...1 0V 2 12V To int battery InT Ext To batt 1 12V 2 0V 3 CTN V_ALIM 17 74V 6 5V Internal battery charging current measure ment 300mA Key RAM back up voltage 2 4V To the cash register To the step motor T...

Page 50: ...01 09 2006 Page 50 10 4 7 Diagrams Main Board 71207283 1 6...

Page 51: ...01 09 2006 Page 51 Main Board 71207283 2 6...

Page 52: ...01 09 2006 Page 52 Main Board 71207283 3 6...

Page 53: ...01 09 2006 Page 53 Main Board 71207283 4 6...

Page 54: ...01 09 2006 Page 54 Main Board 71207283 5 6...

Page 55: ...01 09 2006 Page 55 Main Board 71207283 6 6...

Page 56: ...par tampon avec encre Trodat R f 7081 effectuer par le sous traitant To be marked by the sub contractor using a stamp with Trodat ink Ref 7081 Marquage au feutre ind l bile de la derni re dition ED d...

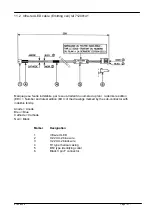
Page 57: ...plan la derni re dition ED Number and latest edition ED of the drawings marked by the sub contractor with indelible felt tip Anode Anode Bleu Blue Cathode Cathode Noir Black Marker Designation 1 Infr...

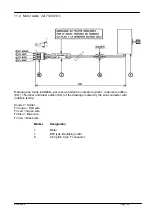
Page 58: ...n la derni re dition ED Number and latest edition ED of the drawings marked by the sub contractor with indelible felt tip Collecteur Collector Rouge Red Emetteur Emitter Noir Black Marker Designation...

Page 59: ...du plan la derni re dition ED Number and latest edition ED of the drawings marked by the sub contractor with indelible felt tip Souder Solder Fil rouge Red wire Fil vert Green wire Fil bleu Blue wire...

Page 60: ...Page 60 11 5 CPU board Power supply cable ref 71208132 Fil noir Black wire Fil rouge Red wire Marker Designation 1 2 54 pitch 6 pin connector 2 0 34mm black wire 3 0 34mm red wire 4 3 96 pitch 6 pin...

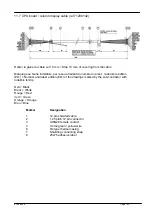
Page 61: ...ro du plan la derni re dition ED Number and latest edition ED of the drawings marked by the sub contractor with indelible felt tip Noir Black Blanc White Rouge Red Vert Green Orange Orange Bleu Blue...

Page 62: ...m ro du plan la derni re dition ED Number and latest edition ED of the drawings marked by the sub contractor with indelible felt tip Noir Black Blanc White Rouge Red Vert Green Orange Orange Bleu Blue...

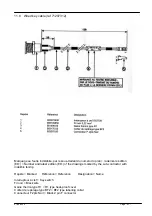
Page 63: ...umber and latest edition ED of the drawings marked by the sub contractor with indelible felt tip Rep re Marked R f rence Reference D signation Name Interrupteur clef Key switch Fil noir Black wire Gai...

Page 64: ...ards Connect the scales to each other via one of the two RJ45 sockets at the bottom using the Scales Scales connecting cable 96100391 up to a maximum of ten sets of scales Declare one set of scales th...

Page 65: ...able writes to the A D board EEPROM by the Write protect control input If the metrological switch is in the upper position when powering up the base recognition and metrological version checks are not...

Page 66: ...splay of a timed message PAPER e The PLUs checksums are checked An error causes the timed display PLU ERROR xxxx PLU xxxx has been found to be inconsistent with its checksum so each time that PLU is c...

Page 67: ...sulating frame on the other All the code loaded into sectors 1 2 and 3 is secured by a 16 bit complemented global checksum All the code loaded into sectors 5 to 19 is secured by a 16 bit complemented...

Page 68: ...THE PROGRAM 68 3 USER INTERFACE 69 4 FILE UPDATE 70 4 1 Starting the Flash Loader program 70 4 2 Connect 70 4 3 Source file 71 4 4 Erase Flash 72 4 5 Program Flash 74 4 6 Quit 75 5 UPDATING THE METRO...

Page 69: ...etely free for erasing and copying This configuration is signalled by the blinking of the back lighting of the displays and obviously no other function is available on the scales The transmission of e...

Page 70: ...or normal functioning Disconnect scales return to the normal functioning Source file Choose the S2 format file which will be downloaded into the scales Flash erase The content of the memory will be er...

Page 71: ...light display are then flashing The PC s screen displays This screen indicate communication set between PC and scales back light display flashing confirms the connection Data displayed are Communicati...

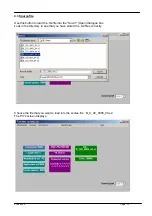
Page 72: ...this button to load the S2 file into the Ouvrir Open dialogue box Look in the directory to see that you have stored the S2 files correctly Choose the file that you want to load into the scales Ex B_C_...

Page 73: ...s button to erase the contents of the Flash memory application Click on the button The PC s screen displays To transfer the application file from the PC to the scales click on the Yes button The progr...

Page 74: ...01 09 2006 Page 74...
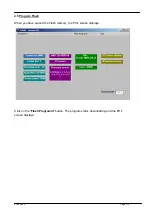
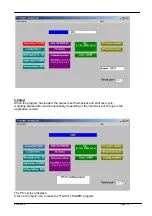
Page 75: ...01 09 2006 Page 75 4 5 Program Flash When you have erased the Flash memory the PC s screen displays Click on the Flash Programm button The program starts downloading and the PC s screen displays...

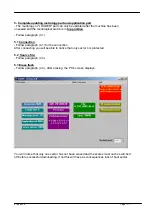
Page 76: ...as loaded the scales reset themselves and start test cycle Updating scales data could be necessary depending of the importance of change in the application version The PC s screen displays Click on th...

Page 77: ...5 1 Connection Follow paragraph 4 1 for the connection After connecting you will be able to notice that only sector 4 is protected 5 2 Source file Follow paragraph 4 3 5 3 Erase flash Follow paragraph...

Page 78: ...01 09 2006 Page 78 5 4 Program Flash Click on the Programm icon The PC s screen displays 5 5 Quit see paragraph 4 6...

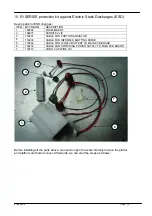
Page 79: ...1 CABLE FOR PHOTOTRANSISTOR 4 153230 CABLE FOR INFRARED EMITTING DIODE 5 153242 CABLE FOR 12V 24V BATTERY TO MAIN PCB BOARD 6 153233 CABLE FOR SWITCHING POWER SUPPLY TO MAIN PCB BOARD 7 133412 CONN CL...

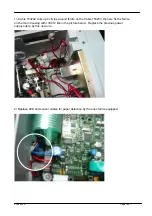
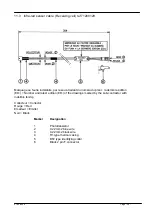
Page 80: ...around ferrite on the Cable 153233 then we fix the ferrite on the main housing with 133412 like in the picture below Replace the previous power supply cable by this new one 2 Replace LED and sensor ca...

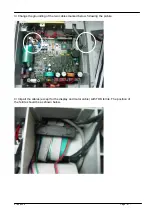
Page 81: ...ge 81 3 Change the grounding of the two cables marked below following the picture 4 Clip all the cables except for the display and motor cable with TDK ferrite The position of the ferrite should be as...

Page 82: ...01 09 2006 Page 82 5 Put the foam into the plastic cavity as shown below Be sure the foam and TDK ferrite are placed properly 6 Assemble the bottom cover...

Page 83: ...d r glable 71207299 Adjustable foot Coque clavier 71207280 Keyboard shell Clip clavier 71208136 Keyboard clip Pack batterie NIMH 13 2V 3Ah 71207297 Pack battery NIMH 13 2V 3Ah Clavier avec nappe 71207...

Page 84: ...s at the collecting point specified for electrical and electronic equipment If you have any questions please contact the responsible authority or the distributor from which you purchased this device S...

Reviews: