

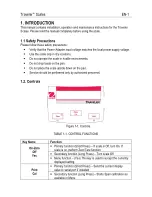


Traveler
™
Scales
EN-5
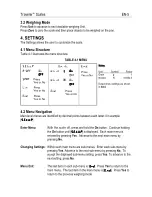
3.2 Weighing Mode
Press
Unit
to advance to next available weighing Unit.
Press
Zero
to zero the scale and then place objects to be weighed on the pan.
4. SETTINGS
The Settings allows the user to customize the scale.
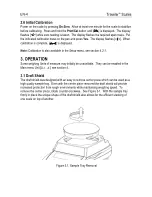
4.1 Menu Structure
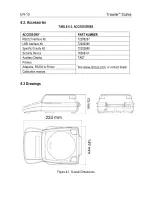
Table 4-1 illustrates the menu structure.
TABLE 4-1 MENU
4.2 Menu Navigation
Main level menus are identified by decimal points between each letter, for example
[
S.E.t.U.P
S.E.t.U.P
S.E.t.U.P
S.E.t.U.P
].
Enter Menu:
With the scale off, p
ress and hold the
On
button. Continue holding
the
On
button until [
S.E.t.U.P
S.E.t.U.P
S.E.t.U.P
S.E.t.U.P
] is displayed. Each main menu is
entered by pressing
Yes
. Advance to the next main menu by
pressing
No
.
Changing Settings:
Within each main menu are sub-menus. Enter each sub-menu by
pressing
Yes
. Advance to the next sub-menu by pressing
No
. To
accept the displayed sub-menu setting, press
Yes
. To advance to the
next setting, press
No
.
Menu Exit:
The last item in each sub-menu is [
EnD
EnD
EnD
EnD
]. Press
Yes
to return to the
main menu. The last item in the main menu is [
E.n.D
E.n.D
E.n.D
E.n.D
]. Press
Yes
to
return to the previous weighing mode.
S.e.t.u.p
A-Off
On
OFF
OFF
OFF
OFF
SpaN
Press
Yes or No
Lin
Press
Yes or No
End
Press
Yes or No
U.n.i.t.
U.n.i.t
g
On
On
On
On
OFF
U.n.i.t
N
On
OFF
OFF
OFF
OFF
End
Press
Yes or No
E.n.d.
Press
Yes or No
Notes:
Notes:
Notes:
Notes:
Unit
Symbol
Factor
Gram
g
1
Newton
N
9.806e-3
Default menu settings are shown
in
bold.


