CHAPTER 4 TESTING
Ohaus Corporation www.ohaus.com
4-2
Valor
™
7000 Series Service Manual
4.4 Performance Tests
Accurate performance of the Valor 7000 scale is determined by a series of four performance
tests. The displayed readings are compared with the tolerances listed for each test in Table
1-2. Tolerance values are expressed in counts. A one-count difference is shown in the last digit
on the scale display.
NOTE:
The following performance tests are used to evaluate scale operation before and
after repairs. The scale must meet the requirements specified in each test as well
as the other specifications listed in Table 1-1. Before proceeding with the
following tests, the scale should be calibrated. (See Appendix A and B.)
4.4.1 Precision Test
The Precision Test measures the Standard Deviation of a set of similar weight readings, which
should match the specification for each model, listed in Table 1-1.
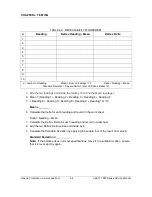
1. Power on the balance. The reading on the display should be 0g.
2. Select a mass weighing near the maximum capacity of the balance, and place it on
the center of the Pan. Observe and record the reading.
3. Remove the mass. The reading should return to 0g ±2 count.
4. Repeat this test three times. The reading should be within ±2 count of the reading
recorded. If so, the balance passes the Precision Test.
5. If the deviation for any set of readings (using the same mass placed on the center of
the Pan) is greater than ±2 d, the balance does not meet the precision specification.
Inspect and correct the following areas:
–
Check for mechanical obstructions. Any foreign object touching any part of the
moving assemblies will cause a balance to fail the Precision Test. Inspect and
correct as necessary.
–
If the scale does not meet specifications, move it to a suitable location, ensure
that it is level, and try again. If it still does not meet specifications, perform a
service calibration, and try again. (See Appendix B for Service Calibration.)


