© 2019 THE OILGEAR COMPANY - ALL RIGHTS RESERVED
Bulletin 948034A
16
Bulletin 948034A
PUMP SERVICE MANUAL
DRIVE SHAFT GROUP
Check:
• the shaft bearing
(306)
for galling, pitting,
binding or roughness.
• the rear shaft bushing in valve plate.
• the shaft and its splines for wear. Replace
any parts necessary.
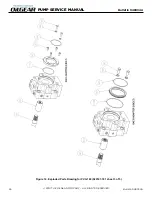
1. Press shaft seal
(007)
into the saddle
(216)
.
2. Align hole in bottom of saddle
(216)
with pin
(217)
in housing. Install saddle in housing and
fasten with eight (8) screws
(225)
.
3. Place housing on a bench with the mounting
flange side down.
4. Grease the back side of each saddle bearing
(204A
and
204B)
and install on the appropriate
side of the saddle
(216)
.
5. The swashblock is inserted from the valve plate
end. Insert swashblock
(201)
into the pump
housing. Once in place, be sure the swashblock
swivels in the saddle bearings. With new
bearings, swiveling may be stiff and not always
smooth.
If removed,
ASSEMBLY
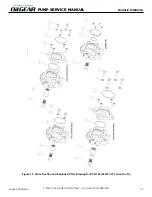
See
Figures
and
. Follow the disassembly
procedures in reverse for re-assembling the pump.
During assembly, install new seals and O-rings.
Apply a thin film of CLEAN grease or hydraulic
fluid to sealing components to ease assembly. If a
new rotating group is used, lubricate thoroughly
with CLEAN hydraulic fluid. Apply fluid generously
to all wear surfaces.
Hydrodynamic Bearing
If the hydrodynamic bearing was removed, a new
one will need to be pressed into the pump housing.
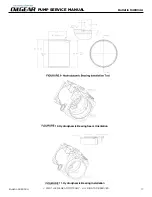
A special tool is required in order to press the
bearing in correctly, See Figure 9. From the valve
plate end, place the new bearing into the pump
housing. Adjacent to where the bearing will be
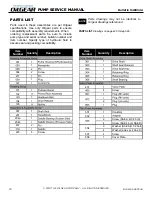
pressed is a slightly larger bore, with a lead-in
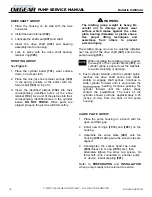
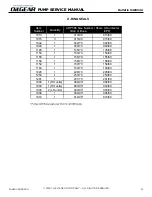
chamfer, see Figure 11. In preparation for pressing,
insert the bearing into this bore and verify it sits
flush. Orient the bearing so that the split in the
bearing is located 90 degrees clockwise from the
control mounting face, See Figure 10. Insert the
small diameter end of the pressing tool inside the
pump housing and into the bearing. Press the
bearing until the tool becomes flush with the valve
plate mounting surface.


