background image

Marking

Function

Position,

ECO

Position,

CUBE


Default

Upon

delivery

Default

Upon

delivery

F1

Compressor’s motor

protection circuit breaker

ON

ON

ON

ON

F2

Electric immersion heater fuse

N/A

OFF

ON

ON

F3

Control fuse (automation

system fuse)

ON

ON

ON

ON

F4

Fuse shared by the unit’s pumps

ON

ON

ON

ON

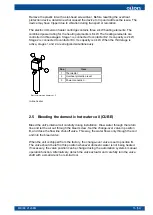
2.3 Outdoor temperature sensor (CUBE, ECO)

The outdoor temperature sensor (TE0) is supplied already connected to its sensor

cable (TE0–W1). Install the sensor during the heat pump’s installation.

Extend the cable if necessary.

● Use a regular insulated copper twin cable for connecting the cable and extending

the cable.

● Select the cross-sectional area of the wires by consulting the table below.

● Join or splice the cable ends in a way that causes no additional electrical resistance

in the wires. Protect the joint against moisture and oxidation.

Cable length (m)

40

60

80

120

Wire cross-sectional area (mm

2

)

0.50

0.75

1.0

1.5

Install the sensor outside the building with the sensor cable gland pointing downwards.

● Place the sensor in a position where the prevailing outdoor temperature can be

measured as accurately as possible.

● Make sure that the sensor is not exposed to solar radiation or heat from the

building.

Even though the sensor housing is protected against dust and water spray (IP65,

provided that the cable gland is pointed downwards), it is advisable to install the unit in

a location that is covered from rain. A good place for the sensor would be, for example,

under the eaves in a shady spot on the north wall of the building.

The type of the outdoor sensor is NTC 10 kΩ. The sensor’s β value is 3,435 K. Any

corresponding 10 kΩ NTC sensor can be used as an alternative. The sensor’s β value

can be changed from the unit’s automation settings.

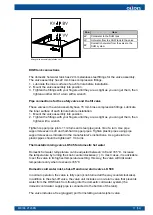
2.4 In-line heater (CUBE, ECO)

CUBE heat pumps are equipped with an in-line heater in the condenser line (label:

EB203). In ECO models, the in-line heater is optional.

M8006 2123EN

13 (54)

Summary of Contents for CUBE 10 EasyAce

Page 1: ...M8006 2123EN 10 June 2021 CUBE and ECO INSTALLATION AND COMMISSIONING...

Page 2: ......

Page 3: ...18 2 8 DHW tank sensor ECO 18 2 9 Electrical connections covers and cable management 19 2 10 Pipe joints 20 2 11 Removing the compressor unit from the frame CUBE 20 3 Heating circuits 3 1 Buffer tank...

Page 4: ...6 4 Condenser circuit flow 47 6 5 Brine circuit flow 47 6 6 Pumps 48 6 7 EU Product Data 51 2 54 M8006 2123EN...

Page 5: ...A ECO 21 EasyAce ECO2107 R 410A 1 2 Instructions and diagrams Document Designation CUBE and ECO Installation and commissioning M8006 This manual ECO and CUBE Electric diagram 34793610 110974 ECO Pipin...

Page 6: ...sfer the refrigerant for recycling or disposal as required by applicable laws rules and regulations The refrigerant is heavier than air The refrigerant may accumulate in enclosed spaces especially at...

Page 7: ...ake it easier to carry and move the unit The unit can be carried short distances by the side bars If necessary the compressor unit can be detached from the frame of the heat pump before carrying or ti...

Page 8: ...valve Install the valves in the heat pump s brine and heating water connections 4 34033361 Shut off valve ver 1 Compressor fitting 28 mm 1 external thread CUBE install the parts in heating circuit con...

Page 9: ...circuit 2 flow temperature OA OA P221 Heating circuit 2 pump OA OA FV222 Heating circuit 2 control valve OA OA TE223 Room temperature 2 OA OA HEATING CIRCUIT 3 TE232 Heating circuit 3 flow temperature...

Page 10: ...ead brass Intended use Sensor pocket for buffer tanks and heating circuits Compatible equipment 36217266 Accessory Heating circuit control valve actuator 3 point 230 V Designation 36962089 Description...

Page 11: ...034063 Accessory Thermostatic mixing valve assembly Designation 34034069 Description Thermostatic mixing valve for domestic hot water LK 545 22 AquaMix 090195 domestic cold water inlet shut off and no...

Page 12: ...ount the unit securely in a vertical position onto its own leveling feet Level the machine using the machine s leveling feet Maintenance and access clearance The system must include shut off valves th...

Page 13: ...BE CUBE EasyAce ver 1 measurements in the image are in millimeters H Domestic hot water from storage tank C Cold domestic water to storage tank 22 mm steel pipe WI Heating water inlet return WO Heatin...

Page 14: ...The unit s switchboard is located behind this cover HUB Connection device for EasyAce Behind a transparent panel Torx T25 ECO A042037 ver 2 measurements in the image are in millimeters WI Heating wate...

Page 15: ...80 120 Wire cross sectional area mm 2 0 50 0 75 1 0 1 5 Install the sensor outside the building with the sensor cable gland pointing downwards Place the sensor in a position where the prevailing outdo...

Page 16: ...g into position 3 Tighten the fitting with your fingers until it is as tight as you can get it then tighten another 1 2 turns with a wrench General instructions If the heater has been installed and en...

Page 17: ...heater ver 2 Pos Item 1 Thermostat 2 Overheat protection reset 3 Power connection In line heater 2 5 Bleeding the domestic hot water coil CUBE Bleed the unit s internal coil carefully during installat...

Page 18: ...ater LK 545 22 AquaMix 090195 domestic cold water inlet shut off and non return valve LK 508 AquaNode 22 090025 fill valve LK 536 ThermoFill EA EN 1717 safety valve LK 514 MultiSafe 090116 10 bar Inte...

Page 19: ...rench Tighten copper pipe joints 1 1 4 turns and steel pipe joints 3 4 of a turn Use pipe support sleeves in soft and half hard copper pipes Tighten plastic pipes using pipe support sleeves as indicat...

Page 20: ...hut off valve on the safety valve s discharge side is not allowed 2 7 Change over valve ECO optional Accessory Change over valve kit Designation GEOEXCV1 Description Includes a change over valve and v...

Page 21: ...or splice the cable ends in a way that causes no additional electrical resistance in the wires Protect the joint against moisture and oxidation 2 9 Electrical connections covers and cable management D...

Page 22: ...ection at the other end of the pipe may become loose 2 11 Removing the compressor unit from the frame CUBE The compressor unit can be detached for easier moving carrying or servicing To avoid injuries...

Page 23: ...er s EB203 corrugated hose Detach the hose by turning the freely rotating nut while keeping the hose from rotating from the other side When connecting or disconnecting the hoses be careful not to twis...

Page 24: ...nstalling the sensor in section Buffer tank sensor 3 2 Buffer tank sensor CUBE ECO ECO heat pumps come with the buffer tank temperature sensor TE255 already connected In CUBE heat pumps the sensor is...

Page 25: ...ternal diameter must be suitable for the sensor probe s diameter Use only metallic sensor pockets that won t corrode to any significant degree from the outside or the inside over time The air gap betw...

Page 26: ...wnstream from the circulation pump If the sensor is too close to the valve its readings will be inaccurate and placing the sensor too far downstream will cause harmful control delay Attach the sensor...

Page 27: ...rement is disabled by default The unit has a built in condenser return temperature sensor TE201 but the sensor is not connected to the switchboard The sensor can be connected to the terminals occupied...

Page 28: ...ncludes other connection options Enabling the control valve Enable the valve from Initial setup settings see chapter Commissioning or from Heating settings see the table below Enable the valve by sele...

Page 29: ...ignation 36962089 Description Esbe ARA651 12101200 3 point SPDT 230 V 3 wires 60 s 90 Valve 34034065 34034067 34034068 34034467 When making connections pay attention to the valve s control direction T...

Page 30: ...Inverted setting enabled DIP switch 6 ON Signal Control direction Rotation direction Increases Closed less heat Counterclockwise CCW Decreases Open more heat Clockwise CW 0 V open 10 V closed Inverte...

Page 31: ...button repeatedly until you circle around again The button has a button lock unlock and lock the button by pressing and holding it for 10 seconds The pump has several different operating modes In mos...

Page 32: ...ECO or in the upper part of the heat pump frame CUBE 24 V input from the heat pump 230 V input from the building s distribution board Documents Electric diagram 34793611 110992 manual 34793612 The au...

Page 33: ...oning process Once the process is complete hand the wireless touch screen over to the end customer 1 Switch on the wireless touch screen by pressing the power button 2 Start the EasyAce app Start the...

Page 34: ...setup The Initial setup settings menu contains the basic settings required during the commissioning process Go through the settings during installation Once the settings are complete hide the Initial...

Page 35: ...e value should be set to 20 25 C Max flow temperature The maximum flow temperature when the outdoor temperature matches the Design outdoor temperature setting The system will keep the flow temperature...

Page 36: ...witched on Increase the delay if you wish to move forward the point at which the next power stages will be switched on to provide supplementary heating in parallel with the compressor and the first st...

Page 37: ...w 5 C freezing protection 2 An alarm prevents the compressor from starting backup operation In backup use space heating takes precedence over heating domestic hot water Select this option if the fuse...

Page 38: ...e bounds of its operating envelope there is a short delay between switching off the compressor and switching on the heater Select this option if the fuse for the heat pump power supply is not rated fo...

Page 39: ...and is provided for reference only Weather Zones FInland ver 1 Weather zone in Finland Design outdoor temperature C I 26 II 29 III 32 IV 38 References L mmitys ja ilmanvaihtolaitteiden suunnittelun n...

Page 40: ...ly between the tank and the heat pump If the heating system includes a buffer tank each heating circuit has its own pump Another case where a heating circuit has its own pump is when the system has no...

Page 41: ...erature Domestic hot water tank heating will start when the DHW tank temperature minus the switching difference falls below the domestic hot water target temperature Domestic hot water heating will st...

Page 42: ...Hz PE 6 8 10 13 17 21 Dimensions and weight Width mm 525 525 525 525 525 525 Depth mm 562 562 562 562 562 562 Height mm 655 655 655 655 655 655 Empty weight kg 126 128 129 140 145 150 Electric immersi...

Page 43: ...l electric immersion heater as standard yes yes yes yes Heater output kW 6 6 6 6 Heater power stages pcs 3 3 3 3 Output for each heater stage kW 2 2 2 2 Soft starter Soft starter as standard yes yes y...

Page 44: ...Dimensions ECO dimensions Pos Dimension Pos Dimension W 525 a 123 D 562 b 464 H 655 c 430 d 503 42 54 M8006 2123EN...

Page 45: ...irculates in a coil DHW is stored in and supplied from the tank Volume L 185 Domestic hot water plate heat exchanger no Domestic hot water coil yes Thermostatic mixing valve assembly as standard no Th...

Page 46: ...sible operating pressure bar 10 Storage tank s material stainless acid proof steel LDX 2101 EN 1 4162 Coil material AISI 316L EN 1 4404 Clearance required for lifting the unit upright CUBE Clearance f...

Page 47: ...2088 2088 Refrigerant charge g 650 900 1100 1250 2000 2100 Refrigerant charge kg 0 65 0 90 1 10 1 25 2 00 2 10 Refrigerant charge CO2 equiv kg 1357 1879 2297 2610 4176 4385 Refrigerant charge CO2 equ...

Page 48: ...2 7 2 8 2 9 2 9 2 9 3 0 Compressor electric power active power kW 1 9 2 5 3 2 4 1 5 4 6 4 Electric current taken by the compressor A 3 4 4 3 5 4 6 9 9 1 10 6 Brine 0 C 3 C and water 55 C 65 C B0 W65 H...

Page 49: ...4 6 3 1 CUBE m 6 5 6 3 5 1 4 2 6 5 Brine circuit flow Check that the brine circuit pump has a sufficient capacity before placing an order for and installing a heat pump If necessary install an additio...

Page 50: ...ss ECO kPa 9 10 11 20 12 17 CUBE kPa 10 12 15 17 Internal pressure loss expressed in terms of pump head ECO m 1 0 1 1 1 2 2 2 1 3 1 8 CUBE m 1 1 1 2 1 5 1 8 Pump head for external pressure loss ECO m...

Page 51: ...Pump curves Wilo Yonos PARA GT 7 5 Grundfos UPMXL GEO 25 125 M8006 2123EN 49 54...

Page 52: ...STRATOS PARA 1 12 P V VARIABLE Fluid being pumped ethanol content 28 fluid temperature during operation 1 5 C viscosity 7 66 mm 2 s density 970 kg m 3 Wilo Stratos Para 1 12 external control mode via...

Page 53: ...led or maintained 1 1 1 1 1 1 STANDARD RATING CONDITIONS BRINE 0 3 C WATER 47 55 C COLDER AND WARMER CLIMATE CONDITIONS j total rated heat output of heat pump and supplementary heater under colder cli...

Page 54: ...ssembled installed or maintained 1 1 1 1 STANDARD RATING CONDITIONS BRINE 0 3 C WATER 47 55 C COLDER AND WARMER CLIMATE CONDITIONS k total rated heat output of heat pump and supplementary heater under...

Page 55: ...BELOW BRINE 0 3 C Outdoor temperature 7 C flow 52 C Pdh kW 5 2 6 9 9 3 11 8 15 6 19 4 Outdoor temperature 2 C flow 42 C Pdh kW 5 4 7 2 9 7 12 4 16 4 20 4 Outdoor temperature 7 C flow 36 C Pdh kW 5 6 7...

Page 56: ...tilting lifting carrying or moving the unit Always pay attention to electrical safety when working with or near electrical components Always switch off electricity using the main switch and ensure th...

Page 57: ......

Page 58: ...OILON GROUP P O Box 5 FI 15801 LAHTI FINLAND Tel 358 3 85 761 Fax 358 3 857 6239 Email info oilon com www oilon com Contact information of Oilon dealer Date of installation...

Reviews: