background image

GB-3

5. Before use

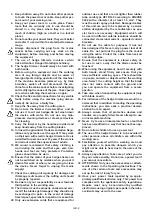
Mounting the bow-type handle 

(Fig. 1)

The bow-type handle must be pulled over the blade sys-

tem from below as shown in Fig. 1 and then set into the 

relief of the hedge shears housing. In doing so, one must 

not push the two parts of the bow-type handle together. 

To fix the bow-type handle the two included screws must 

be screwed into the threadings in the housing through 

the openings of the handle and fastened tightly. 

Handguard 

(Fig. 2)

Slide  the  handguard  onto  the  handguard  plate  at  the 

front  side  of  the  housing  until  it  effectively  locks  into 

place.

Power connection

The machine can only be connected to a single-phase 

a.c.  current  connection.  The  machine  is  protectively 

insulated  in  accordance  with  classification  II  of  VDE 

0740. Before using the machine ensure that the mains 

current  agrees  with  the  operating  voltage  data  on  the 

machine’s identification plate.

Power Circuit Breaker:

Machines  which  will  be  used  in  different  outside 

locations  must  be  connected  to  a  Power  Circuit 

Breaker.
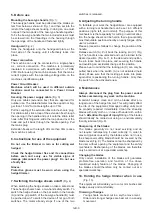
Securing the power supply cable

 (Fig. 3)

Only  use  cables  (extension  flex)  that  are  approved  for 

outdoor use. The cable diameter must be equal to or big-

ger than 1.5mm² for cable lengths up to 75m.
Put the coupling of the extension flex onto the shears‘ plug. 

For strain relief, stick a loop of the extension flex through 

the opening in the handle and put it onto the strain relief 

hook. After finishing work, slide the loop ahead over the 

hook and pull it back through the handle opening. Pull 

the mains plug.
Extension flexes with a length of more than 30m reduce 

the machine’s output.

6. Instructions for use of the equipment  

Do  not  use  the  trimmer  in  rain  or  for  cutting  wet 

hedges!
Check  the  hedge  trimmer  flex  and  its  connections 

before  each  and  every  use  for  visible  signs  of 

damage  (disconnect  the  power  plug)!    Do  not  use 

a faulty flex.
Gloves:

Protective  gloves  must  be  worn  when  using  the 

hedge trimmer.

7. Switching the hedge shears on/off


(Fig. 4)


When switching the hedge shears on take a safe stand. 

These hedge shears have a two-hand safety switch. To 

switch the hedge shears on the bar switch in the handle 

(A) and the grip switch of the bow-type handle (B) must 

be pushed down.


To switch the device off let go of both 

switches.  The  motor  already  stops  if  one  of  the  two 

switches is released.   

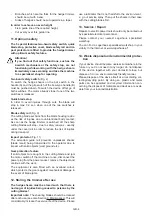
8. Adjusting the turning handle

To  facilitate  your  work  the  hedgetrimmer  are  equipped 

with a turning rear handle that can be set in 3 different 

positions  (right,  left,  and  normal).  The  purpose  of  this 

mechanism is that especially for cutting in vertical direc-

tion the hedge shears can be held in their ergonomically 

most favourable position whereby an early fatigue of the 

user is avoided.

Please proceed as follows to change the position of the 

handle:

Release  switch  (A).  Pull  back  the  locking  pin  (C)  (Fig. 

5). The handle is now unlocked and can be turned to the 

desired position (Fig. 6+7). In the desired end position, 

the  pin  locks  back  into  place  and  securing  the  handle 

and avoiding an accidental change of the position.

Please bear in mind that the locking pin (C) can only be 

pulled  back  when  the  switch  (A)  is  not  activated  (held 

down).  Make sure that the locking  pin locks into place 

again  after  repositioning  the  turning  handle.  Only  then 
the switch can be activated anew.

9. Maintenance

Always disconnect the plug from the power socket 

before commencing any work on the machine.

Important:  Always  clean  and  oil  the  blades  after  pro-

longed use of the hedge trimmer. This will greatly affect 

the  life  of  the  equipment.  Damaged  cutting  units  must 

be  properly  repaired  immediately.  Clean  the  shearing 

blades with a dry cloth or – in case of heavier dirt – with a 

brush. 

Attention: Danger of injury!

Oiling of the blades 

should  ideally  be  carried  out  using  an  environmentally 

friendly lubricant (Fig. 8).

Sharpening of the blades

The  blades  generally  do  not  need  servicing  and  do 

not  require  resharpening  if  used  correctly.  In  order  to 

prevent injuries caused by the blades when not in use, 

the  sharpened  cutting  blade  should  be  covered  by  the 

blade cover (Fig. 9). The blades cannot be sharpened by 

the user without opening the equipment and the safety 

mechanism.  Resharpening  of  the  blades  can  therefore 

only be carried out at a specialist workshop.

Changing the blades

Only  correct  installation  of  the  blades  will  guarantee 

problem-free  operation  and  function  of  the  above 

mentioned  safety  feature  of  the  blades.  Changing  of 

the  blades  should  therefore  only  be  carried  out  at  a 

specialist workshop. 

10.  Holding  the  hedge  trimmer  when  in  use 

(Fig. 10)

This equipment will enable you to cut or trim bushes and 

hedges easily and comfortably.

Trimming of hedges

-  Young shoots are best cut in a scythe move ment.

-  Older and stronger hedges are best cut in a sawing 

movement.

Summary of Contents for HSD 700 Prof

Page 1: ...ioni perl utilizzo Istruzioni per l uso IT Gebrauchsanweisung Vor Inbetriebnahme Gebrauchsanweisung lesen DE Operating Instructions Read operating instructions before use GB Lire attentivement le mode d emploi avant chaquemise en service FR Manuel d utilisation ...

Page 2: ...2 1 1 3 ...

Page 3: ...4 6 7 5 2 A A A A C B B ...

Page 4: ...8 mm 8 9 10 3 ...

Page 5: ...tzschild 4 Netzleitung mit Stecker 5 Sicherheitsmesserbalken 6 Anstoßschutz 7 Verriegelung Drehgriff FR 1 2 Interrupteur maniement à 2 mains 3 Bouclier de protection 4 Câble de secteur avec connecteur 5 Couteaux de sécurité 6 Butée de protection 7 Verrouillage de la poignée tournante GB 1 2 Operating switches two hand operation 3 Hand guard 4 Mains flex with plug 5 Blade safety rail 6 Impact protec...

Page 6: ...one protezione dell ambiente Questo apparec chio non può essere smaltito con la spazzatura dome stica con rifiuti non riciclabili Consegnare l apparecchio vecchio esclusivamente in un punto di raccolta pubblico DE 1 Augen und Gehörschutz tragen 2 Warnung 3 Gebrauchsanweisung lesen 4 Dieses Elektrowerkzeug nicht dem Regen aussetzen 5 Bei Beschädigung oder Durchschneiden der An schlussleitung sofort ...

Page 7: ...chtigungen der Maschine und anderer Sachwerte entstehen Achtung Beim Gebrauch von Elektrowerkzeugen sind zum Schutz gegen elektrischen Schlag Verlet zungs und Brandgefahr folgende grundsätzlichen Sicherheitsmaßnahmen zu beachten Lesen und beachten Sie alle diese Hinweise bevor Sie dieses Elektrowerkzeug benutzen Bewahren Sie die Si cherheitshinweise gut auf Maschine nur in technisch einwandfreiem ...

Page 8: ...hre Verantwortlichkeit als Benut zer gegenüber Dritten im Arbeitsbereich 19 Die Schere ist sachgemäß zu warten und zu überprüfen Die Messer dürfen bei Beschädi gung nur paarweise ausgewechselt werden Bei Beschädigung durch Stoß ist fachmännische Überprüfung unumgänglich 20 Verwenden Sie nur Verlängerungsleitungen die für den Außengebrauch zugelassen sind und die nicht leichter sind als Gummischlau...

Page 9: ...eckenschere Abb 4 Zum Einschalten der Heckenschere nehmen Sie bitte einen sicheren Stand ein Diese Heckenschere hat eine 2 Hand Sicherheitsschaltung Zum Einschalten der Heckenschere muss die Schalterleiste im Handgriff A sowie der Schaltgriff im Bügelgriff B gedrückt werden Zum Ausschalten lassen Sie beide Schalter wieder los Der Motor schaltet bereits bei Loslassen einer der bei den Schalter ab 8...

Page 10: ...ückgesetzte Schneidmesser vermindert die Verletzungsgefahr durch unbeabsichtigte Körperberührung Sobald die Maschine ausgeschaltet ist stoppt das scharfe Schneidmesser aus Sicherheits gründen bündig unter dem Kamm sodass Verletzungen beim Transport weitgehend ausgeschlossen sind Anstoßschutz Abb 11 Die überstehende Führungsschiene verhindert beim Anstoßen an einen festen Gegenstand Wand Boden usw ...

Page 11: ... de porter préjudice à la machine et à d autres objets Attention En utilisant des outils électriques il faut observer les règles fondamentales de sécurité sui vants pour vous protéger contre commotion électri que danger de blessures et danger de feu Veuillez lire et observer tous ces instructions avant d utiliser cet outil électrique Conservez les règles de sécurité à une place sûre Employer uniqu...

Page 12: ...ité à l égard de tiers dans la zone de travail 19 Le taille haie est à entretenir et à vérifier Les la mes doivent uniquement être échangées de paire En cas de détérioration par chocs l inspection par un spécialiste est indispensable 20 N utilisez que des câbles de rallonge autorisés pour l emploi à l extérieur ils ne doivent en aucun cas être plus légers que les câbles en caoutchouc H07 RN F confo...

Page 13: ...ail 7 Brancher et éteindre le taille haies Ill 4 Pour mettre le taille haie en marche prenez une posi tion sûre Ce taille haies est équipé d un couplage de sécurité à 2 mains Pour brancher le taille haie appuyer sur la réglette de commutation dans la poignée à main A et sur la poignée de commutation dans la poignée étrier B Pour éteindre la machine relâchez les deux poignées Le moteur s éteint déj...

Page 14: ... par un contact involontaire Dès que la machine est debranchée le couteau coupant s arrête instantanément à cause de raisons de sécurité exactement audessous de la came Pour cela les bles sures pendant le transport sont presque exclues Butée de protection ill 11 La tringle de guidage qui dépasse évite que l utilisateur ne reçoive des coups désagréables recul du couteau provoqués lorsque l outil to...

Page 15: ...vi per l utente oppure terzi ma anche rischi di danneggiamento della macchina o di cose Attenzione Con l impiego di utensili elettrici e per prevenire contatti di corrente elettrica ferimenti e pericolo di incendio devono sempre essere osservate le seguenti indicazioni di sicurezza Legga e osservi tali indicazioni prima di utilizzare l apparecchio e conservi bene le presenti norme Conservare con c...

Page 16: ...non possa essere acceso inavvertitamente Disinse rire assolutamente la spina di rete 17 La lama di taglio deve essere ispezionata ad con regolarità per identificare eventuali danni Se qualsiasi danno fosse stato identificato la lame di taglio deve essere riparata a regola d arte 18 Assumete la Vostra responsabilità quali utenti dell apparecchio nei confronti di terze persone possibilmente entrate ne...

Page 17: ...di lunghezza superiore a 30 m com porta una riduzione del rendimento della macchina 6 Istruzioni sull uso Non impiegare le cesoie con pioggia oppure per il taglio di siepi umide Controllare prima di ogni uso il cavo delle cesoie e le connessioni onde assicurarsi che non vi siano difetti apparenti tirare la spina Sostituire i cavi difettosi Guanti Si raccomanda insistentemente di indossare guanti d...

Page 18: ...si arresta dopo di aver liberato uno dei due elementi di comando entro max 0 2 secondi IT 4 Barra di lame di sicurezza Figura 9 La lama nella sua posizione rientrata dal pettine riduce il rischio di ferite da un contatto involontario con il corpo Appena l utensile viene disinserito le lame di taglio per motivi di sicurezza si posizionano sotto le lame a pettine in modo che durante il trasporto non...

Page 19: ...ety conscious manner for suitable applications in a technically perfect condition only and with due regard to the operating instructions Immediately rectify or have rectified any faults which could adversely affect safety This machine may cause serious injuries Please read the instruction manual carefully as to the correct handling the preparations the maintenance and the proper use of the hedgetri...

Page 20: ...the blades get damaged they should only be exchanged in pairs In the event of damage from impact specialist s inspection is essential 20 Only use extension cords that are approved for outdoor use and that are not lighter than rubber tube cords type H07 RN F according to DIN VDE 0282 with a diameter of at least 1 5 mm2 They must be water spray protected Damaged cables of this unit are only to be re...

Page 21: ...wo switches is released 8 Adjusting the turning handle To facilitate your work the hedgetrimmer are equipped with a turning rear handle that can be set in 3 different positions right left and normal The purpose of this mechanism is that especially for cutting in vertical direc tion the hedge shears can be held in their ergonomically most favourable position whereby an early fatigue of the user is ...

Page 22: ...e recoil being transmitted to the operator due to impact with solid objects wall ground etc Gear protection feature If solid objecst are caught in the cutting blade and jam the motor switch off the machine at once disconnect the power plug from the power socket remove the object and continue with the work The equipment is also fitted with an overload cutout which protects the gears against mechanic...

Page 23: ...que Ikra GmbH Représentant pour la conformité CE Mogatec GmbH La documentation technique est conservée par Gerhard Knorr Kärcherstraße 57 DE 64839 Münster EG Konformitätserklärung entsprechend der EG Maschinenrichtlinie 98 37 EG Wir ikra GmbH Schlesier Straße 36 D 64839 Münster Altheim erklären in alleiniger Verantwortung dass die Heckenschere HSD 700 Profi HS 6707 Okay auf die sich diese Erklärung...

Page 24: ...bH Maintenance of technical documentation Gerhard Knorr Kärcherstraße 57 DE 64839 Münster Dichiarazione CE di Conformità ai sensi della direttiva macchine 98 37 EG Noi ikra GmbH Schlesier Straße 36 D 64839 Münster Altheim dichiara sotto la propria responsabilità che gli tagliasiepi HSD 700 Profi HS 6707 Okay é conforme ai Requisiti Essenziali di Sicurezza e di Tutela della Salute di cui alle Dirett...

Page 25: ... sont à la charge du client FR Warranty For this electric tool the company provides the end user independently from the retailer s obligations resulting from the purchasing contract with the following warranties The warranty period is 36 months beginning from the hand over of the device which has to be proved by the original purchasing document For commercial use and use for rent the warranty peri...

Page 26: ...alzburg Tel 0043 662 468 68100 Fax 0043 662 468 68105 AT DE Zentral Genossenschaft eG Lauterbergstraße 1 D 76137 Karlsruhe Tel 0049 721 352 1325 Fax 0049 721 352 1324 Landi Schweiz AG Schulriedstrasse 5 CH 3292 Dotzigen Tel 0041 32 352 0111 Fax 0041 32 352 0270 CH ...

Reviews: