background image

B710 B720 B730 User’s Guide > 114

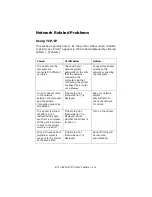
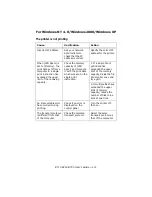
For Windows NT 4. 0/Windows 2000/Windows XP

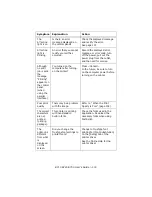
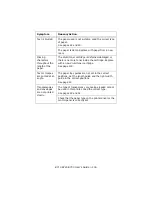
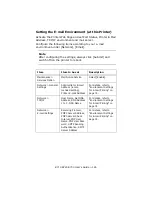
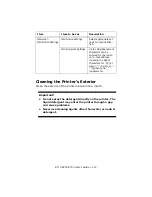
The printer is not printing

Cause

Verification

Action

Incorrect IP address. 

Ask your network 
administrator to 
check that the IP 
address is correct. 

Specify the correct IP 
address for the printer. 

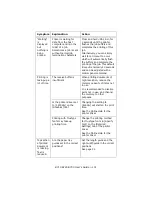
When [LPD Spool] is 
set to [Memory], the 
print data sent from a 
computer in a single 
print instruction has 
exceeded the upper 
limit of the receiving 
capacity. 

Check the memory 
capacity of [LPD 
Spool] and compare 
it with the print data 
which was sent in the 
single print 
instruction. 

1. If a single file of 
print data has 
exceeded the upper 
limit of the memory 
capacity, divide the file 
into smaller ones and 
try again. 

2. If multiple files have 
exceeded the upper 
limit of memory 
capacity, reduce the 
number of files to be 
sent at one time. 

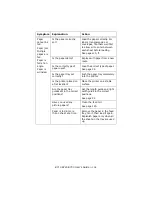
An irrecoverable error 
has occurred during 
printing. 

Check if an error is 
displayed on the 
control panel. 

Turn the printer off, 
then on. 

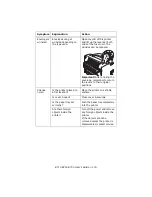
The transport protocol 
is different from that 
of the computer. 

Check the selected 
transport protocol. 

Select the same 
transport protocol as 
that of the computer. 

Summary of Contents for B710

Page 1: ...User s Guide 59322001 my okidata com B710 B720 B730...

Page 2: ...iOS Device 16 Security 16 User Controls 17 Print Media 18 Paper Exit Paths 18 Top Exit Path 18 The Rear Exit Path 19 Loading Standard Paper 20 Usable Media 24 Custom Sizes 25 Configuring Custom Sizes...

Page 3: ...0 Admin User Flash Menu 61 Admin Disk Menu 62 Admin Compact Flash Menu 63 Admin Spooling Menu 63 Admin Job Accounting Menu 64 Admin Change Password Menu 64 Admin Maintenance Menu 64 Print Features 65...

Page 4: ...ality is Poor 104 Error Messages alphabetical order 107 Network Related Problems 112 Using TCP IP 112 For Windows NT 4 0 Windows 2000 Windows XP 114 Using Printer Web Page 115 E Mail Related Problems...

Page 5: ...B710 B720 B730 User s Guide 5 Appendix A 141 PCL Emulation Symbol Sets 141...

Page 6: ...all reasonable efforts have been made to make this document as accurate and helpful as possible we make no warranty of any kind expressed or implied as to the accuracy or completeness of the informat...

Page 7: ...Computer Virus Oki is not responsible for any breakdown of units due to infection of computer virus Class I Laser System This product is a Class I Laser System that does not emit dangerous laser beam...

Page 8: ...orts lists from the printer Indicates items such as hard buttons and indicators on the keyboard and printer Important Notes Cautions Warnings Important Indicates important information which you should...

Page 9: ...mples of items that may be illegal to copy or print in your country Currency Bank notes and checks Bank and government bonds and securities Passports and identification cards Copyright material or tra...

Page 10: ...ront View 1 Default output tray pages exit print side down 2 Control panel 3 Ventilation hole do not block 4 Tray 1 150 sheets 5 Tray 2 550 sheets 6 Paper meter amount of paper left in Tray 2 7 Power...

Page 11: ...B710 B720 B730 User s Guide 11 Rear View 1 Power cord connector 2 Parallel connector 3 Network connector 4 USB connector 5 Serial connector 6 Duplex unit connector 7 Ventilation holes...

Page 12: ...artridge Contains the toner and the photosensitive drum 2 Transfer roll cartridge Transfers the toner image on the surface of the photosensitive drum to the paper 3 Fuser unit Fixes the toner on the p...

Page 13: ...u 4 Down Arrow Menu mode press to navigate down in the menu screen listings 5 On Line Press to switch back and forth between on line Ready to Print and Off line status When Off line the machine cannot...

Page 14: ...Menu Mode For configuring settings related to the printer This screen appears when you press the Enter button For more information on the menu mode see page 44 No Name Description 1 LCD display Displ...

Page 15: ...ode is 10 Watts or less Exiting the Power Save Mode The printer automatically exits from Power Save mode once it receives data or if any key on the operator panel is pressed The time required to exit...

Page 16: ...the currently displayed web page using Safari press the Action button and then the Print button You will see the Printer Options dialog Press the Printer button to select the desired printer from the...

Page 17: ...nly these users will be allowed to print If this feature is not in use and thus there are no authorized users then the printer will allow any user to print as it does prior to the addition of the AirP...

Page 18: ...Guide 18 Print Media_________________ Paper Exit Paths Before sending a job to the printer make sure you have the correct exit path engaged Top Exit Path The default path is the top exit bin 1 Printed...

Page 19: ...cial media such as labels card stock envelopes etc This provides the straight through path needed to prevent curling and jams Printed documents exit face up To use the rear exit be sure the exit lever...

Page 20: ...er which works well with this product 1 Pull the tray out and place it on a flat surface 2 If installed remove the lid Paper name Weight Paper type FX P 17 lb US Bond 64 g m2 Plain Xerox 4024 20 lb US...

Page 21: ...B720 B730 User s Guide 21 3 If the base plate of the paper tray is raised push it down 4 When loading paper longer than A4 size slide the left and right lock tabs in the paper tray outwards to unlock...

Page 22: ...the grip of the paper tray and pull its extendable part to the front until it reaches its maximum 6 Squeeze the length guide and slide it to the desired paper size 1 Squeeze the right width guide and...

Page 23: ...th guide with the paper width correctly If the right width guide is not in place this may cause paper jams Do not load paper exceeding the maximum fill line or the maximum capacity allowed 8 Firmly cl...

Page 24: ...ter rain or vapor For details contact service Tray Media Sizes Weight Capacity Tray 1 Standard sizes that can be automatically detected A5 B5 A4 Executive 7 25 10 5 Letter 8 5 11 Legal 8 5 13 Legal 8...

Page 25: ...ll Custom sizes must be fed print side up and short edge first Tray 1 Minimum 3 x 5 inches 76 x 127 mm Maximum 8 5 x 34 4 inches 216 x 900 mm Tray 2 or optional trays 3 and 4 Minimum 3 9 x 5 8 inches...

Page 26: ...ze See the description of Express Print for an easy way to print on various Custom Sizes Caution When setting the paper size in the printer driver and control panel be sure to specify the same size as...

Page 27: ...ession lowest to highest is Transparency Thin Thick3 Normal Thick1 Thick2 Media Fuser Setting Exit Path Transparency Transparency Rear only Pre Punched Normal Top or Rear Letter Head or Pre Printed No...

Page 28: ...ssible to damage your printer by using unsupported transparencies Examples of transparencies which work well with this printer Note Transparencies with white frames and full color transparencies canno...

Page 29: ...B710 B720 B730 User s Guide 29 2 Remove the tray from the printer 3 If installed remove the lid...

Page 30: ...B710 B720 B730 User s Guide 30 4 Remove all paper from a tray before loading transparencies 5 Fan the stack of new transparencies before putting them in the tray...

Page 31: ...B710 B720 B730 User s Guide 31 6 Adjust the paper guides to fit the transparencies 7 Insert the transparencies into the tray...

Page 32: ...elect the Transparency Media Type and correct Media Size for the tray to be used 10 In the printer driver or the computer application program select Transparency as the media type you wish to use Impo...

Page 33: ...The heat from the fuser can melt some adhesives and possibly damage your printer Envelopes can be printed from all trays Usable standard sizes COM10 COM9 C5 Monarch DL All other envelope sizes must b...

Page 34: ...B710 B720 B730 User s Guide 34 2 Remove the tray from the printer 3 If installed remove the lid 4 Remove all paper from a tray...

Page 35: ...be placed with the flap toward the right side of the printer C5 with the flap on the short edge must be placed with the flap edge feeding into the printer Do not load more than 15 envelopes in Tray 1...

Page 36: ...inter Labels can be printed from any tray Caution Use labels that were designed for use in laser printers The heat from the fuser can melt some adhesives and possibly damage your printer 1 Make sure t...

Page 37: ...B710 B720 B730 User s Guide 37 2 Remove the tray from the printer 3 If installed remove the lid 4 Remove all paper from the tray before loading labels...

Page 38: ...B710 B720 B730 User s Guide 38 5 If needed adjust the guides to fit the label sheets 6 Insert the label sheets in the tray...

Page 39: ...abel sheets in Tray 1 or more than 290 sheets in Tray 2 and optional trays 3 and 4 Do not fill any tray above the fill line marked inside the tray 7 Reinstall the lid and insert the tray firmly into t...

Page 40: ...ted on before including color printing Wrinkled folded or torn paper Wet paper Curled paper Paper with static electricity Adhesive paper Paper with special coatings Treated colored paper Paper using i...

Page 41: ...cument If there are multiple trays that match the criteria for automatic tray selection a tray is selected based on the printer s Tray Priority as set using the printer s web pages Note If there are n...

Page 42: ...Media Check in regard to paper size To force a specific paper size disable Auto Resize in the printer menu under Admin Setup Print Menu Express Print To use Express Print you must disable Media Check...

Page 43: ...Store paper at a temperature of 50 to 86 F 10 to 30 C at relative humidity of 30 to 65 away from direct sunlight flat not on its edge bent or curled preferably in a cabinet After opening a ream of pap...

Page 44: ...press Enter Note Menus and submenus may or may not be displayed depending on the options installed Printing a Menu Map The Menu Map provides a listing of all the current settings in the printer menu...

Page 45: ...or panel Print Jobs Menu Configuration Page Counts Supplies Life Network Wireless System Information Menus Menus Tray Configuration Sys Config Menu Admin Setup Network Menu Wireless Setup Print Menu P...

Page 46: ...Drive The file selected for printing must be one of the following formats Supported PDF PCL5 PCL6 FX80 or PostScript Generic text such as a txt file Size of PDF files to be printed is limited by avail...

Page 47: ...ters Printer Name IP Address Subnet Mask Gateway Address Network Address Network Version Submenus Example Resettable Usage Counter 123456 Yes Page Counter 123456 No Toner Page Count 123456 Yes Fuser C...

Page 48: ...hard disk drive is installed Compact Flash if compact flash is installed Information Menu Provides printouts of printer settings for various printing functions Submenus Description Print Usage Report...

Page 49: ...e Tray1 Auto Sense must be off to use this feature Tray1 Media Type Plain Transparency Pre punched Letterhead Colored Preprinted Bond Label Card Stock Postcard Envelope Thick 1 Thick 2 Thick 3 Thin Ot...

Page 50: ...n Off Tray3 Papersize Letter B5 A5 A6 Statement Executive C5 Envelope DL Envelope Com10 Envelope Monarch Envelope Com9 Envelope Oficio Legal13 Legal14 A4 Custom Note Tray3 Auto Sense must be off to us...

Page 51: ...off to use this feature Tray4 Media Type Plain Transparency Prepunched Letterhead Colored Preprinted Bond Label Card Stock Postcard Envelope Thick 1 Thick 2 Thick 3 Thin Other Tray4 X Dimen 3 88 8 50...

Page 52: ...r supported languages Display Contrast 1 to 5 Default is 3 Print PS Errors On Off Print Density 1 to 7 Default is 4 Tray1 X Adjust 0 to 15 Default is 8 Tray1 Y Adjust 0 to 15 Default is 8 Tray2 X Adju...

Page 53: ...o scroll between a z and 0 9 When the desired character is displayed press Enter to advance to the next character position To go back a digit press Back When all desired characters have been entered p...

Page 54: ...l IP Address user specified Subnet Mask user specified Gateway Address user specified Factory Default Execute DNS Enable Disable WINS Enable Disable Web Enable Disable SNMP Disable SNMP v1 v2 SNMP v1...

Page 55: ...lable Settings WPS PIN Connect Enter PIN on Access Point WPS PBC Connect Push WPS Button on Access Point Select Network Choose from list of discovered nets Remove Network Choose from list of remembere...

Page 56: ...nus Available Settings Personality Auto Emulation PCL PostScript 3 FX Copies 1 999 Duplex On Off Duplex Bind Long Edge Short Edge Auto Resize Enable Disable Media Check Enable Disable Resolution 600 d...

Page 57: ...8 100 00 Default is 10 00 Symbol Set Default is PC 8 see Appendix A for a complete list of all the available symbol sets CR Function CR CR LF LF function LF LF CR A4 Print Width 78 Columns 80 Columns...

Page 58: ...Set Set 1 Set 2 Symbol Set Default is PC 8 Available Symbol Sets Zero Char Slashed Normal Line Pitch 6 LPI 8 LPI CR Function CR CR LF Line Length 80 Column 130 Column Form Length 11 inch 11 7 inch 12...

Page 59: ...1200 2400 4800 9600 19200 38400 57600 115200 Data Bits 8 7 Stop Bits 1 2 Parity None Even Odd DTR Ready Busy Off On DTR On Off Off On DTR Error Off On RTS Ready Busy Off On RTS On Off Off On RTS Error...

Page 60: ...led PS Protocol ASCII RAW Submenus Available Settings Month January thru December Default is current month Day 1 to 31 Default is current day Year 2000 2099 Default is current year Hour Midnight 1 AM...

Page 61: ...on Data Security On Off When set to ON as data is deleted the location where the data was stored is overwritten by random data When set to OFF the data is deleted Print Reads and prints the selected f...

Page 62: ...escription Data Security When set to ON as data is deleted the location where the data was stored is overwritten by random data When set to OFF the data is deleted Print Reads and prints the selected...

Page 63: ...e data was stored is overwritten by random data When set to OFF the data is deleted Print Reads and prints the selected file from Compact Flash Delete This selection will delete the selected file or d...

Page 64: ...ce type SubMenu Available Settings Enabled Yes No Print Info Execute Submenus Available Settings Description Menu Reset Execute Restore the panel settings to Factory Default Save Menu Execute Saves th...

Page 65: ...Version 1 6 directly from a standard USB flash drive without any connection to a host computer The size of PDF files to be printed is limited by available space in the printer s standard user flash me...

Page 66: ...sired file Note The BACK button may be used to return from a sub directory to the parent directory to exit the Print option 7 You will be prompted to enter the number of Copies for the print request t...

Page 67: ...are stored in the printer for future printing For example you might use this to store a frequently used form The document will remain there until the expiration date you specify or until you delete it...

Page 68: ...e type in a name for the job 7 Under Job PIN enter your 6 digit password and click OK 8 For Stored Secure Print and Proof and Print enter the job expiration date use zero if you do not wish the job to...

Page 69: ...d returns to the Ready to Print state Secure Print Jobs The printer processes the job prompts you to delete it then returns to the Ready to Print state Proof and Print Jobs The printer prints one copy...

Page 70: ...l 7 Press Enter delete the job or press Cancel to abort the delete Printing on Banners Banners up to 35 4 inches 900 mm long by up to 8 5 inches 216 mm wide can be printed from Tray 1 Loading Banner P...

Page 71: ...B710 B720 B730 User s Guide 71 3 If the base plate of the paper tray is raised push it down 4 Slide the left and right lock tabs in the paper tray outwards to unlock them...

Page 72: ...710 B720 B730 User s Guide 72 5 Hold the grip of the paper tray and pull its extendable part to the front until it reaches its maximum 6 Squeeze the right width guide 1 and slide it to the banner widt...

Page 73: ...of available space in the printer s memory If you are printing large files you may need to install either the optional Compact Flash or Hard Disk option Note You may not be able to print some PDF fil...

Page 74: ...ctronic Mail E mail Printing Models with the optional Hard Disk Drive or Compact Flash installed can receive and print e mails sent directly from your computer via TCP IP communication including e mai...

Page 75: ...w to send e mails from the computer to the printer using Outlook Express as an example 1 Create mail contents using your mailing software and attach any TIFF or PDF files Important Only text format ca...

Page 76: ...the user is not always connected to the network a telephone charge will be incurred every time this printer retrieves data regularly from the mail server Connect the printer to an private IP address F...

Page 77: ...e Printing Bar Codes are supported for PCL5 Internal Bar Codes Code 128 Code 3 of 9 Interleaved 2 of 5 UPC EAN Postnet Supported Software Generated Bar Codes UPC EAN Code 128 EAN UCC 128 PostNet Inter...

Page 78: ...feed in the Printer Properties in the driver When Tray 1 is set to Manual mode you must press ENTER to print each sheet Collating When you are printing multiple copies of a multi page document the pr...

Page 79: ...n the form of a small book Cover Sheet The printer enables you to choose a different paper source for the cover sheet of a document This allows you to use a different stock and or color paper for the...

Page 80: ...ou can add room on a page to allow for binding without modifying the document in the authoring application Poster Printing If you have a large page image that can not be printed on the available paper...

Page 81: ...arate from the previous print job The Offset Catch Tray must be installed to use this feature Once installed this feature is enabled by default Print Quality You can adjust quality settings including...

Page 82: ...ll pages or only the first page Predefined COPY DRAFT and CONFIDENTIAL watermarks are provided in the driver You can view these by clicking on their name in the Watermark Pane of the Watermark Window...

Page 83: ...ngs for specific documents use your Printer Properties options within the driver Note Any setting you make in the application from which you are printing will override settings in the Embedded Web Ser...

Page 84: ...B710 B720 B730 User s Guide 84 The EWS home page for the Model B730 printer is shown below The various functions are accessed through the menu on the left side of the page...

Page 85: ...in the printer can cause a fire If a sheet of paper is wrapped around the heat roller or when clearing a jammed sheet that is difficult or impossible to see do not try to remove it by yourself Doing s...

Page 86: ...B710 B720 B730 User s Guide 86 Paper Jams Inside Cover A 1 If the optional offset catch tray is installed lift it out of the way A...

Page 87: ...B710 B720 B730 User s Guide 87 2 Open Cover A 3 Holding the drum toner cartridge by the grip remove it from the printer 1...

Page 88: ...B710 B720 B730 User s Guide 88 4 Turn the roll 2 and remove any jammed paper inside 5 Put the drum toner cartridge back in the printer...

Page 89: ...de 89 6 Close Cover A 7 If installed lower the offset catch tray to its original position Caution If you continue to print with the offset catch tray folded this may cause a paper jam Always use the p...

Page 90: ...B710 B720 B730 User s Guide 90 Removing Jams Inside the Paper Tray s 1 Pull out all paper trays and remove any wrinkled paper...

Page 91: ...B710 B720 B730 User s Guide 91 2 Examine the inside of the printer and remove any jammed pieces of paper 3 Push the paper tray s completely back into the printer...

Page 92: ...B710 B720 B730 User s Guide 92 4 Open and close cover A Doing this will clear the error message...

Page 93: ...B710 B720 B730 User s Guide 93 Paper Jams Inside Cover B 1 Remove the rear tray WARNING The fuser unit is hot You may get burned if you touch it directly B...

Page 94: ...e the lever as shown in the diagram and open the cover B 1 Then open the cover of the fuser unit 2 indicated by a small green label with a black star and remove any jammed paper 3 Close the fuser unit...

Page 95: ...B710 B720 B730 User s Guide 95 Paper Jams Inside Cover C Duplex Unit 1 Remove the rear tray C...

Page 96: ...B710 B720 B730 User s Guide 96 2 Push up the lever shown in the diagram to open the cover Then remove the jammed paper 3 Close the cover and replace the rear tray...

Page 97: ...B710 B720 B730 User s Guide 97 Paper Jams Inside Cover D Offset Catch Tray 1 Open the Offset Catch Tray cover and pull out the jammed paper 2 Close the cover D...

Page 98: ...ed modification can cause smoke or fire Note Limitations of the printer and incorrect settings at the printer computer and server corresponding to your network environment may also result in printing...

Page 99: ...r is not responding to bidirectional communication printing cannot be done Turn the bidirectional communication setting to Disable on the control panel and then print again The printer has insufficien...

Page 100: ...omputer after turning on the printer Press Cancel In the future be sure to turn on the computer power before turning on the printer Poor print quality There may be a problem with the image Refer to Wh...

Page 101: ...me The receive buffer is insufficient When printing documents of high resolution reduce the memory capacity of items not in use It is recommended to disable ports not in use and channel the memory to...

Page 102: ...Load the correct type of paper See page 24 Is the paper tray set correctly Push the paper tray completely into the printer Is the printer placed on a flat location Place the printer on a stable surfac...

Page 103: ...the levers to their original positions Strange noise Is the printer placed on a flat location Place the printer on a stable surface Is cover A open Close cover A securely Is the paper tray set correct...

Page 104: ...h a new drum toner cartridge See page 119 The Toner Saving feature is on Un check the Toner Saving check box on the Graphics tab of the printer driver See the Online Help for the printer driver Levers...

Page 105: ...he paper is damp Replace with paper from a new ream The paper used is not suitable Load the correct type of paper See pages 24 and 40 The whole sheet is printed black The drum toner cartridge is defec...

Page 106: ...artridge Replace with a new drum toner cartridge See page 119 Text or images are printed at an angle The paper tray guides are not set in the correct positions Set the length guide and the right width...

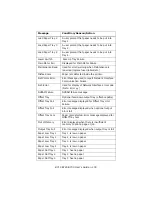
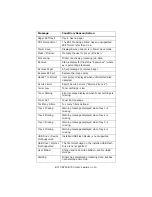
Page 107: ...ommand Bad Target Str TARGET string format error Bad TEntry CMD Unrecognized Target Entry command Call Service Help message used for service type errors Cancel Job Confirmation prompt used when CANCEL...

Page 108: ...Firmware Upgrade mode is active Format Error Failure during attempted format of flash Formatting Status display for file status Fuser Failure Error message for Fuser Failure ID Mismatch Displayed for...

Page 109: ...ace error code Net1 Error yy NVRAM Failure NVRAM failure message Offset Tray Optional face down output tray offset capable Offset Tray Fail Error message displayed for Offset Tray Unit Failure Offset...

Page 110: ...e Error xx Toner Low Toner cartridge is low Toner Missing Error message displayed when Toner cartridge is missing Toner Out Toner Out message Too Many Filters Too many filters defined Tray 1 Missing W...

Page 111: ...B710 B720 B730 User s Guide 111 Warming Up Displayed when printer is Warming Up Write Status display for file status Write xx where xx is percentage received Message Condition Reason Action...

Page 112: ...directly to the network connecting the computer An error has occurred in the network between the computer and the printer Connection cannot be established Unable to print NetworkError is displayed As...

Page 113: ...layed Double click My Computer and right click the disk example C drive with Windows Select Properties from the menu displayed and then check available free space After deleting unnecessary files to i...

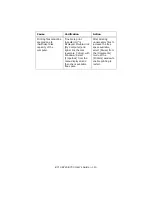
Page 114: ...ity of LPD Spool and compare it with the print data which was sent in the single print instruction 1 If a single file of print data has exceeded the upper limit of the memory capacity divide the file...

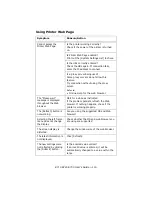
Page 115: ...r The Please wait message is displayed throughout the Web browser Wait for a while as instructed If the problem persists refresh the Web browser If nothing happens check if the printer is working prop...

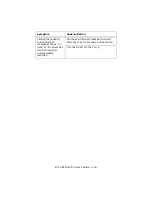
Page 116: ...e Submit button prompts messages such as no data or the server has returned invalid or unrecognizable response Are the user name and password correct Enter the correct user name and password Turn the...

Page 117: ...ith your network administrator During E mail printing the attached PDF file was not printed If the memory capacity is insufficient it may not be printed If you print big attachments frequently we reco...

Page 118: ...ge displays you can continue to print about 100 more sheets Make sure you have a new drum toner cartridge on hand When the following message displays printing stops and you must replace the drum toner...

Page 119: ...f the photosensitive drum Do not let the drum toner cartridge stand or place it upside down The drum might be damaged A drum shutter protects the photosensitive drum from light Do not open the drum sh...

Page 120: ...s Guide 120 3 Remove any output paper and open cover A Caution Do not touch any parts inside the printer 4 Hold the drum toner cartridge by the grip and pull it out slowly Discard it in accordance wit...

Page 121: ...5 Take the new drum toner cartridge out of the packaging box and shake it 7 or 8 times as shown in the diagram Important If the toner is not evenly spread out the print quality may be reduced Also the...

Page 122: ...out the seal horizontally Important Pull out the seal horizontally The tape might break if it is pulled out diagonally After the seal has been pulled out do not shake or bump the drum toner cartridge...

Page 123: ...r opening cover A remove any dust or stains inside the printer with a dry clean cloth 8 Close cover A securely 9 If installed lower the offset catch tray to its original position Caution If you contin...

Page 124: ...to highlight Information Menu then press Enter 3 Use the up and down arrow buttons to select Print Usage Rep Print Menu Map Network Summary Print PCL Fonts Print PS Fonts Print FX Fonts 4 With the rep...

Page 125: ...ation that can be sent through Mail Notice Service are listed below Settings for Mail Notice Service To use the Mail Notice Service settings on the network and e mail environment are required Check wi...

Page 126: ...nce Services Option Mail Notice Service Select Enable Network General Settings Administrator E mail Address recom mended setting Printer E mail Address For details refer to Environment Settings for E...

Page 127: ...er through a gap and cause problems Never use cleaning agents other than water or neutral detergent Network Mail Notice Settings Mail Notice Settings Select appropriate set tings for mail notifica tio...

Page 128: ...s Guide 128 1 Wipe the parts with a wet but well wrung soft cloth then wipe it dry with another soft cloth 2 For stubborn stains moisten a soft cloth with a small amount of neural detergent and gently...

Page 129: ...touch a labelled area found on or near the heat roller You can get burned If a sheet of paper is wrapped around the heat roller do not try to remove it by yourself To avoid injuries or burns switch of...

Page 130: ...ations given below 1 While pushing down on the right end of the shaft 1 widen the tab on the feed roll to loosen it 2 and then slowly remove the feed roll from the shaft 3 2 Wipe the rubber parts with...

Page 131: ...ed roll with that of the shaft and push the feed roll completely in so that the short tab fits into the slot of the shaft First Clean the Rollers Inside of Printer 1 If the optional offset catch tray...

Page 132: ...B710 B720 B730 User s Guide 132 3 Open Cover A 4 Hold the drum toner cartridge by the grip and remove it Set it on a piece of paper to keep it from dirtying the tabletop...

Page 133: ...B710 B720 B730 User s Guide 133 5 Locate and clean the feed rollers see cleaning procedure on page 130 6 Hold the drum toner cartridge by the grip and insert it into the printer...

Page 134: ...B710 B720 B730 User s Guide 134 7 Close cover A securely 8 If installed lower the offset catch tray to its original position Next Clean the Tray Rollers 1 Pull the paper trays out of the printer...

Page 135: ...each tray see cleaning procedure on page 130 3 If you have optional paper trays installed leave the trays outside the printer and proceed to the next section 4 If you do NOT have any optional paper tr...

Page 136: ...emoved reach inside the printer to access the tray module rollers at the back for cleaning Illustration 1 below is a view of the optional tray module removed from the printer to illustrate the locatio...

Page 137: ...B710 B720 B730 User s Guide 137 3 Push the paper trays back into the printer and turn the printer back on...

Page 138: ...the other facing the back should firmly grip the recessed areas on the bottom part of both sides of the printer Never try to lift the printer by gripping any other areas Bend your knees to avoid possi...

Page 139: ...topper to its original position if it s raised 4 Pull out the paper tray from the printer and remove any paper in the tray Note Keep the paper wrapped and away from humidity and dirt 5 Push the paper...

Page 140: ...Do not shake the drum toner cartridge after removing it from the printer The toner will spill While it is out of the printer put the drum toner cartridge back into its original bag or wrap it with a t...

Page 141: ...TUG 6S ISO85 SPANISH OG GERMAN 1S SPANISH 90D ISO DUTCH 0E ROMAN EXT 91S ISO SWEDISH 1 92S ISO SWEDISH 2 93S ISO SWEDISH 3 2038Z IBM 437 2039Z IBM 850 2037Z IBM 860 2036Z IBM 863 2035Z IBM 865 8Q PC S...

Reviews: