background image

Replacing consumable items > 40

R

EPLACING


CONSUMABLE


ITEMS

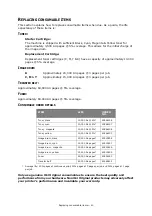
This section explains how to replace consumable items when due. As a guide, the life 

expectancy of these items is:

T

ONER

:

Starter Cartridge:

The machine is shipped with sufficient Black, Cyan, Magenta & Yellow toner for 

approximately 3,500 A4 pages @ 5% coverage. This allows for the initial charge of 

the image drum.

Replacement Cartridge:

Replacement toner cartridges (C, M, Y & K) have a capacity of approximately 10,000 

pages @ 5% coverage

I

MAGE


DRUM

:

K  

Approximately 20,000 A4 pages @ 3 pages per job.

C, M 

&

 Y

Approximately 15,000 A4 pages @ 3 pages per job.

T

RANSFER


BELT

Approximately 60,000 A4 pages @ 5% coverage.

F

USER

:

Approximately 60,000 A4 pages @ 5% coverage.

C

ONSUMABLE


ORDER


DETAILS

* Average life: 20% pages at continuous print, 50% pages at 3 pages per job and 30% pages at 1 page 

per job.

Only use genuine Oki Original consumables to ensure the best quality and 

performance from your hardware. Non Oki Original products may adversely affect 

your printer's performance and invalidate your warranty.

ITEM

LIFE

ORDER 
NO.

Toner, black

10,000 A4 @ 5%*

43866108

Toner, cyan

10,000 A4 @ 5%*

43866107

Toner,  magenta

10,000 A4 @ 5%*

43866106

Toner, yellow

10,000 A4 @ 5%*

43866105

Image drum, black

20,000 A4 pages*

43913808

Image drum, cyan

15,000 A4 pages*

43913807

Image drum,  magenta

15,000 A4 pages*

43913806

Image drum, yellow

15,000 A4 pages*

43913805

Fuser

60,000 A4 pages*

43854903

Transfer belt

60,000 A4 pages*

43363412

Summary of Contents for C710n

Page 1: ...C710n C710dn C710dtn C710cdtn User s Guide TM C700 Series C700...

Page 2: ...gistered trademarks of Oki Electric Industry Company Ltd Energy Star is a trademark of the United States Environmental Protection Agency Hewlett Packard HP and LaserJet are registered trademarks of He...

Page 3: ...o 108 8551 Japan IMPORTER TO THE EU AUTHORISED REPRESENTATIVE Oki Europe Limited trading as OKI Printing Solutions Central House Balfour Road Hounslow TW3 1HY United Kingdom For all sales support and...

Page 4: ...the machine 15 Menu functions 16 Operator Panel 16 How to change the settings User 17 How to change the settings Administrator 17 Configuration Menu 18 Print information menu 19 Print secure Job 20 Me...

Page 5: ...TIONS AND WARNINGS NOTE A note appears in this manual like this A note provides additional information to supplement the main text which may help you to use and understand the product CAUTION A cautio...

Page 6: ...ion lets you share this valuable resource among users on your office network Photo Enhance mode to improve printouts of photographic images Windows PCL driver only Ask Oki a user friendly function for...

Page 7: ...d LCD display panel 3 Paper tray Standard paper tray Holds up to 530 sheets of 80g m paper 4 Multi purpose tray Used for feeding heavier paper stocks envelopes and other special media Also for manual...

Page 8: ...s avoids bending the paper around curves in the paper path and enables feeding of up to 220g m media CHANGING THE DISPLAY LANGUAGE The default language used by your printer for display messages and fo...

Page 9: ...printers In particular avoid office transparencies designed for use by hand with marker pens These will melt in the fuser and cause damage Labels should also be of the type recommended for use in copi...

Page 10: ...ransparencies should be loaded print side up and top edge into the printer Do not use the duplex two sided printing function FACE DOWN STACKER The face down stacker on the top of the printer can hold...

Page 11: ...TRAYS 1 Remove the paper tray from the printer 2 Fan the paper to be loaded at the edges 1 and in the middle 2 to ensure that all sheets are properly separated then tap the edges of the stack on a fla...

Page 12: ...between the paper and the guides and rear stopper Do not overfill the paper tray Capacity depends on the type of paper stock Do not load damaged paper Do not load paper of different sizes or types at...

Page 13: ...r stacker a is closed the paper exits from the top of the printer Stacking capacity is approximately 350 sheets depending on paper weight For face up printing make sure the face up rear stacker a is o...

Page 14: ...ing on headed paper load the paper with pre printed side down and top edge away from the printer Optional duplex unit must be installed for this function Envelopes should be loaded face up with top ed...

Page 15: ...ries to print jobs efficiently and effectively please refer to the Printing Guide and the Barcode Guide For full details of how to access and use the printer security features please refer to the Secu...

Page 16: ...ER SIZE displayed 5 Attention LED ON A warning occurs Printing may be possible e g low toner BLINKING An error occurs Printing not possible e g toner empty OFF Normal condition 6 Back Button Returns t...

Page 17: ...er to display the setting An asterisk will appear next to the setting indicating that this setting is currently in effect 5 Do one of the following Press Back again to move up to the list of menus or...

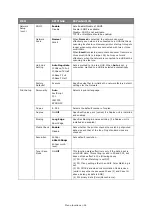
Page 18: ...item to display the percentage of a consumable remaining Network Printer Name Short Printer Name IP Address Subnet Gateway MAC Address Network FW Version Web Remote version Displays the full printer...

Page 19: ...rameter and select execute to print out a Postscript emulation typeface list PCL font List Execute Scroll down to this parameter and select execute to print out a PCL font list IBM PPR Font List Execu...

Page 20: ...r button is pressed The following message will appear if Delete is selected Are You Sure Yes No The display will return to the source menu if No is selected All jobs will be deleted if Yes is selected...

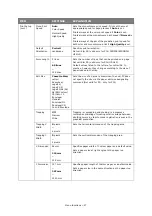
Page 21: ...ndition indicated by Select by scroll and Enter button Unit of Measurement Default millimeter Selects UOM Inches or millimeter default condition indicated by Select by scroll and Enter button Tray1 Co...

Page 22: ...a Heavy 2 Tray usage Do Not Use When Mismatching Configure Paper Size Media Type Media Weight Tray Usage Defines default condition indicated by Select by scroll and Enter button User type 1 to 5 are d...

Page 23: ...elect by scroll and Enter button Error Report Default Off Select from On Off default condition indicated by Select by scroll and Enter button Print Position Adjust Default 0 00 Select from X Adjust Y...

Page 24: ...d that this will shorten the ID life by as much as this rotation default condition indicated by Select by scroll and Enter button Hex Dump Execute Prints out data received from the host PC in the hexa...

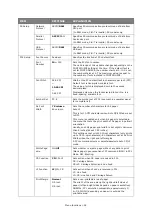
Page 25: ...f EtherTalk Protocol Frame Type Auto 802 2 802 3 Ethernet II SNAP Sets the frame type Netware should be enabled TypeIP Address Set Auto Manual Sets the IP Address setting method TCP IP should be enabl...

Page 26: ...the network factory default settings for the Network Print Setup Personality Auto PostScript PCL IBM PPR EPSON FX Selects a printer language Copies 1 999 Selects the default number of copies Duplex On...

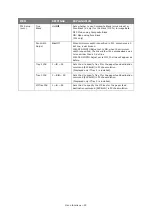
Page 27: ...Edit Size Cassette Size Letter Executive Legal14 Legal13 5 Legal13 A4 A5 A6 B5 Custom C5 Com 10 Envelope Monarch Envelope DL Envelope C5 Com 9 Envelope Sets the size of an area to draw when the host...

Page 28: ...set of PCL see machine operator panel for complete list A4 Print Width 78 column 80 column Sets the number of characters for A4 paper Auto LF This is for 10 CPI characters when Auto CR LF Mode is set...

Page 29: ...fied the line width will be emphasized so as to look wider than a 1 dot line With PEN WIDTH Adjust set to OFF the line will appear as before Tray 2 ID 1 5 59 Sets the to specify Tray 2 for the paper f...

Page 30: ...Sets whether to eject a blank sheet Available only when simplex is set CR Function CR CR LF Sets action when CR code is received LF Function LF LF CR Sets action when LF code is received Line Length 8...

Page 31: ...s 66 lines in the LETTER size printable area Text Height Same Diff Sets height of a character SAME Regardless of CPI same height DIFF According to CPI character heights vary Color Setup Ink Simulation...

Page 32: ...y default setting Machine performs partition division and initializes each partition When this menu is executed the following confirmation message appears Are You Sure Yes No If No is selected you wil...

Page 33: ...installed the layout of this menu may be different from that of each partition The previously used layout will be displayed In Non PS machines PS is replaced by COMMON so the message is displayed as P...

Page 34: ...EEPROM of CU Resets User menu to the factory default If Execute is selected exits from the menu Save Settings Execute Saves menus currently set With this function the menus with which operation was l...

Page 35: ...djusts HIGHLIGHT light area of the TRC Darker Lighter Mid Tone 3 2 1 0 1 2 3 Adjusts MID TONE area of the TRC Darker Lighter Dark 3 2 1 0 1 2 3 Adjusts DARK area of the TRC Darker Lighter Cyan Magenta...

Page 36: ...rt Usage Report Enable Disable Enables Disables the printing of the Usage Report When changing a setting value the printer is rebooted Change Password Changes the password Enable must be selected in F...

Page 37: ...ility of the parallel interface Ecp Enable Disable Extended Capabilities Port enables disables this function Ack Width Narrow Medium Wide Sets ACK width for compatible reception 0 5 s 1 0 s 3 0 s Ack...

Page 38: ...the resetting of the cipher key will be executed ITEM SETTINGS EXPLANATION Check File System Execute Resolves mismatch between actual memory and displayed memory available in a file system Performs ad...

Page 39: ...ill appear to discontinue processing Do You Wish to Cancel Yes No If NO is selected the procedure will continue If YES is selected the procedure will discontinue Enable initialization No Yes Prevents...

Page 40: ...imately 60 000 A4 pages 5 coverage FUSER Approximately 60 000 A4 pages 5 coverage CONSUMABLE ORDER DETAILS Average life 20 pages at continuous print 50 pages at 3 pages per job and 30 pages at 1 page...

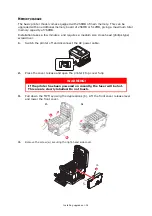
Page 41: ...ue Do not use hot water and never use solvents of any kind They will make stains permanent 1 Press the cover release and open the printer s top cover fully NOTE When the LCD display indicates TONER LO...

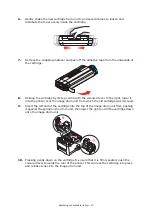
Page 42: ...dge to the right to release the left hand end as shown and withdraw the toner cartridge out of the printer 3 Clean the top of the ID unit with a clean lint free cloth 4 Put the cartridge down gently o...

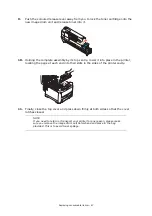
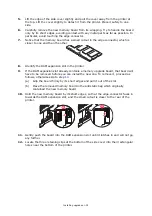
Page 43: ...the right lower it into the printer over the image drum unit from which the old cartridge was removed 9 Insert the left end of the cartridge into the top of the image drum unit first pushing it agains...

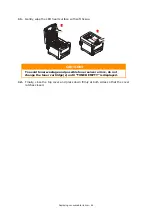
Page 44: ...rface with soft tissue 12 Finally close the top cover and press down firmly at both sides so that the cover latches closed CAUTION To avoid toner wastage and possible toner sensor errors do not change...

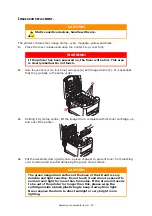
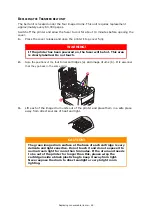
Page 45: ...of paper to prevent toner from marking your furniture and to avoid damaging the green drum surface CAUTION Static sensitive devices handle with care WARNING If the printer has been powered on the fuse...

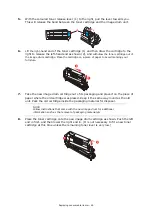
Page 46: ...marking your furniture 7 Take the new image drum cartridge out of its packaging and place it on the piece of paper where the old cartridge was placed Keep it the same way round as the old unit Pack th...

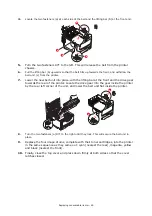
Page 47: ...re lower it into place in the printer locating the pegs at each end into their slots in the sides of the printer cavity 11 Finally close the top cover and press down firmly at both sides so that the c...

Page 48: ...me order 3 Lift each of the image drum units out of the printer and place them in a safe place away from direct sources of heat and light WARNING If the printer has been powered on the fuser will be h...

Page 49: ...the front and the drive gear towards the rear of the printer Locate the drive gear into the gear inside the printer by the rear left corner of the unit and lower the belt unit flat inside the printer...

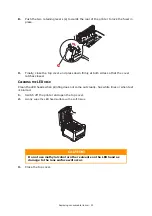
Page 50: ...rom its packaging and remove the transit material 6 Holding the new fuser by its handle make sure that it is the correct way round The retaining levers a should be fully upright and the two locating l...

Page 51: ...so that the cover latches closed CLEANING THE LED HEAD Clean the LED heads when printing does not come out clearly has white lines or when text is blurred 1 Switch off the printer and open the top cov...

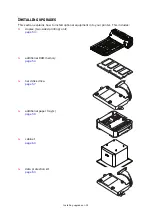
Page 52: ...ction explains how to install optional equipment into your printer This includes duplex two sided printing unit page 53 additional RAM memory page 54 hard disk drive page 57 additional paper tray s pa...

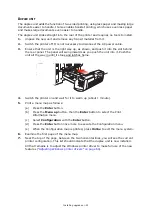
Page 53: ...ush the unit into it Push the unit all the way in until it stops and latches home 4 Switch the printer on and wait for it to warm up about 1 minute 5 Print a menu map as follows a Press the Enter butt...

Page 54: ...dium size cross head philips type screwdriver 1 Switch the printer off and disconnect the AC power cable 2 Press the cover release and open the printer s top cover fully 3 Pull down the MP Tray using...

Page 55: ...If the RAM expansion slot already contains a memory upgrade board that board will have to be removed before you can install the new one To remove it proceed as follows otherwise skip to step 10 a Grip...

Page 56: ...the Enter button b Press the Menu up button then the Enter button to select the Print Information menu c Select Configuration with the Enter button d Press the Enter button once more to execute the C...

Page 57: ...AC power cable 2 Press the cover release and open the printer s top cover fully 3 Pull down the MP Tray using the depressions b Lift the front cover release lever and lower the front cover 4 Remove t...

Page 58: ...inter on 10 When the printer is ready print a menu map as follows a Press the Enter button b Press the Menu up button then the Enter button to select the Print Information menu c Select Configuration...

Page 59: ...er off and disconnect the AC power cable 2 Place additional paper tray s on desired location 3 Observing safety rules for lifting and using locating guides place printer on top of the additional paper...

Page 60: ...the Printers window STORAGE CABINET Instructions for installing the Storage Cabinet are supplied with the Cabinet DATA PROTECTION KIT The Data Protection Kit is a system for encoding data to be stored...

Page 61: ...printer When a jam occurs the printer immediately stops and the Alert LED on the Status Panel together with the Status Monitor informs you of the event If printing multiple pages or copies do not assu...

Page 62: ...the rear later 2 Press the cover release and open the printer s top cover fully CODE LOCATION CODE LOCATION 370 Duplex unit 382 Paper exit 371 Duplex unit 383 Duplex unit 372 Duplex unit 390 MP Tray 3...

Page 63: ...rum complete with its toner cartridge up and out of the printer 5 Put the assembly down gently onto a piece of paper to prevent toner from marking your furniture and to avoid damaging the green drum s...

Page 64: ...surface and withdraw the sheet c To remove a sheet just entering the fuser 3 separate the trailing edge of the sheet from the belt push the fuser pressure release lever 4 towards the front and down to...

Page 65: ...user unit using the handle b Press release lever c and pull the trapped paper from the fuser e Replace fuser unit into the machine and move locking levers a toward the rear of the machine 8 Starting w...

Page 66: ...10 Open the rear exit tray a and check for a sheet of paper in the rear path area b Pull out any sheets found in this area If the sheet is low down in this area and difficult to remove it is probably...

Page 67: ...ut the paper tray and ensure that all paper is stacked properly is undamaged and that the paper guides are properly positioned against the edges of the paper stack When satisfied replace the tray 16 F...

Page 68: ...l Paper capacity at 80g m 530 sheets in main tray 530 sheets in optional 2nd tray 100 sheets in multi purpose tray or 50 transparencies or 10 envelopes Paper weight 64 176g m in main tray 64 203g m in...

Page 69: ...15 000 A4 pages 3 pages per job Belt life 60 000 A4 pages at 3 pages per job Fuser life 60 000 A4 pages Power supply 220 to 240VAC 50 60 Hz 1 Hz Power consumption Operating 1200 max 530 W av 25 C Sta...

Page 70: ...nce menu 37 Major printer components and paper path 61 Menu functions 16 Menus factory default settings 17 how to use 16 USB menu 37 Multi purpose tray how to use 14 paper metrics 10 O Operator Panel...

Page 71: ...ku Tokyo 108 8551 Japan Tel 81 3 5445 6158 Fax 81 3 5445 6189 http www okidata co jp Oki Data Singapore Pte Ltd 78 Shenton Way 09 01 Singapore 079120 Tel 65 221 3722 Fax 65 421 1688 http www okidata c...

Page 72: ...Oki Europe Limited Blays House Wick Road Egham Surrey TW20 0HJ United Kingdom Tel 44 0 208 219 2190 Fax 44 0 208 219 2199 www okiprintingsolutions com 07088101 iss 3...

Reviews: