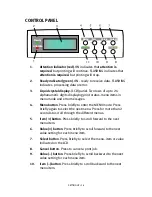

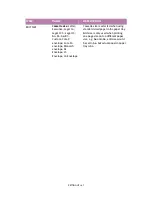


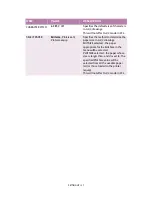


SETTING UP > 48
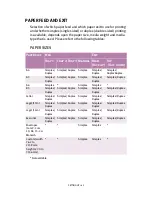
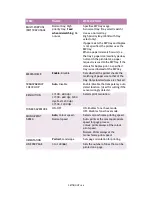
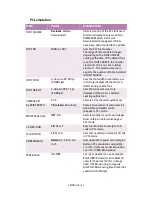
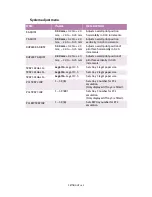
Media menu
Item
Value
Description
TRAY 1 MEDIA
TYPE
Plain
; Letterhead;
Transparency; Bond;
Recycled; Card stock;
Rough.
User type 1 - 5
Selects the paper type for Tray 1.
User type 1 - 5 are displayed only if
registered in the host PC. If Media
character strings are specified, these
will be displayed instead.
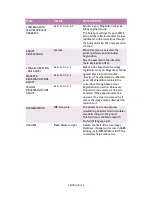
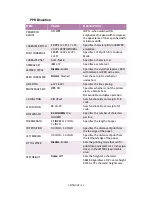
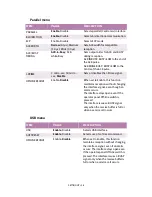
TRAY 2 AND 3
MEDIA TYPE
Plain
; Letterhead; Bond;
Recycled; Card stock;
Rough;
User type 1 - 5
Selects the paper type for the
selected paper tray (Only displayed if
fitted). User type 1 - 5 only displayed
if registered in the host PC. If
Media character strings are
specified, these will be displayed
instead.
TRAY 1, 2 AND 3
MEDIA WEIGHT
Auto; Light; Medium light;
Medium
; Medium heavy;
Heavy; Ultra heavy
Sets the paper weight for the
selected paper tray. Tray 2 and Tray 3
only displayed if fitted.
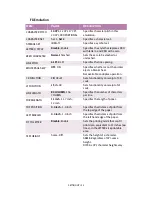
MP TRAY
PAPERSIZE
A4
; A5; A6; B5; Legal 14;
Legal 13.5; Legal 13;
Letter; Executive; Custom;
Com-9 envelope; Com-10
envelope; Monarch
envelope; DL Envelope; C5
Envelope; C4 Envelope
Sets the paper size for the
multipurpose paper tray.
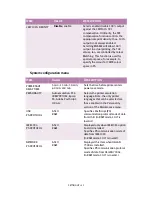
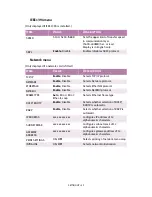
MP TRAY MEDIA
TYPE
Plain
; Letterhead;
Transparency; Labels;
Bond; Recycled; Card
stock; Rough; User type 1
to 5
Selects the paper type for
multipurpose paper tray. User type 1
to 5 are only displayed if they have
been registered.
MP TRAY MEDIA
WEIGHT
Auto
; Light; Medium light;
Medium; Medium heavy;
Heavy; Ultra heavy
Sets the paper weight for the
multipurpose (MP) paper tray.
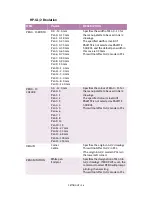
UNIT OF
MEASURE
inches
; millimetres
Sets the units of measurement for
custom paper size.
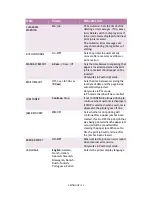
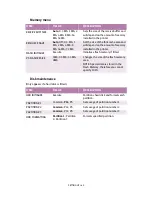
X DIMENSION
3 inches to
8.5 inches
76 mm to 216 mm (
210
mm
)
Sets the dimensions of custom
paper. For these dimensions to work,
the MP tray paper size must be set
custom.
Y DIMENSION
5 inches to 47.2 inches
(
11 inches
)
127 mm to 1200 mm (
297
mm)
Sets the dimensions of custom
paper. For these dimensions to work,
the MP tray paper size must be set to
custom.
Summary of Contents for C7300
Page 1: ...C7100 C7300 C7500 USER S GUIDE WINDOWS 2000 l ...
Page 20: ...SETTING UP 20 3 Remove the LED head restrainer from behind the LED heads in the top cover ...
Page 22: ...SETTING UP 22 5 Remove the protective sheets from each of the four image drums ...
Page 27: ...SETTING UP 27 LOADING PAPER 1 Remove the paper tray from the printer ...
Page 158: ...MAINTENANCE 158 5 Remove the protective sheet from the new image drum ...


