background image

21

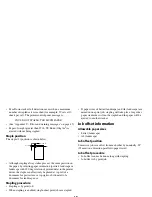
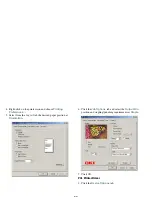
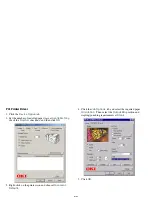
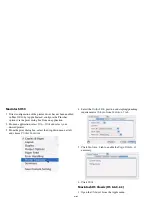
4. Define the punching and/or stapling requirements (None, 

Staple,  Punch (Long Edge), Punch (Long Edge). 

5. Define where the finished documents are ejected:

Stacker (Face-down)

: paper ejects to the top of the printer

Finisher (Face-up)

: paper ejects to the upper stacker of the 

Finisher

Finisher (Face-down)

: paper ejects to the lower stacker of the 

Finisher.

Note: An error message appears if an inappropriate 

combination of paper size, stapling, punching, output 
destination has been selected.

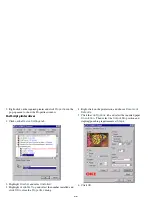
Windows 95/98/Me

1. Click 

Start—Settings—Printers

 to open the Printers dialog 

box.

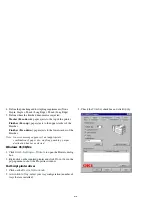
2. Right-click on the required printer and click 

Properties

 in the 

pop-up menu to show the Properties window.

PostScript printer driver

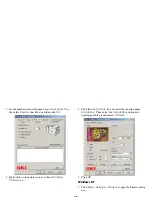
1. Click on the 

Device Options

 tab.

2. At 

Available Tray,

 select your tray configuration (number of 

trays that are installed).

3. Check the 

Finisher

 checkbox and click 

Apply

.

Summary of Contents for C9300 Series

Page 1: ......

Page 2: ...l 16 Stacker summary information 16 Punching information 17 Allowable paper sizes 17 Allowable paper weight 17 Hole positions 17 Punching procedure 17 Stapling information 17 Allowable paper sizes 17...

Page 3: ...r 37 Replenishing the staple cartridge unit 37 Removing the punch chips 40 Appendix A Specification 42 Main characteristics 42 Configuration diagram 43 Appendix B Paper feed and ejection rules 43 Prin...

Page 4: ...ings Note A note appears in this manual like this A note provides additional information to supplement the main text which may help you to use and understand the product CAUTION A caution appears in t...

Page 5: ...ipment however there are a few basic precautions that should be taken to avoid personal injury or damaging the machine Read this guide carefully and save it for future reference Read and follow all wa...

Page 6: ...five paper trays before starting installation of the Finisher and Cabinet The trays include the original tray Tray 1 an additional tray Tray 2 and an additional HCF unit Trays 3 through 5 The minimum...

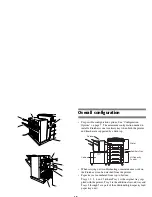
Page 7: ...the printer control panel See Checking the Finisher on page 12 Checking installation space Check that sufficient space is available for the installation as indicated in the following diagrams 70cm 27...

Page 8: ...it Since the Finisher is mounted on casters ensure that it is in a stable position before proceeding 5 Carefully remove all of the adhesive tape polystyrene and cardboard packing materials from the Fi...

Page 9: ...e the Staple Cover Identifying component items Finisher Check the following items have been unpacked from the Finisher box 1 Face Up Stacker 2 Face Down Stacker 3 Finisher 4 Bridging Assembly 5 Blanki...

Page 10: ...2nd Tray Finisher Printer Cabinet Cabinet Engine 1st Tray 2nd Tray Finisher Printer Cabinet Cabinet 3rd Tray Spacer Engine 1st Tray 2nd Tray Finisher Printer Cabinet Spacer Hi Capacity Engine 1st Tra...

Page 11: ...the supplied Blanking plate is not necessary for the C9300 C9500 printers 2 Pull down the printer Face Up Stacker 1 in the three stages shown 2 and peel off the seal 3 to expose the connector 4 3 Fit...

Page 12: ...liary tray with the printer 6 Refit the printer access cover previously removed by clicking it into place and then refitting the retaining screw WARNING The Finisher weighs 55 lbs 25kg Do not attempt...

Page 13: ...e and then secure it with the small screw 9 Fit the Face Down Stacker 1 and Face Up Stacker 2 to the Finisher 10 If necessary and available adjust the height of the Cabinet so that the Finisher alignm...

Page 14: ...e Decurler Lever 1 to the horizontal position 12 Check that the Finisher can be detached from the printer by rotating the Decurler Lever 1 to point vertically downwards lifting the Release Lever 2 and...

Page 15: ...s actually work Checking the Finisher Settings The addition of the Finisher to your printer system installs a number of additional menu settings This section guides you through these settings and chec...

Page 16: ...This function prints a map of all the menu settings and shows all the new settings now available with your Finisher installed 1 Press Menu 0 to access the Information Menu 2 Press Item 1 and then pre...

Page 17: ...the second option bin and turn the Stapler Mode to ON Print a menu map or multiple copies of demo pages must be more than 1 copy and verify that these are correctly stapled Note that if you choose to...

Page 18: ...When carrying out troubleshooting or maintenance work on the Finisher it can be detached from the printer Paper trays are numbered from top to bottom Trays 1 2 3 4 and 5 where Tray 1 is the original t...

Page 19: ...h is 3 94 to 11 69 100 to 297mm and length is 5 83 to 35 43 148 to 900mm Paper size must be set to Portrait Envelope 1 Portrait No 3 Envelope 2 Portrait No 4 Envelope 3 Landscape No 4 Com 9 Com 10 DL...

Page 20: ...Punching procedure Each sheet is punched individually Stapling information Allowable paper sizes Letter landscape A4 landscape Allowable paper weight Only normal paper of weight 17 to 27 lb US Bond 6...

Page 21: ...printer driver the staple can effectively be placed at top left of a document for portrait use or top right or bottom left of a document for landscape use Stapling procedure Stapling is by print job...

Page 22: ...Finisher Settings on page 12 The functions associated with the Finisher that are available on the printer control panel are accessed via The PRINT MENU The USAGE MENU PRINT MENU options Note Settings...

Page 23: ...1 original tray 1 additional tray and 1 high capacity feed unit 3 Define the paper orientation Portrait Landscape or Landscape with 180 deg rotation of printed data to suit your punching and or stapl...

Page 24: ...of the Finisher Note An error message appears if an inappropriate combination of paper size stapling punching output destination has been selected Windows 95 98 Me 1 Click Start Settings Printers to...

Page 25: ...rientation Then select the Output Bin position and stapling punching requirements at Staple 5 Click OK PCL Printer Driver 1 Click the Device Options tab 2 Set the number of installed paper trays at Av...

Page 26: ...1 Click Start Settings Printers to open the Printers dialog box 2 Right click on the required printer and click Properties in the pop up menu to show the Properties window PostScript printer driver 1...

Page 27: ...Preferences 5 Select from the Layout tab the desired paper position at Orientation 6 Click the Job Options tab and select the Output Bin position and stapling punching requirements at Staple 7 Click...

Page 28: ...K 3 Right click on the printer icon and choose Printing Preferences 4 Click the Job Options tab and select the required paper Orientation Then select the Output Bin position and stapling punching requ...

Page 29: ...2 Highlight Finisher and select Installed 3 Highlight Available Tray and select the number installed and click OK to close the Properties dialog 4 Right click on the printer icon and choose Document D...

Page 30: ...at Available Tray check the Finisher checkbox and then click OK 3 Right click on the printer icon and choose Document Defaults 4 Click the Job Options tab and select the required paper Orientation Th...

Page 31: ...pplication select File Print and select your desired printer 3 From the print dialog box select the drop down menu at left and choose Printer Features 4 Select the Output Bin position and stapling pun...

Page 32: ...aserWriter 8 icon Click on the Setup button 3 Click on Configure 4 Change Available Tray to the required value 5 Change Finisher to Installed 6 Click OK twice 7 From within an application click File P...

Page 33: ...tion 12 Click Save Settings or Print Troubleshooting For a full list of error and warning messages refer to Appendix C Error and warning messages on page 45 Counteracting paper curl If the paper emerg...

Page 34: ...367 Note 1 Paper may be jammed in both the printer and the Finisher For details of clearing a paper jam in the printer refer to the printer User s Guide Note 2 When a printer paper jam is cleared reco...

Page 35: ...Lever 1 to point downwards b Rotate the Release Lever 3 upwards and detach the Fin isher from the printer 3 Remove the jammed paper Following are instructions on removing paper broken out by the locat...

Page 36: ...Box 2 You can empty the Chip Box when you have removed it b Open the Staple cover 3 c Rotate the blue knob 4 located in the Finisher Guide in the direction of the arrow and remove the paper when it a...

Page 37: ...e Cover 2 Location 366 a Open the Finisher Cover 1 and remove the paper 2 b Close the Finisher Cover 1 4 Attach the Finisher to the printer a Push the Finisher towards the printer until it clicks into...

Page 38: ...rler Lever 1 to point downwards b Rotate the Release Lever 3 upwards and detach the Finisher from the printer c Open the Staple Cover 1 to expose the Staple Unit 2 2 Remove the staple cartridge unit f...

Page 39: ...jammed sta ples 1 c Use handle 2 to close the cartridge unit 4 Fit the Staple Cartridge unit into the Staple Unit WARNING Be careful to avoid components and edges inside the Finisher a Push the Stapl...

Page 40: ...Replenishing the staple cartridge unit when the staples are almost exhausted See Appendix D Consumables on page 46 for details of ordering new staples Disposing of the punch chips i e small circular...

Page 41: ...move the Staple Cartridge unit from the Staple Unit WARNING Carefully avoid components and edges inside the Finisher Do not touch the Staple Unit motor 3 which may be hot a Lift the blue Lock Lever 1...

Page 42: ...1 c Push the new cartridge of staples into the Staple Cartridge unit until a click is heard d Remove the Tape 1 4 Fit the Staple Cartridge unit into the Staple Unit WARNING Carefully avoid components...

Page 43: ...ng error message will occur at the printer control panel CHECK STAPLER CARTRIDGE 471 STAPLER CARTRIDGE MISSING Removing the punch chips When the punch Chip Box is almost full and requires to be emptie...

Page 44: ...in the raised position while you refit the Chip Box 2 b Lower the Finisher Guide 1 back into position 4 Attach the Finisher to the printer a Push the Finisher towards the printer until it clicks into...

Page 45: ...er capac ity Maximum 30 sheets or paper thickness 3mm weight 17 to 27 lb US Bond or 64 to 104g m2 Punch holes 3 hole punching Punching paper size Long side binding Letter landscape A4 landscape B5 lan...

Page 46: ...05 to 175g m2 Most paper can be used only in single sided printing from all trays except for A6 from MP tray only Normal paper 47 to 52 lb US Bond 176 to 198g m2 Most paper can be used only in single...

Page 47: ...landscape No 4 Com 9 Com 10 DL C4 and Monarch cannot be used Paper ejection details Finisher Face Up stacker No stapling is possible when using the Face Up Stacker Duplexing is only available for norm...

Page 48: ...ggested remedial actions are given with the messages below Normal paper 21 to 27 lb US Bond 81 to 104g m2 Letter landscape A4 landscape d d x d Size and Weight EO PL PS ST Error Warning message Meanin...

Page 49: ...ip box is not fitted properly or is missing See page 40 INSTALL FINISHER 473 FINISHER REMOVED The Finisher is not attached correctly to the printer Check Finisher is attached to printer SERVICE CALL n...

Page 50: ...entifying component items 14 Install 3 Cabinet Installation and Levelling 6 Checking installation space 4 Checking the Finish 12 Checking the Finisher Operation 13 Configuration Options 7 Identifying...

Page 51: ...s 18 Punch information 16 Punch chips removing 40 R Removing the punch chips 40 S Safety instructions 2 Specifications 41 Stacker face down 16 face up 16 Staple cartridge 35 information 17 jam 34 posi...

Reviews: