background image

ML1120

 Plus

/ML1190

 Plus

 User’s Guide - Paper handling > 35

3.


Remove the sheet guide Assy.

4.


Remove the left and right knobs of the tractor Assy.

Sheet guide Assy

Tractor Assy

Knob

Summary of Contents for ML1120 Plus

Page 1: ...User s Guide ML1120 Plus ML1190 Plus ML1120 Plus ML1190 Plus ...

Page 2: ... possible we make no warranty of any kind expressed or implied as to the accuracy or completeness of the information contained herein The most up to date drivers and manuals are available from the Oki Printing Solutions web site http www okiprintingsolutions com Copyright 2010 Oki Printing Solutions Oki is a registered trademarks of Oki Electric Industry Co Ltd Microline are trademarks of Oki Data...

Page 3: ...er 16 Printing a test page 16 Printing from a computer 17 Utilities 18 Overview 18 Accessing 18 Description of utilities 18 Installing the utilities 19 Windows 19 OKI DIPUS Dot Impact Printer Utilities 19 General information 19 How to install 19 Additional information 19 Status Monitor 19 Menu Setup Utility 20 Top of Form Setup Utility 20 Button Setup Utility 20 Paper handling 21 Loading cut sheet...

Page 4: ...eed settings 66 Printer impact mode 66 Normal speed printing 66 High speed printing 66 Quiet printing 66 Setting TOF position at the place of user s choice 67 Troubleshooting 68 Clearing paper jams 68 Cut sheet paper jammed in printer 68 Continuous forms jammed in printer 70 Responding to alarm conditions 72 Responding to general problems 72 Cleaning your printer 77 Printer exterior 77 Printer int...

Page 5: ...s NOTE A note provides additional information to supplement the main text CAUTION A caution provides additional information which if ignored may result in equipment malfunction or damage WARNING A warning provides additional information which if ignored may result in a risk of personal injury ...

Page 6: ...guide NOTE Images used in this manual may include optional features that your printer does not have installed This manual is your user s guide check the web site www okiprintingsolutions com for the most up to date version for your printer and forms part of the overall user support listed below This User s Guide to help you to become familiar with your printer and make the best use of its many fea...

Page 7: ... in Acrobat You can access specific information in two ways In the list of bookmarks down the left hand side of your screen click on the topic of interest to jump to the required topic If the bookmarks are not available use the Contents on page 3 In the list of bookmarks click on Index to jump to the Index If the bookmarks are not available use the Contents on page 3 Find the term of interest in t...

Page 8: ...uction 2 Choose which pages you wish to print a All pages 1 for the entire manual b Current page 2 for the page at which you are looking c Pages from and to 3 for the range of pages you specify by entering their page numbers 3 Click on OK 1 2 3 ...

Page 9: ...ter setting up your printer according to the instructions in the Set up Guide retain your packing materials and container in case you ever need to ship or transport your printer Identifying component parts The main parts of your printer are identified and briefly explained below Front view 1 Print Head prints the characters on the paper 2 Paper Type Lever set according to the type of paper used cu...

Page 10: ...according to the thickness of the paper There is also a setting to facilitate ribbon replacement 5 Control Panel contains button switches and indicators described in detail later that allow you to operate the printer ML1120 Plus ML1190 Plus 6 Power Switch to turn the printer power ON OFF 7 Ribbon Cartridge holds the printer ribbon ...

Page 11: ...er connector connect to printer power cable 3 Paper Guides can be adjusted as required to locate the left edge of cut sheet paper 4 Pin Tractor to load and feed continuous forms 5 Serial connector connect to serial interface cable 6 USB connector connect to USB interface cable 7 Parallel connector connect to parallel interface connector 1 2 3 4 5 7 6 ...

Page 12: ... on which to site your printer Allow enough space around your printer e g at least 60 cm from any wall for easy access to the Platen Knob and the various paper feed paths Make sure a grounded power outlet is available nearby Powering on your printer 1 Ensure that your printer Power Switch is set to OFF 60cm 75cm ...

Page 13: ...EL and STATUS indicators on the control panel illuminate Producing a test print To check that your printer is operational produce a test print on a sheet of 80 gsm A4 paper for example as follows CAUTION Allow at least 5 seconds between turning the printer ON after turning it OFF A shorter time interval between turning ON OFF operations may cause printer power failure Do not turn the printer OFF w...

Page 14: ...o paper in the printer 5 With the long side of the paper against the paper guide insert the paper carefully into the printer The printer will automatically grip the paper and start the test print NOTE If required you can pause the test print by pressing the SEL button and then resume the test print by again pressing the SEL button 6 When the test print has completed the paper is automatically ejec...

Page 15: ...llel for direct connection to a PC This port requires a bi directional IEEE 1284 compliant parallel cable Serial for direct connection to a PC This port requires a bi directional RS232C serial interface cable USB for connection to a PC running Windows 98 or above This port requires a shielded cable less than 5m long conforming to USB version 2 0 NOTE Interface cables are not supplied with your pri...

Page 16: ...omputer and follow the on screen instructions to install the printer driver for use with your printer Printing a test page As an example using Windows XP 1 Use Start Printers and Faxes to show the Printers and Faxes window 2 Highlight the driver for your printer 3 Use File Properties to show the Properties window 4 On the General tab click the Print Test Page button 5 Ensure that a test page has p...

Page 17: ...g to your printer from for example a Windows application on your computer make your printing selections from the driver windows that appear on screen These driver windows have been designed to be easy to use and intuitive while supplementary on line help is available by clicking each window Help button ...

Page 18: ...rovided on the CD shipped with your printer Dot Impact Printer Utilities OKI DIPUS Status Monitor Menu Setup Utility Top of Form Setup Utility Button Setup Utility Description of utilities 1 OKI DIPUS Dot Impact Printer Utilities This is a set of utilities that allow you to control the printer from your computer These utilities support Windows operating systems using parallel USB or network connec...

Page 19: ...f Form Setup Utility Button Setup Utility How to install Start setup exe in the Service Utilities OKI DIPUS folder of the CD Additional information See the Help for details on using these utilities Status Monitor The Status Monitor is a small background program that keeps track of the state of your printer It tells you when the printer is functioning normally when there is a problem such as a pape...

Page 20: ...ck resetting Top of Form Setup Utility This utility lets you set the top of form from your computer for each available paper path You can also save frequently used settings to a file on your computer for quick resetting Button Setup Utility This utility lets you disable buttons on the printer from your computer It is mainly for use by administrators to keep multiple users from accidentally changin...

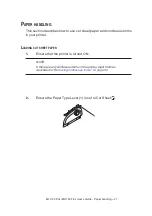
Page 21: ...w to use cut sheet paper and continuous forms in your printer Loading cut sheet paper 1 Ensure that the printer is turned ON NOTE If there are any continuous forms in the printer eject them as described in Removing continuous forms on page 32 2 Ensure the Paper Type Lever 1 is set to Cut Sheet 1 ...

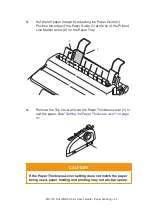
Page 22: ... Paper Guide 1 at the tip of the Printed Line Marker arrow 2 on the Paper Tray 4 Remove the Top Cover and set the Paper Thickness Lever 1 to suit the paper See Setting the Paper Thickness lever on page 41 CAUTION If the Paper Thickness Lever setting does not match the paper being used paper feeding and printing may not work properly 1 2 1 ...

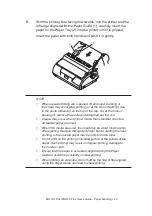
Page 23: ...ing off remove the paste and straighten out the curl Crease may occur when thinner media than standard ones like A4 feather paper are used When thin media are used the sheet may be rolled into the roller after ejecting Remove the ejected paper before starting the next printing or the ejected paper may be rolled into the roller Do not print on the printing prohibited portion at the bottom of the pa...

Page 24: ... If required add another sheet for the printer to continue printing from where it left off To eject a cut sheet left in the printer carry out the following 1 Press the SEL button to put the printer off line 2 Press the LOAD EJECT button and the paper is ejected to the Paper Tray NOTE Paper longer than A4 length 297 mm may overlap and possibly fall off the Paper Tray ...

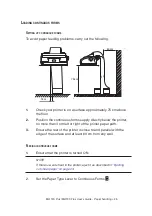
Page 25: ...ntinuous forms supply directly below the printer no more than 3 cm left or right of the printer paper path 3 Ensure the rear of the printer is close to and parallel with the edge of the surface and at least 60 cm from any wall Feeding continuous forms 1 Ensure that the printer is turned ON NOTE If there is a cut sheet in the printer eject it as described in Ejecting cut sheet paper on page 24 2 Se...

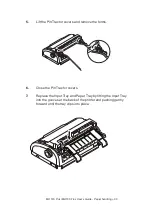
Page 26: ...t the paper See Setting the Paper Thickness lever on page 41 NOTE If the Paper Thickness Lever setting does not match the paper being used paper feeding and printing may not work properly 4 Remove the Paper Tray and Input Tray together by gripping the Input Tray at both sides and pulling it up and away from the printer 1 ...

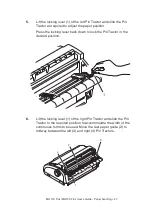
Page 27: ...the paper position Press the locking lever back down to lock the Pin Tractor in the desired position 6 Lift the locking lever 1 of the right Pin Tractor and slide the Pin Tractor to the required position to accommodate the width of the continuous forms to be used Move the rear paper guide 2 to midway between the left 3 and right 4 Pin Tractors 1 1 2 3 4 ...

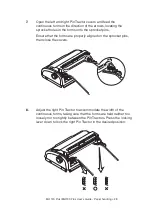
Page 28: ...oles in the forms onto the sprocket pins Ensure that the forms are properly aligned on the sprocket pins then close the covers 8 Adjust the right Pin Tractor to accommodate the width of the continuous forms taking care that the forms are held neither too loosely nor too tightly between the Pin Tractors Press the locking lever down to lock the right Pin Tractor in the desired position ...

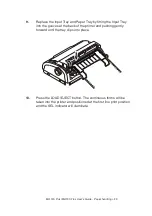
Page 29: ...by fitting the Input Tray into the gooves at the back of the printer and pushing gently forward until the tray clips into place 10 Press the LOAD EJECT button The continuous forms will be taken into the printer and positioned at the first line print position and the SEL indicator will illuminate ...

Page 30: ...ck together thus feeding two pages at the same time resulting in paper jam In this case unfasten the pile of sheets before feeding Further if jams occur due to the pile of the paper use of Rear Tractor is recommended When continuous paper of 3 4 width is used move Paper Guide L to the middle of the paper Under the circumstance of high temperature and high humidity the paper become frail and galley...

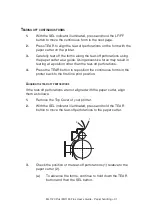
Page 31: ... tearing at a position other than the tear off perforations 4 Press the TEAR button to reposition the continuous forms in the printer back to the first line print position Aligning the tear off perforations If the tear off perforations are not aligned with the paper cutter align them as follows 1 Remove the Top Cover of your printer 2 With the SEL indicator illuminated press and hold the TEAR butt...

Page 32: ... cutter Removing continuous forms 1 Tear off the continuous forms See Tearing off continuous forms on page 31 2 Press the SEL button to set the printer off line and reposition the continuous forms in the printer 3 Press the LOAD EJECT button to move the front edge of the continuous forms backwards to the Pin Tractors NOTE If sprocket holes of the last page of the forms disengage from the sprocket ...

Page 33: ... 33 5 Lift the Pin Tractor covers and remove the forms 6 Close the Pin Tractor covers 7 Replace the Input Tray and Paper Tray by fitting the Input Tray into the gooves at the back of the printer and pushing gently forward until the tray clips into place ...

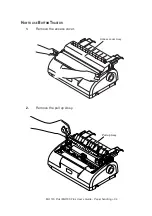
Page 34: ...ML1120 Plus ML1190 Plus User s Guide Paper handling 34 How to use Bottom Tractor 1 Remove the access cover 2 Remove the pull up Assy Access cover Assy Pull up Assy ...

Page 35: ...ML1120 Plus ML1190 Plus User s Guide Paper handling 35 3 Remove the sheet guide Assy 4 Remove the left and right knobs of the tractor Assy Sheet guide Assy Tractor Assy Knob ...

Page 36: ...s User s Guide Paper handling 36 6 Fit the U ditch of the tractor Assy to post turn it in the direction of using the post as fulcrum and lock it to the printer proper 5 Fix the sheet guide Assy Sheet guide Assy Tractor Assy ...

Page 37: ...ndling 37 7 Insert the paper from the paper insertion opening as shown in the diagram Paper insertion opening 8 Set the paper to the tractor Assy As regards the ways of choosing the paper size and setting see the paper setting of the rear tractor ...

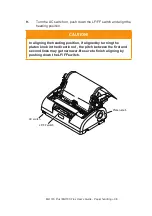
Page 38: ... FF switch and align the heading position CAUTION In aligning the heading position if aligned by turning the platen knob in the direction of the pitch between the first and second lines may get narrower Be sure to finish aligning by pushing down the LF FF switch AC switch LF FF switch Platen knob ...

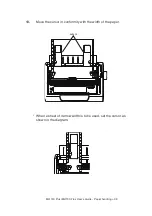
Page 39: ...L1120 Plus ML1190 Plus User s Guide Paper handling 39 cursor 10 Move the cursor in conformity with the width of the paper When a sheet of narrow width is to be used set the cursor as shown in the diagram ...

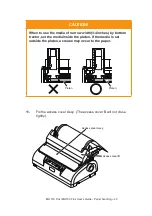
Page 40: ...over Assy The access cover B will not close tightly CAUTION When to use the media of narrow width 3 4inches by bottom tractor set the media inside the platen If the media is set outside the platen a crease may occur to the paper Platen Platen Access cover B Access cover Assy ...

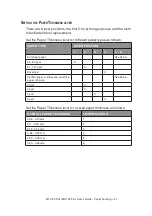
Page 41: ... for different paper types as follows paper TYPE Lever position 1 2 3 4 5 6 Cut sheet paper See below 52 80 gsm X 81 127 gsm X Envelope X Carbon paper or Pressure sensitive paper 40 gsm See below 2 part X 3 part X 4 part X 5 part X Set the Paper Thickness lever for overall paper thickness as follows Overall paper thickness Lever position 0 06 0 10 mm 1 0 11 0 18 mm 2 0 19 0 25 mm 3 0 26 0 32 mm 4 ...

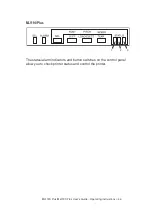
Page 42: ...lus User s Guide Operating instructions 42 Operating instructions Control panel ML1120 Plus The status alarm indicators and button switches on the control panel allow you to check printer status and control the printer 1 2 ...

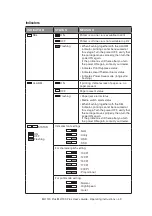
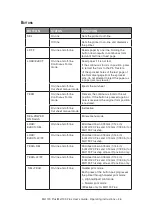
Page 43: ... Suppress status Indicates Head Thermal Alarm status Indicates Power Save mode long cycle flashing ALARM ON If printing indicates lack of paper i e no paper present OFF Paper present status Flashing Paper jam alarm status Media switch alarm status When flashing together with the SEL indicator printing cannot be resumed at this stage Turn the power OFF verify that the carriage moves properly then t...

Page 44: ...120 Plus ML1190 Plus User s Guide Operating instructions 44 ML1190 Plus The status alarm indicators and button switches on the control panel allow you to check printer status and control the printer 1 2 3 ...

Page 45: ...status Indicates Head Thermal Alarm status Indicates Power Save mode long cycle flashing ALARM ON If printing indicates lack of paper i e no paper present OFF Paper present status Flashing Paper jam alarm status Media switch alarm status When flashing together with the SEL indicator printing cannot be resumed at this stage Turn the power OFF verify that the carriage moves properly then turn the po...

Page 46: ... continuous form to the cut position If the button is pressed again or data is received the original form position is restored On line and off line Cut sheet manual mode Ineffective SEL POWER ON Switch Enters menu mode LOAD EJECT SEL On line and off line Microfeed down 0 18 mm 1 144 in for ML1120 Plus and 0 14 mm 1 180 in for ML1190 Plus step LOAD EJECT LF FF On line and off line Microfeed down 0 ...

Page 47: ...to cut sheet mode 2 To activate menu mode carry out one of the following While holding down the SEL button set the printer Power Switch to ON 3 Place the cut sheet on the Paper Tray The cut sheet passes through the printer Once ejected place the cut sheet in the Paper Tray again The printer will print the first menu option 4 Press the TEAR button to print out the current menu settings 5 Exit or pr...

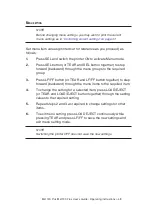
Page 48: ...d backward through the menu groups to the required group 3 Press LF FF button or TEAR and LF FF button together to step forward backward through the menu items to the required item 4 To change the setting for a selected item press LOAD EJECT or TEAR and LOAD EJECT button together through the setting values to the required setting 5 Repeat steps 2 and 3 as required to change settings for other item...

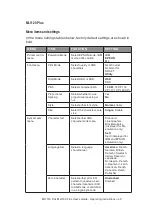
Page 49: ...g Select whether to use proportional spacing or not Yes No Style Select either font style Normal Italics Size Select the character scale size Single Double Symbol sets menu Character Set Select either ANK character code table Standard Line Graphics Block Graphics displayed for ML emulation only Set I Set II displayed for IBM and EPSON emulation only Language Set Select a language character set Ame...

Page 50: ...perforation setup command is received the received command is given priority 25 4 mm 1 No Page Length Select the length of a continuous form 279 4 mm 11 296 3 mm 11 2 3 304 8 mm 12 355 6 mm 14 431 8 mm 17 76 2 mm 3 82 6 mm 3 25 84 7 mm 10 3 88 9 mm 3 5 93 1 mm 11 3 101 6 mm 4 127 0 mm 5 139 7 mm 5 5 152 4 mm 6 177 8 mm 7 203 2 mm 8 215 9 mm 8 5 Cut position adjust Select an adjustment value for th...

Page 51: ...12 16 93 mm 2 3 19 05 mm 3 4 21 17 mm 5 6 23 28 mm 11 12 25 40 mm 1 27 52 mm 13 12 Use top of form Bottom feed menu Line Spacing Select line feed pitch 6 LPI 8 LPI Skip Over Perforation Select whether to skip over perforation or not When a skip over perforation setup command is received the received command is given priority 25 4 mm 1 No Page Length Select the length of a continuous form 279 4 mm ...

Page 52: ...ting paper on the tray and feeding it while the printer is waiting for paper to be fed in cut paper manual feed mode Invalid 0 5 sec 1 0 sec 2 0 sec Page length control Control the page length of cut paper by MENU setting by Actual page length Cut sheet auto eject Position Select a printable area at the bottom of cut sheets of paper in cut paper mode the character centre position 6 35 mm 3 12 12 7...

Page 53: ...e graphics print data exists in a line Bi directional Uni directional 7 or 8 Bits Graphics Set the graphics data unit to 7 or 8 bits ML emulation only 8 7 Receive buffer size Select size of the received buffer 1line 32 K 64 K Paper out override Select whether to detect paper end or not No Yes Print Registration 1 Adjust the print starting position on printing in the reverse direction The position ...

Page 54: ... operation or not upon receiving a CR code Yes No Auto CR Select whether to perform auto CR operation upon receiving a carriage return command IBM emulation only Yes No Print DEL Code Set whether 7FH code is printed with DEL mark or not ML emulation only No Yes SI select pitch 10 CPI Set how to handle an SI command received in 10 CPI mode IBM emulation only 15 CPI 17 1 CPI SI select Pitch 12 CPI S...

Page 55: ...e Select the type of quiet mode Mode 1 Mode 2 Reverse Feed Control Set reverse feeding TOF stop TOF over Centering position continuous Set the centering position for the print head by the number of characters of 10CPI ANK Default Mode1 Mode2 Centering position cut sheet Set the centering position for the print head by the number of characters of 10CPI ANK Default Mode1 Mode2 Power Save Time Select...

Page 56: ... Enable Disable Serial I F Parity Set parity None Odd Even Ignore Serial Data 7 8 Bits Set serial data length 8 bit 7 bit Protocol Set protocols DTR X ON X OFF DTR X ON X OFF Diagnostic Test Set Cancel loop testing of the serial interface No Yes Baud Rate Set the transmission speed of the serial interface 9 600 bps 4 800 bps 2 400 bps 1 200 bps 600 bps 300 bps 19 200 bps DTR Signal Set whether to ...

Page 57: ...ct character pitch 10 CPI 12 CPI 15 CPI 17 1 CPI 20 CPI Proportional Spacing Select whether to use proportional spacing or not Yes No Style Select either font style Normal Italics Size Select the character scale size Single Double Symbol sets menu Character Set Select either ANK character code table Set I Set II Language Set Select a language character set American French German British Danish I S...

Page 58: ...perforation setup command is received the received command is given priority 25 4 mm 1 No Page Length Select the length of a continuous form 279 4 mm 11 296 3 mm 11 2 3 304 8 mm 12 355 6 mm 14 431 8 mm 17 76 2 mm 3 82 6 mm 3 25 84 7 mm 10 3 88 9 mm 3 5 93 1 mm 11 3 101 6 mm 4 127 0 mm 5 139 7 mm 5 5 152 4 mm 6 177 8 mm 7 203 2 mm 8 215 9 mm 8 5 Cut position adjust Select an adjustment value for th...

Page 59: ...12 16 93 mm 2 3 19 05 mm 3 4 21 17 mm 5 6 23 28 mm 11 12 25 40 mm 1 27 52 mm 13 12 Use top of form Bottom feed menu Line Spacing Select line feed pitch 6 LPI 8 LPI Skip Over Perforation Select whether to skip over perforation or not When a skip over perforation setup command is received the received command is given priority 25 4 mm 1 No Page Length Select the length of a continuous form 279 4 mm ...

Page 60: ...ting paper on the tray and feeding it while the printer is waiting for paper to be fed in cut paper manual feed mode Invalid 0 5 sec 1 0 sec 2 0 sec Page length control Control the page length of cut paper by MENU setting by Actual page length Cut sheet auto eject Position Select a printable area at the bottom of cut sheets of paper in cut paper mode the character centre position 6 35 mm 3 12 12 7...

Page 61: ...directional Uni directional Receive buffer size Select size of the received buffer 1line 32 K 64 K Paper out override Select whether to detect paper end or not No Yes Print Registration 1 Adjust the print starting position on printing in the reverse direction The position moves to the right or left in 1 720 in increments 10 1 0 10 1 Print Registration 2 Adjust the print starting position on printi...

Page 62: ... auto CR operation upon receiving a carriage return command IBM PPR and IBM AGM emulation only Yes No SI select pitch 10 CPI Set how to handle an SI command received in 10 CPI mode IBM PPR and IBM AGM emulation only 15 CPI 17 1 CPI SI select Pitch 12 CPI Set how to handle an SI command received in 12 CPI mode IBM PPR and IBM AGM emulation only 12 CPI 20 CPI Time out print Select valid or invalid V...

Page 63: ... 30 min 60 min Paper End Select whether a printer status where no paper is loaded is set to SEL or DESEL On line Off line Parallel I F I Prime Set I Prime signal control of the Centronics interface Invalid Buffer Print Buffer Clear Auto Feed XT Set whether to enable or disable Auto Feed XT signal of the Centronics interface EPSON emulation only Valid Invalid Bi Direction Set whether to enable or d...

Page 64: ...nce position 23 28 mm 11 12 in The reference position refers to the first line of the paper i e the position to which the printer feeds the paper when automatically loading the paper NOTE Adjusting of TOF can be done in cut sheet mode or continuous forms mode MENU Item Function Setting Serial I F Baud Rate Set the transmission speed of the serial interface 9 600 bps 4 800 bps 2 400 bps 1 200 bps 6...

Page 65: ...sheet mode place the paper in the Paper Tray and press LOAD EJECT 5 Press the following buttons to adjust the first printing line To feed the paper forward by a small amount press and hold down the LOAD EJECT button and then press the SEL button To feed the paper backward by a small amount press and hold down the LOAD EJECT button and then press the LF FF button NOTE If the specified correction ra...

Page 66: ...icator is illuminated 2 Hold down the SEL button and press the TEAR button Status Indicator 1 turns off and Status Indicator 2 is illuminated High speed printing Use this for high speed printing 1 Ensure the SEL indicator is illuminated 2 Hold down the SEL button and press the TEAR button Status Indicator 1 is illuminated and Status Indicator 2 turns off High speed printing is applied only to the ...

Page 67: ... the paper will be fed to the printer Single sheets Set the paper in the tray and the paper will be fed to the printer 4 Switch to the off line 5 Push the LOAD EJECT button continuously and adjust the position of printing start by combining the following buttons Forward minute reline LOAD EJECT button SEL button Rear minute reline LOAD EJECT button LF FF button NOTE The range set for TOF is betwee...

Page 68: ... any operations inside the printer with the Power Switch set to ON 1 Set the Power Switch to OFF 2 Remove the Top Cover 3 Set the Paper Thickness lever to the Replace Ribbon position position 6 WARNING The Print Head may be hot after printing Allow it to cool before touching it 4 Remove the ribbon cartridge See Changing a ribbon cartridge on page 79 ...

Page 69: ...n Knob in the relevant direction and pull the cut sheet out from the top of the printer 7 If a paper fragment remains inside the printer a use tweezers to grip and extract it or b insert a triple folded sheet from the Paper Tray and turn the Platen Knob to pass the folded sheet through and push out the paper fragment ...

Page 70: ...Set the Power Switch to ON Continuous forms jammed in printer WARNING Do not carry out any operations inside the printer with the Power Switch set to ON 1 Set the Power Switch to OFF 2 Tear off any unprinted continuous forms 3 Remove the Paper Tray and Input Tray together by gripping the Input Tray at both sides and pulling it up and away from the printer ...

Page 71: ...he printer 6 If a form fragment remains inside the printer place two or three forms in a stack on the Pin Tractors and turn the Platen Knob to push the fragment out of the printer 7 When the paper jams are cleared replace the Input Tray and Paper Tray by fitting the Input Tray into the gooves at the back of the printer and pushing gently forward until the tray clips into place 8 Set the Power Swit...

Page 72: ...ot be resumed at this stage Turn the power OFF verify that the carriage moves properly then turn the power ON again If the problem is still there after you turn the power ON again contact your dealer Responding to general problems Use the following table to help you to identify symptoms with possible causes and take suggested remedial actions Problem Cause Action No power No power The power cable ...

Page 73: ...en the print head overheats the printer automatically starts unidirectional split printing When the print head temperature drops sufficiently the printer will return to its original operation PE warning The print carriage does not operate There is contamination on the carriage shaft Clean any paper dust and contamination from the carriage with a dry cloth Print blurring The characters are too pale...

Page 74: ...Incorrect positions of the Paper Guide or Pin Tractors Select and adjust the position again depending on the paper type Reselect the left and right margins correctly in the application When continuous forms are used the content of a single form is printed on two forms The paper length selected in the application does not match the physical paper length Match the paper length selected in the applic...

Page 75: ...eet feed No paper feed Sheets are located off the paper guide Load sheets with their left edges against the paper guide Sheets are not loaded to the end Load sheets to the end The platen rotates without paper feed or continuous forms instead of cut sheets are fed Sheets are not loaded to the end Load sheets to the end The printer is in the continuous forms mode Eject the continuous forms and selec...

Page 76: ...kip over perforation spacing is selected Cancel the skip over perforation spacing The selected skip over perforation spacing does not match the physical tear off perforation positions The paper length selected in the application does not match the physical paper length Match the paper length selected in the application with the physical paper length in use Select the paper length in number of line...

Page 77: ...ring the printer Clean the exterior of the printer as required but at least every six months or 300 hours of operation whichever comes first 1 Moisten a piece of cotton cloth with diluted neutral detergent and carefully wipe the printer exterior Printer interior WARNING As the print head becomes hot during printing allow it to cool before carrying out any cleaning inside the printer Do not use any...

Page 78: ... What to Clean The carriage and the area around it Clean and remove paper waste dirt dust and ribbon shreds The paper travel surface CAUTION When you clean the interior of the printer with a vacuum cleaner do not attempt to clean any parts smaller than the suction nozzle Do not clean any interior working parts with the suction nozzle to avoid possible damage to the printer ...

Page 79: ...n cartridge CAUTION Only use genuine Oki Original consumables to ensure the best quality and performance from your hardware Non Oki Original products may damage your printer s performance and invalidate your warranty WARNING Do not change the ribbon cartridge with the Power Switch set to ON 1 Set the Power Switch to OFF 2 Set the Paper Thickness lever to Replace Ribbon position 6 3 Remove the Top ...

Page 80: ...w it to cool down before touching it 4 Grip the ribbon cartridge with your fingers at each end and slope it up and out to remove it from the carriage 5 Dispose of the cartridge in accordance with your local guidelines 6 Remove the new ribbon cartridge from its wrapping and note the position of the Ribbon Guide 1 blue Knob 2 and Pin 3 1 2 3 ...

Page 81: ... a slightly loose ribbon may make it easier to mount the ribbon cartridge 8 Hold the ribbon cartridgewith your fingers pressing on its ribbon guide and slope it upward and inward along the guide rails until the ribbon guide comes in line with the U slot at the top of the cartridge 9 Turn the blue knob anticlockwise in the direction of the arrow to wind up the ribbon CAUTION Do not turn the knob cl...

Page 82: ...Replace the Top Cover 11 Set the Paper Thickness lever to match the paper being used See Setting the Paper Thickness lever on page 41 12 Set the printer Power Switch to ON Consumable order information Item Life Order no Ribbon cartridge Black 4 million characters 43571806 ...

Page 83: ...ertical tab yes Direct line feed yes Duplication capability Continuous forms the original page 4 more pages total maximum paper thickness less than 0 325 mm Cut sheet the original page 4 more pages total maximum paper thickness less than 0 325 mm Feeding direction Feed forward Feed backward Feeding mode Friction feed mode top Pin tractor feed mode rear Continuous forms tape tail detection method D...

Page 84: ...2 5 W or less Power cable 3 core AC power cable approximately 1 8 m length Interfaces Bi directional parallel IEEE1284 1994 USB 2 0 RS 232C Dust and corrosion Use the printer in a general office environment Environmental conditions Operating Storage 5 C to 35 C 20 to 80 RH Testing condition for print precision 15 C to 30 C 40 to 70 RH 10 C to 50 C 5 to 95 RH When the printer is stored it should be...

Page 85: ... original page 4 more pages total maximum paper thickness less than 0 325 mm Cut sheet the original page 4 more pages total maximum paper thickness less than 0 325 mm Feeding direction Feed forward Feed backward Feeding mode Friction feed mode top Pin tractor feed mode rear Continuous forms tape tail detection method Detected when remaining paper is approximately 46 mm long It can however print ti...

Page 86: ...gth Interfaces Bi directional parallel IEEE1284 1994 USB 2 0 RS 232C Dust and corrosion Use the printer in a general office environment Environmental conditions Operating Storage 5 C to 35 C 20 to 80 RH Testing condition for print precision 15 C to 30 C 40 to 70 RH 10 C to 50 C 5 to 95 RH When the printer is stored it should be in its original packaging with no moisture formation Standard usage Av...

Page 87: ... serial 15 USB 15 L loading paper continuous forms 24 cut sheet 21 M menu settings changing 39 confirming 38 initialising 55 list 40 N normal speed printing 57 P paper jams continuous forms 60 cut sheet 58 printer control panel 33 location 12 parts 9 test print 13 printing files 17 Q quiet printing 57 R ribbon changing 69 ordering 72 S setting paper thickness 31 specifications 73 switching ON 12 T...

Page 88: ...ok 10120 Thailand Tel 662 679 9235 Fax 662 679 9245 http www okisysthai com OkiData Australia Pty Ltd Level1 67 Epping Road Macquarie Park NSW 2113 Australia Tel 61 2 8071 0000 Support Tel 1800 807 472 Fax 61 2 8071 0010 http www oki com au Comworth Systems Ltd 8 Antares Place Rosedale Auckland 0632 New Zealand Tel 64 9 477 0500 Fax 64 9 477 0549 http www comworth co nz OkiData S P Ltd Malaysia Re...

Page 89: ...43471827EE Rev2 ...

Reviews: