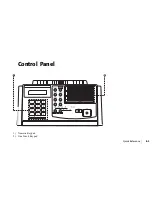
background image

Quick Reference

E-11

|

Press YES

§

§

§

§

§

.

Using the numeric keypad, enter the transmission time.

Press YES

§

§

§

§

§

.

Press YES

§

§

§

§

§

 to select faxing from memory.

10 Select a location: press a One Touch key, press Auto Dial

and enter a two-digit Auto Dial number, press plus a
group number, or dial as you would on a normal
telephone.

11 Press YES

§

§

§

§

§

 to confirm your selection.

12 Repeat steps 10 and 11 as necessary to continue selecting

locations.

13 When you are finished, press 

©

NO.

14 If you have selected multiple locations, your OKIFAX asks

if you want to confirm your selections with a printed
report before proceeding. If you do, press YES

§

§

§

§

§

.

After the report is printed and if you want to make
corrections, press 

©

NO and go back to step 10.

To remove a location, select the location in the same way,
but press 

©

NO to delete it from your transmission.

15 When all of your corrections are correct, press Start. Your

OKIFAX scans the documents into memory and waits until
the set date and time before sending the fax. When
scanning is completed, your OKIFAX is available for other
transmission operations.

Canceling a Delayed Transmission

Press Stop.

Press YES

§

§

§

§

§

. The display shows the Location ID of the

delayed transmission currently loaded in your OKIFAX.

Press YES

§

§

§

§

§

.

If the delayed transmission was a feeder transmission,

press Stop again to remove the document from the
document feeder.

Confirmation Report

After transmission, press Copy (with no documents

loaded) to see the confirmation report on the display.

Press Copy again to print the report.

Summary of Contents for OF5250

Page 1: ...st 7 Send to Single Location Keypad Dialing 7 One Touch 7 Auto Speed Dial 8 Group Dial 8 Broadcasting 9 Redialing 9 Switching Between Memory Feeder Transmit Modes 9 Search Key Dialing 10 Delay Transmi...

Page 2: ...endorsement by Okidata Copyright 1999 by Okidata All rights reserved Written and produced by the Okidata Training Publications Department Please address any comments on this publication by mail to Tra...

Page 3: ...Quick Reference E 3 Control Panel 1 Numeric Keypad 2 One Touch Keypad...

Page 4: ...YES 7 Press Select Function to finish Fax I D 1 Press Select Function 2 Press 9 User Program 3 Press 4 on the numeric keypad 4 PressYES 5 Enter the full telephone number of your fax machine using the...

Page 5: ...Multipage documents should be the same size and shape neatly aligned Maximum number of pages 30 pages normal weight paper 20 lb 15 pages for light or heavy weight paper 1 Adjust document guides to the...

Page 6: ...anual paper feeder down 4 Adjust the paper guides 5 Insert a sheet of paper face up Adjust the guides again to ensure that the paper is straight 1 ABC 2 DEF 3 GHI 4 JKL 5 MN 6 PRS 7 TUV 8 WXY 9 OQZ 0...

Page 7: ...al as you would on a normal telephone 3 Press Start to begin the transmission One Touch How to Program 1 Press Select Function 2 Press 8 Location Program 3 Press a One Touch key to program 4 Enter the...

Page 8: ...on the numeric keypad 3 Press Start Group Dial How to Program 1 Press Select Function 2 Press 8 Location Program 3 On the numeric keypad press the key 4 Using the numeric keypad enter the two digit g...

Page 9: ...tions press NO 8 If you want a printed report of your selections press YES If you want to make corrections press NO and go back to step 4 To remove a location select the location in the same way but p...

Page 10: ...me day skip to step 6 Otherwise press NO 5 Using the numeric keypad enter the transmission date up to three days in advance 6 PressYES 7 Enter the transmission time 8 PressYES 9 Press NO to select the...

Page 11: ...to make corrections press NO and go back to step 10 To remove a location select the location in the same way but press NO to delete it from your transmission 15 When all of your corrections are corre...

Page 12: ...d the document in the document tray 2 Press Copy 3 If only one copy is required wait and the machine will begin copying momentarily To make multiple copies enter the number of copies required using th...

Page 13: ...r down 4 Adjust the paper guides on the feeder 5 Insert a sheet of paper face up Adjust the guides again to ensure that the paper is straight 1 ABC 2 DEF 3 GHI 4 JKL 5 MN 6 PRS 7 TUV 8 WXY 9 OQZ 0 AUT...

Page 14: ...OKIFAX 5250 6 Press Copy see the instructions above If you are making more than one copy or copying a multipage document insert additional sheets when the previous sheet is all the way through the mac...

Reviews: