background image

Handbook

|

93

You sent a fax but the image the remote fax machine
received was very poor
.

If your document had a lot of small type, complex
illustrations, photos, or was very light or very dark, try
changing your Transmit Resolution and Type of Original
settings (see Loading Documents in the “Basic Faxing
Operations” section). Copy the document on your machine to
see how it will transmit. The problem may be caused by
telephone line interference. Try sending the document again
later.

You keep getting reports you do not want.

Check your user function settings and turn off the reports you
do not want. See the “Customizing Features and Operations”
section.

You sent a fax but it was received completely blank.

Make sure that you have loaded your document face down.

The image received on your machine was very poor

Contact the person sending you the fax and ask them to
change their Resolution and Type of Original settings. Ask
the person to make a copy of the document on their fax
machine to ensure that it is working properly. Then ask them

to send the fax again. If you still have a problem, try making
a copy of a document on your machine to make sure it is
working properly.

You tried dialing using One-Touch or 2-3 digit Speed Dial
but nothing happened.

Make sure that something is programmed into the Speed Dial
key you are using. Check the fax number to make sure it was
entered correctly (see the Basic Faxing chapter). When
you are dialing with an 2-3 digit speed dial code, be sure to
press the Speed Dial/Search key before you enter the code.

Your machine does not answer the phone or receive faxes.

First check to see that the power cord is connected to the AC
outlet. Also check the reception mode you are using. Your
machine will not automatically receive faxes in manual
answering mode [TEL]. See “Setting the Answering Mode”
in the Installation section.

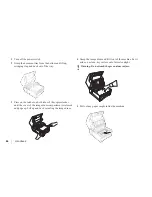
Your received documents are light or have vertical streaks
on them and you are not out of toner
.

Gently wipe the lens surface of your machine’s LED array
and then see if the machine works properly (refer to
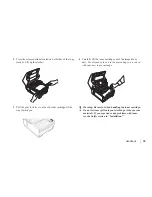
“Replacing the Toner Cartridge”). If your machine still does

Summary of Contents for OKIFAX 5900

Page 1: ...User s Handbook...

Page 2: ...software products manufactured by other companies does not necessarily constitute endorsement by Oki Data Copyright 1999 by Oki Data Americas Inc All rights reserved Second edition August 1999 Writte...

Page 3: ...ely process the date and time All future products are committed to meeting the same Year 2000 compliance Energy Star As an ENERGY STAR partner Oki Data has determined that this product meets the ENERG...

Page 4: ...iv Handbook...

Page 5: ...Cartridge 19 Attaching the Document Stacker 20 Connecting to the Telephone Line 21 Installing the External Optional Handset 21 Connecting an External Telephone or Answering Machine 22 Connecting Power...

Page 6: ...Touch and 2 or 3 Digit Speed Dial Numbers 39 Programming a Speed Dial 41 Chain Dialing 42 Programming a Group Directory 42 Basic Faxing 43 Preparing Documents 43 Guidelines 43 Document Size 43 Multip...

Page 7: ...x 59 Printing Confidential Faxes 59 Relay Faxing 60 Relay Broadcast Report 60 Sending Documents Requested by Another Fax Machine Polling Transmission 61 Memory Polling 61 Memory Polling Bulletin 62 Fa...

Page 8: ...les 84 Options 84 Problem Solving 85 Clearing a Document Jam 85 Clearing a Printing Paper Jam 85 Printing a Cleaning Page 88 Display Panel Messages 88 Error Messages 88 Reading the Print Counters 91 P...

Page 9: ...function information etc Automatic Document Feeder A D F Capacity of up to 50 sheets of recommended letter A4 paper Speed dialing Set up to 40 Model 5700 or 80 Model 5900 pre programmed telephone num...

Page 10: ...ing fax and voice communications thus allowing the use of an answering machine on the same telephone line Closed network Prevents the reception of unsolicited communications Large Paper Capacity 250 s...

Page 11: ...rage capacity Available in either 2 0 or 4 0 Mbyte boards Telephone Handset Connects directly to the machine and operates like a standard telephone MFP PC Interface Kit Installation of MFP software ha...

Page 12: ...Copy Stacker Release Buttons Press these two buttons one on each side to gain entry to toner image drum area One Touch Keypad Use for one touch dialing of preprogrammed telephone numbers as well as i...

Page 13: ...er Indicator Shows level of paper remaining in paper tray Paper Tray Holds 250 sheets of paper universal type legal letter A4 Document Guides Adjust guides to the width of documents to be faxed copied...

Page 14: ...e handset external telephone or answering machine Back Cover Remove this cover to expose the expansion slots for optional memory and NIC board IEEE 1284 Parallel Port Standard hardware for connection...

Page 15: ...a green photosensitive drum which receives information from the LED print head and transfers it to the printing paper Toner Cartridge This black cylinder installed inside the image drum unit contains...

Page 16: ...8 Handbook...

Page 17: ...e to the lower row from the upper row when data such as telephone numbers is listed in two rows 5 Shift Right Key Use this key to Move to the next operational layer in the programming of the machine D...

Page 18: ...ramming the Sender ID Location ID etc use this key to enter unique characters Symbols Umlaut characters and Norwegian characters 15 Numeric Keypad These 12 keys work like the keypad on a standard tele...

Page 19: ...chine to normal operation from the Power Save mode Start the copying function 21 Stop Key Use this key to Cancel the operation shown on the display Cancel the transmission of a fax press twice within...

Page 20: ...in the programming of names in the machine memory In addition to the alphanumeric keys a number of special keys are provided for programming convenience Alphabet Keys One Touch keys 1 27 except 20 Whe...

Page 21: ...sired key s close the main panel Signal Tones The OKIFAX 5700 5900 machines emit a number of sounds to inform the user of specific conditions Key Select Tone This is a short beep that is emitted each...

Page 22: ...ne do not plug your fax machine into anything other than a standard RJ 11C jack Your fax machine is intended to be grounded electrically and is equipped with a three wire grounded power cord For your...

Page 23: ...ispose of the old toner cartridge or image drum Do not expose these components to light for more than five minutes Never expose the green drum inside the image drum unit to direct sunlight Always hold...

Page 24: ...between 20 and 80 and where the temperature is between 50 F 10 C and 92 F 32 C Unpacking Remove contents from the carton Be sure that all the items listed below are included 1 OKIFAX 5700 or 5900 Fax...

Page 25: ...Handbook 17 Setting Up Your Fax Machine 1 Lift up on the document tray and swing it up and out of the way 2 Press the release buttons located on both sides of the copy stacker Lift up the stacker...

Page 26: ...ge drum cartridge then lift it out Caution Do not touch the green drum surface 4 Grasp the protective sheet and pull it out 5 Put the image drum cartridge back into place 6 Press down at each end of t...

Page 27: ...of this section Important This machine will only operate using toner cartridges specified by OKI for this facsimile machine The use of any other toner will result in the display of an operation error...

Page 28: ...n into the toner well 5 Push the lock lever forward until it stops 6 Close the copy stacker and document tray Attaching the Document Stacker Attach the document exit stacker on the back of the machine...

Page 29: ...your fax machine follow these instructions to install it 1 Plug in one end of the handset cord into the handset and the other end into the jack on the front of the cradle Place the handset in the cra...

Page 30: ...the jack in your external device To connect both an answering machine and a telephone 1 Connect your answering machine to your fax machine 2 Plug your external telephone s cord into the telephone jac...

Page 31: ...e change the 1 ST PAPER SIZE user function setting to match your new paper size See Customizing Features and Operations 1 Pull out the paper tray 2 Adjust the paper guides a to the width of your paper...

Page 32: ...the LCD window If a document is loaded menu functions for sending documents are displayed first If no document is loaded other menu functions are displayed Navigating the Function Menu The menu is se...

Page 33: ...to most points on the menu Speed access numbers are only assigned to Set Up menu functions To see how the menu is organized press HELP Your machine will print out a Function List with instructions to...

Page 34: ...rsor to the left Press SHIFT RIGHT to move the cursor to the right Press ENTER to set an option Press CLEAR to clear entered data 2 Using Speed Access If a function is assigned a speed access number s...

Page 35: ...e 18 Instant Dial 11 Monitor Volume 19 Restrict Access 12 Buzzer Volume 20 ECM Function 13 User Language 21 Closed Network 14 Remote Diagnosis 22 Toner Save 15 TX Mode Default 23 Sender ID Switch 16 N...

Page 36: ...6 Pulse Dial Rate Incoming Options 60 Incoming Ring 64 PC FAX Switch 61 Remote Receive 65 CNG Count 62 T F Timer Program 66 Ring Response 63 Continuous Tone 67 Distinctive Ring Report Options 70 MCF S...

Page 37: ...ch page of every fax sent Important Programming this information into your fax machine is required by law in the United States TSI CSI This is the telephone number of your fax machine This number is p...

Page 38: ...ing calls are fax messages and automatically receives all incoming fax messages Manual Receive Mode TEL You use the same line for both fax and telephone calls and the majority of your incoming calls a...

Page 39: ...during Memory Reception mode You can set a password to disable the Memory Reception mode Forwarding Mode FWD All fax communications are received into memory then forwarded to another telephone number...

Page 40: ...not answer Available settings are from 0 to10 tries Speed access no 40 The default setting is 3 tries Redial Interval Speed access no 41 The function controls how long your machine waits between each...

Page 41: ...n programmed your machine will recognize the access digit you use in your PBX to get an outside line After it dials your access digit your machine will pause to wait for an outside line before dialing...

Page 42: ...set to ON Available settings are ON OFF and DRC Remote Receive Speed access no 61 This function allows switching from telephone to fax mode to receive an incoming fax Use the keypad on the optional ha...

Page 43: ...ending on where you purchased it The language programmed is used to display messages on the control panel as to well as to print reports Paper Size Setting The machine can support two different paper...

Page 44: ...e telephone systems used to route calls internally for example in a company When dialing a telephone number if a prefix access number is required to open an outside line the line is connected to a PBX...

Page 45: ...dby mode Dial Prefix can also be accessed from the main menu by entering its speed access code 51 Keep in mind that all of the outside telephone numbers programmed into the machine must begin with the...

Page 46: ...dden panel for an equivalence of 80 keys Two 40 digit numbers can be programmed to each one touch key a primary number and an alternative number that is used if the primary number is busy or goes unan...

Page 47: ...e main number 3 Alternate telephone number ALT Up to 40 characters If the main number is busy or does not answer the machine will automatically dial this alternate number 4 Communications speed 33 6K...

Page 48: ...aps Key One Touch key 31 Use this key to switch between uppercase and lowercase when entering alphanumeric characters Unique Key One Touch key 20 Use the same as the 0 of the numeric keypad and for en...

Page 49: ...ess Enter 6 Input a name if desired press Enter 7 Input alternate telephone number ALT if desired press Enter 8 Select Communication Speed press Enter 9 Select On or Off for Echo Protection press Ente...

Page 50: ...ations as a group will save time You can create up to 20 different groups of telephone numbers each group having a maximum of 140 5700 or 230 5900 locations Each group is listed by a group dial number...

Page 51: ...s the Copy key If your documents are heavily bent creased or torn make a copy on a photocopier and send the copy instead Document Size All documents must have minimum width of 5 8 148 mm and a minimum...

Page 52: ...l sending or receiving another message as long as the document feeder is clear To do this load the document select your location and press the Start key Your Document will be sent when the current com...

Page 53: ...ast default setting use NORMAL contrast For documents that are too light use LIGHT contrast For documents that are too dark use DARK contrast 5 Your Documents are now ready for faxing or copying Sendi...

Page 54: ...that letter 4 When the correct location is found press the Start key to begin faxing Using the Numeric Keypad 1 Dial as you would on a normal telephone 2 If you make a mistake press the DEL key to bac...

Page 55: ...t key to begin faxing 6 To confirm the location input press the Enter key instead of the start key at Step 5 You can select to have the locations displayed or to print a list To delete an entry simply...

Page 56: ...pen a telephone line you will hear a dial tone Enter the number If an external telephone is connected to your machine you can dial in real time by picking up the handset Redialing If a line is busy or...

Page 57: ...e will emit a tone following disconnection telling you that the transmission was successful Receiving Faxes to Memory Your machine automatically receives messages into memory without immediately print...

Page 58: ...select Print from Memory press Enter 3 Press to select Print Memory Msg press Enter If a memory reception password has been set enter the 4 digit password Press Enter Even if you see a TONER LOW messa...

Page 59: ...a closed network 1 Press Menu Exit to enter the menu 2 Input speed access number 21 Closed Network wait 3 When Closed Network displays press or to select a setting press Enter 4 Press Menu Exit to re...

Page 60: ...load documents as long as memory is available When the first transmission is complete the next fax is automatically sent TX Prep Activated will display for 2 3 seconds Do not attempt to load documents...

Page 61: ...oad the document s in the document tray 2 Press Copy The display shows Number of Copies 3 If only one copy is required wait and the machine begins copying 4 To make multiple copies enter the number of...

Page 62: ...own Stacking The machine can process copies in two ways stacked with printed side up or with print side down The position of the lever located on the side of the machine above the power switch determi...

Page 63: ...Location s 7 Enter the desired location using either Speed Dial numbers or the numeric keypad 8 Press Start The machine scans the document s into memory and waits until the time programmed to begin tr...

Page 64: ...800 is 8 00AM 2000 is 8 00PM There is no limitation to the number of batch transmission sessions to set using Speed Dial numbers 31 40 however no more sessions will be accepted once memory is filled C...

Page 65: ...scanned pages press Enter Confidential Faxes Facsimile machines are often located in open areas where passersby can look through the messages received If a remote machine is compatible with OKIFAX pro...

Page 66: ...for that box is correctly entered To create a personal confidential mailbox 1 Press Menu Exit key to enter Menu 2 Input speed access number 03 wait 3 Enter the personal box number 1 16 press Enter 4...

Page 67: ...rinting Confidential Faxes Each time the machine receives a confidential fax it will print a Confidential Reception Report which lists the mailbox number s that received faxes To print confidential me...

Page 68: ...ich starts the relay broadcast by sending the original documents Before you can program your fax machine to initiate a relay broadcast you will need to obtain the following information from the operat...

Page 69: ...No press Enter 4 Enter the telephone number of the desired location using the numeric keypad 40 characters max press Enter 5 Press Menu Exit to return to standby mode Sending Documents Requested by A...

Page 70: ...tin polling can be conducted you must open personal mailboxes for storage of the documents to be scanned To create a personal bulletin polling mailbox 1 Press Menu Exit key to enter Menu 2 Input speed...

Page 71: ...1 If no message is stored in the personal mailbox No Data in Memory will display 2 If you want to delete a message without printing it after inputting the mailbox number and pressing Enter press the...

Page 72: ...s that you have scanned into the machine for polling To print or cancel polled faxes in memory 1 Press Menu Exit to enter the menu 2 Press Enter to select Print from Memory 3 Press toselectPrint Memor...

Page 73: ...on Paper Toner Error When the machine is operating under any of the answering modes except FWD TEL or MEM this function provides a reliable backup against the problems of paper or toner shortages If...

Page 74: ...ess the Menu Exit key to enter the menu 2 Enter the speed access number of the parameter you want to change 3 When the display shows the parameter you want press or to select the setting press Enter 4...

Page 75: ...s available If it is set to OFF the machine first confirms contact with the remote location and then transmits the document reading from the document tray without scanning into memory Restrict Access...

Page 76: ...long the machine waits for the call to be answered before switching to FAX mode Available settings are 20 and 35sec CNG Count Speed access no 65 When set either in the T F or TAD modes the machine de...

Page 77: ...67 3 When the display shows the parameter you want press or to select the setting press Enter 4 Press Menu Exit to return to standby mode Memory Password Speed access no 04 This is a 4 digit numeric...

Page 78: ...return to standby mode To cancel restricted access ID 1 Press Menu Exit to enter menu 2 Enter speed access no 05 wait 3 Enter department number 1 24 press Enter 4 Enter a 4 digit password using the n...

Page 79: ...prints at the top of each page of the fax Options The following options are available for enhancing the operation of your OKIFAX 5700 5900 See the Maintenance section for information on purchasing th...

Page 80: ...stores up to 360 pages 5700 and 520 pages 5900 Part 40755302 4 MB Memory Expansion Card stores up to 520 pages 5700 and 680 pages 5900 Part 40755312 Handset The optional handset connects directly to...

Page 81: ...s The date and time at which the message was scanned into memory for transmission The name or telephone number of the machine you were communicating with The communication mode used for each transmiss...

Page 82: ...e Location ID the number of pages sent and the result of the communication Broadcast Entry Report Each time you program a multiple location transmission broadcast your machine gives you the option of...

Page 83: ...settings for each One Touch key PRM ECHO Power Outage Report Your machine has a 72 hour built in battery backup in the event of a power failure If power is interrupted to your machine then the power...

Page 84: ...was opened during the communication NO The transmission or reception failed due to a communication error OK The communication was completed successfully PUNIT This error code indicates a problem with...

Page 85: ...Communication codes indicate the communication mode was used for a communication B C Multiple location transmission broadcast CALLING A communication initiated by your machine CALLED A communication i...

Page 86: ...The first toner cartridge installed in a new image drum unit will have a decreased yield because the image drum unit itself has to be filled If your machine displays REPLACE TONER CART replace the to...

Page 87: ...way toward you 4 Carefully lift the toner cartridge out of the image drum unit For disposal place it in the plastic bag you received with your new toner cartridge Warning Be careful when handling the...

Page 88: ...toner Then carefully peel the tape from the bottom of the toner cartridge 6 Holding the cartridge with the bottom down insert the left side into the toner well placing it under the tab a 7 Lower the...

Page 89: ...rder one The life of an image drum depends on a number of factors including temperature and humidity the type of paper you use and the number of pages per job The image drum cartridge should last abou...

Page 90: ...e buttons located on both sides of the copy stacker Lift up the stacker 4 Firmly lift up to disengage the drum cartridge with its toner cartridge then lift it out Wrap it in the packaging materials fr...

Page 91: ...er when you replace the image drum and to clear the CHANGE DRUM message To reset the image drum counter 1 Press Menu Exit to enter the menu 2 Press until the symbol is beside COUNTER 3 Press Enter twi...

Page 92: ...arry OKI brand supplies Order on the Internet at http www okidata com Click on the where to buy link Consumables Toner Cartridge Kit Part 40815606 Image Drum Kit Part 40433308 Options See the Customiz...

Page 93: ...ocument tray to its original operating position and push down until it locks in place 5 Turn the power switch back on Clearing a Printing Paper Jam If your machine displays PAPER JAM or NO PAPER when...

Page 94: ...s on both sides of the copier stacker until the cover of the image drum compartment is released and pops up Lift up and back revealing the image drum 4 Grasp the image drum and lift it out of the mach...

Page 95: ...he image drum unit back into the machine 11 Close the cover to the image drum compartment pushing down on it until both latches catch 12 Return the document tray to working position 13 Turn the power...

Page 96: ...sts the status and error messages that may appear on your machine s display panel and explains what they mean and how to correct any problem they indicate Normal Display in Standby Mode Under normal o...

Page 97: ...Jam RELOAD DOCUMENT Paper feed error A document to be faxed or scanned has not fed into the scanner properly Remove the document and reload it into the document tray TONER LOW REPLACE TONER CART or RE...

Page 98: ...ry are erased ERROR77 No ID is entered This error will occur if the machine is set in Restrict Access mode requiring a password to access machine operations INVALID TONER CART REFER TO USER GUIDE This...

Page 99: ...de COUNTER 3 Press Enter twice 4 Press Clear twice 5 Press Menu Exit to return to standby mode Problem Checklist Your 5700 5900 is a complex machine with many features and functions that allow it to o...

Page 100: ...hows a communication error This alarm indicates any of a number of problems You may be trying to communicate with an incompatible fax machine your machine can only communicate with ITU T Group 3 fax m...

Page 101: ...ent on their fax machine to ensure that it is working properly Then ask them to send the fax again If you still have a problem try making a copy of a document on your machine to make sure it is workin...

Page 102: ...that they have loaded documents and set their fax machine in polling transmission mode Your machine is connected to a PBX and you can not dial out You must enter your dial prefix before the telephone...

Page 103: ...he type of external telephone used If this problem happens often consult your service representative Shipping Your Machine When shipping the machine once it is in use please follow the re packaging pr...

Page 104: ...es may vary Proof of purchase is required for warranty work Be sure to retain your purchase documents Customer Support Professionals 1 800 OKIDATA 1 800 654 3282 Toll Free in the U S and Canada Our Cu...

Page 105: ...ystem Automated Attendant is available 24 hours a day 7 days a week The system can provide immediate assistance with Basic Operating Procedures Sales and Service Referrals Parts and Consumable Referra...

Page 106: ...Transmissions 56 Caps Key 12 chain dial number 12 Chain Dialing 42 Change Password 59 Cleaning Page 88 Clear Key 10 Closed network 2 Communication Codes in Reports 77 Communication Error 92 Consumabl...

Page 107: ...phen Key 11 I Image Drum Handling 15 Replacing 81 Internet 97 K Key Select Tone 13 L LCD Panel 9 Location ID 10 M Manual Receive Mode 30 Memory Polling 61 Memory Polling Bulletin 63 Memory Reception M...

Page 108: ...s 51 Power Save mode 11 Power Switch 4 Print Counters 91 Printing Confidential Faxes 59 Printing of Faxes Polled into Memory 64 Priority Transmission 56 Programming Personal Confidential Mailboxes 58...

Page 109: ...pecial character keys 13 Speed Dial 10 Speed Dial Search Key 11 Speed dialing 1 Start Copy Key 11 Stop Key 11 Supplies 84 T TEL Jack 1 6 TEL Jack 2 6 Telephone Answering Device Mode 31 Telephone Direc...

Reviews: