background image

English

OKIOFFICE 44

5

• The two 

TEL

 ports on the back of the machine are only suitable for 2 

wire devices. Not all standard telephones will respond to incoming 
ringing when connected to an extension socket.

• This machine may not necessarily provide an effective hand-over of a 

call from a telephone connected to the same line.

• The operation of this machine on the same line as a telephone or other 

equipment with audible warning devices or automatic ring detectors 
will give rise to bell tinkle or noise and may cause false tripping of the 
ring detector. Should such problems occur, the user is not to contact the 
telephone company.

Operation & Maintenance

• Use a dry cloth to clean the control panel and the main body of the unit. 

• Aside from the instructions specifically mentioned in this User’s Guide, 

your machine is not user serviceable. DO NOT attempt to service the 
machine or lubricate moving parts by yourself.

• Disconnect the power cable before trying to remove any objects that 

may have fallen into the machine. 

• Immediately disconnect the machine if it becomes physically damaged 

and arrange for its repair or disposal. 

• When relocating your machine, always disconnect the telephone line 

before disconnecting the power cable. When reconnecting your 
machine, connect the power cable first, then the telephone line.

• This machine is not intended to be used in parallel with any other 

telephone devices.

84sugb.fm  Page 5  Monday, August 9, 1999  4:05 PM

Summary of Contents for OKIOFFICE 44

Page 1: ...English OKIOFFICE 44 1 English Setup Guide 84sugb fm Page 1 Monday August 9 1999 4 05 PM...

Page 2: ...dorsement by the manufacturer of this equipment This user s guide is subject to change without notification Copyright 1999 by Oki All rights reserved Written and produced by Oki Europe Ltd OKI and OKI...

Page 3: ...g Paper Trays Stackers 7 Installing Toner Cartridge 8 Connecting Power Cable 11 Connecting Telephone Line 12 Loading Printing Paper 12 Control Panel 13 Setting Answering Mode 13 Setting Machine Identi...

Page 4: ...t Do not use your machine near water or spill liquid of any kind into it Installation Hints Install your machine in a dust free location away from direct sunlight Do not connect your machine to a powe...

Page 5: ...company Operation Maintenance Use a dry cloth to clean the control panel and the main body of the unit Aside from the instructions specifically mentioned in this User s Guide your machine is not user...

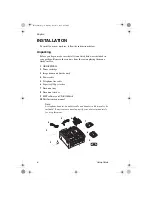
Page 6: ...y surface 1 OKIOFFICE 44 2 Toner cartridge 3 Image drum unit inside unit 4 Power cable 5 Telephone line cable 6 Paper tray Copy stacker 7 Document tray 8 Document stacker 9 MFP software on CD ROM disk...

Page 7: ...s in the top of the machine until the tabs lock into place 2 Insert the document tray into the long horizontal slot on the top of the unit until it locks into place 3 Slot the tabs of the document sta...

Page 8: ...t out of the way Caution Never expose the image drum unit to light for more than 5 min utes Never expose the image drum unit to direct sunlight Always hold the image drum unit by the ends Never touch...

Page 9: ...ge drum are inserted correctly as shown Then press down firmly on both ends of the image drum until it snaps into place 7 Remove the protective plastic cover from the toner well in the image drum unit...

Page 10: ...to insert the toner cartridge backwards into the im age drum unit 9 With the ridged sides facing up and the coloured lever on your right insert the toner cartridge into the image drum unit Slide the l...

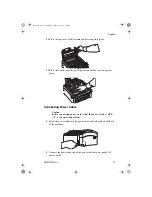
Page 11: ...naps into place Connecting Power Cable Caution Before connecting power ensure that the power switch is OFF 0 is in depressed position 1 Insert the power cable into the power inlet socket located on th...

Page 12: ...up to 100 sheets of standard weight 80 gsm paper For best results use paper specially made for laser printers or photocopiers Note Your machine is set at the factory to use A4 paper If you intend to...

Page 13: ...ng Answering Mode Your machine has a number of answering modes which determine how it handles incoming calls both fax and voice The current answering mode appears on your machine s stand by display 1...

Page 14: ...rmation into your machine is a legal requirement 1 Press the SELECT FUNCTION key then the USER PROG One Touch key followed by 4 on the numeric keypad The display shows 4 SYSTEM DATA PRG YES NO 1 7 2 P...

Page 15: ...the current communication ends 1 Adjust the document guides to the width of the paper you are using 2 Neatly stack your documents then insert them face down into the document feeder If necessary read...

Page 16: ...ake up to 50 copies at one time Your machine automatically makes all copies in FINE mode EX FINE and PHOTO mode can be selected manually by pressing the YES key 1 Load your documents and press the COP...

Reviews: