- 24 -
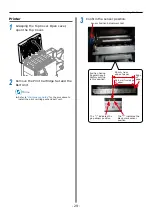
Loading Media
15
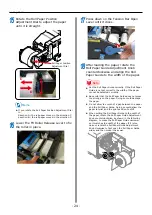
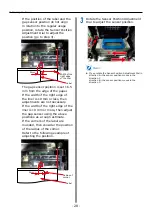
Rotate the Roll Paper Position
Adjustment Dial to adjust the paper
until it is straight.
Roll Paper Position
Adjustment Dial
D
C
A
B
Memo
z
If you rotate the Roll Paper Position Adjustment Dial
in
direction A
→
the roll paper moves in the direction C
direction B
→
the roll paper moves in the direction D
16
Lower the F0 Roller Release Lever to fix
the roller in place.
17
Press down on the Tension Bar Open
Lever until it clicks.
18
After loading the paper, rotate the
Roll Paper Guide Adjustment Knob
counterclockwise and align the Roll
Paper Guide to the width of the paper.
Note
z
Set the Roll Paper Guide correctly. If the Roll Paper
Guide is not set correctly, the width of the paper
cannot be detected correctly.
z
Be careful that the Roll Paper Guide does not press
too strongly on the paper. Doing so could damage
the paper.
z
Do not allow too much of a gap between the paper
and the Roll Paper Guide. Doing so could allow the
paper to twist and the print position to shift.
z
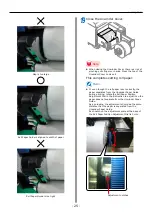
When setting the Roll Paper Guide to the width of
the paper, rotate the Roll Paper Guide Adjustment
Knob counterclockwise, as shown in the following
diagram, to make the Roll Paper Guide narrower
so it matches the width of the paper. If it is too
narrow, rotate the Roll Paper Guide Adjustment
Knob clockwise to first open the Roll Paper Guide
wider, and then make it narrower.
Summary of Contents for Pro1040
Page 1: ...Pro1040 Pro1050 Windows PS Printer Driver User s Guide...
Page 16: ...16 Registering a Desired Paper Size with the Printer Driver...
Page 36: ...36 Canceling a Print Job...
Page 55: ...55 4 Adjusting the Color Adjusting Color with a Printer Driver 56...
Page 72: ...72 Printing by using applications to specify Spot Color toner PS printer drivers only...
Page 73: ...73 6 Troubleshooting Printer Driver Malfunctions 74...


