- 90 -
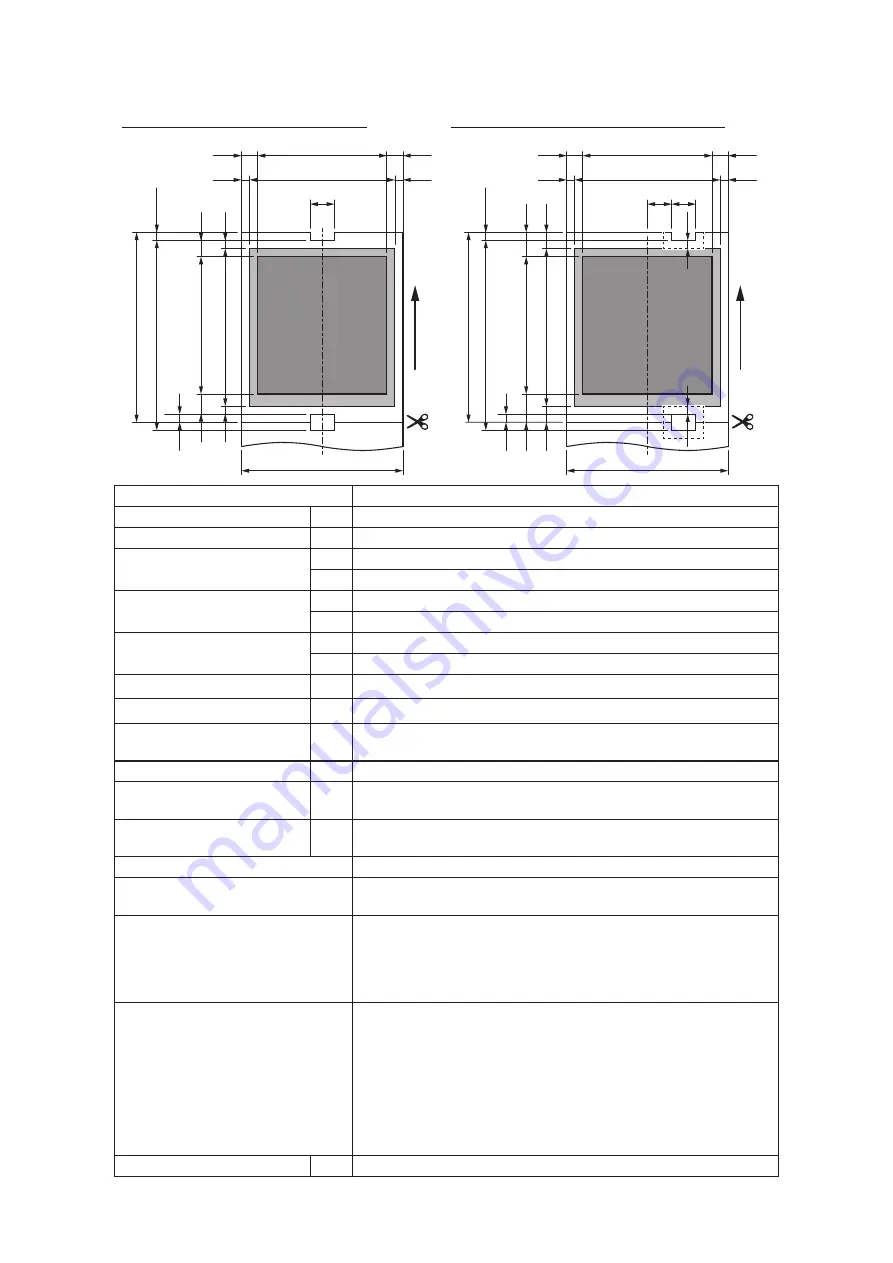
• Continuous paper: with holes
A
a
a
b
b
e
J
(I/2)
d
f
I
c
A
a
a
b
H
P
H
b
e
J
(I/2)
d
f
g
g
I
c
F
F
Assured
printing r
ange
Assured
printing r
ange
Printable r
ange
Printable r
ange
Paper feed direction
Paper feed direction
Assured printing range
Assured printing range
If the hole is in the paper center
If the hole is not in the paper center
B Printable range
B Printable range
Paper thickness
0.080 - 0.250 mm
Paper width
A
36 - 86 mm
Cut length
F
53 - 551 mm
Left/Right margin
a
4.2 mm
b
2 mm or above (or 3 mm with a paper width of 86 mm)
Top margin
c
4.2 mm
d
2 mm or above
Bottom margin
e
6.3 mm
f
2 mm or above
Hole margin
g
2 mm or above (Do not print around the hole.)
Hole width
H
7 mm or above
Hole length
I
If the hole is in the paper center: 1.6 - 5 mm
If the hole is not in the paper center: 1.6 - 13 mm
Hole pitch
J
53 - 551 mm
Distance from paper
center to right side
P(R) 3.5 - 36 mm (when the hole is on the right side to the
paper center)
Distance from paper
center to left side
P(L) 3.5 - 29 mm (when the hole is on the left side to the
paper center)
Paper form settings
CONTINUOUS PAPER
Cut type settings
If the hole is in the paper center: CENTER HOLE
If the hole is not in the paper center: SIDE HOLE
Use conditions
If the hole is in the paper center, set a value larger
than the size of the paper hole in [Bottom margin].
If the hole is not in the paper center, set a value equal
to or larger than the half of the size of the paper hole
in [Top Margin] and [Bottom margin].
Assured printing range
[If the hole is in the paper center]
4.2 mm or more from the bottom of the hole on the
top of the paper, 4.2 mm or more from the left and
right edges of the paper, and 6.3 mm or more from
the bottom edge of the paper
[If the hole is not in the paper center]
4.2 mm or more from the top, left and right edges of
the paper, and 6.3 mm or more from the bottom edge
(cut position) of the paper
Printable range
B
80 mm (max)
Summary of Contents for PRO330S
Page 1: ...User s Manual...
Page 14: ...Unpacking 2 Unpacking 15 Checking the accessories 16 Installing consumables 18...
Page 102: ...102 8 Close the feeder cover...
Page 151: ...151 8 Remove the toner cover 9 Close the top cover 10 Open the toner cartridge cover...
Page 162: ...162 8 Close the top cover...
Page 172: ...172 15 Close the top cover...
Page 178: ...178 7 Install the image drum back to the machine 8 Close the top cover...
Page 182: ...182 11 Close the top cover...
Page 263: ...263 10 Input the admin password and click OK 11 Con rm the setting result and click Back...
Page 266: ...266 11 Con rm the setting result and click Back...
Page 280: ...EE8001 2750Z002 Rev1...


