background image

11


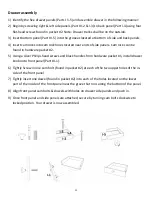
Drawer assembly 


1)


Identify the five drawer panels (Parts I 1

-

5) and assemble drawer in the following manner:


2)


Begin by screwing right & left side panels (Part # I

-

2 & I

-

3) to back panel (Part I

-

4) using four 

flat

-

head screws found in packet #2. Note: Drawer tracks shall be on the outside.


3)


Insert bottom panel (Part # I

-

5) into the grooves located at bottom of side and back panels.


4)


Insert cam locks into cam lock holes located near ends of side panels. Cam locks can be 
found in hardware packet #2.


5)


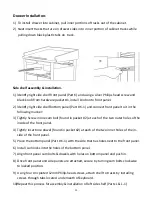
Using a silver Philips head screws and black handles from hardware packet #1, install drawer 
knob onto front panel (Part # I

-

1). 


6)


Tightly Screw in one cam bolt (found in packet #2) at each of the two upper holes of the in-
side of the front panel.


7)


Tightly insert one dowel (found in packet #2) into each of the holes located on the lower 
part of the inside of the front panel near the grove that runs along the bottom of the panel. 


8)


Align front panel cam bolts & dowels with holes on drawer side panels and push in.


9)


Once front panel and side panels are attached, secure by turning cam bolts clockwise to 
locked position. Your drawer is now assembled.


Summary of Contents for GSL

Page 1: ...1 The Greystone Lectern ASSEMBLY MANUAL Model GSL...

Page 2: ...ut shelves and a slid ing keyboard tray The cabinet is equipped with two shelves for ample storage and moves easily with four double hooded casters Dear Valued Customer Thank you for your purchase Alt...

Page 3: ...ed parts A list of all the parts is listed be low Read the instructions carefully and follow the diagrams to ensure an easy and correct assembly Tools Required Philips head screwdriver or power Screwd...

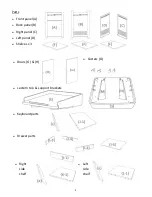
Page 4: ...4 Parts Front panel A Back panel B Right panel C Left panel D Shelves x 3 Lectern top support brackets Keyboard parts Drawer parts Casters O Doors G H Right side shelf Left side shelf...

Page 5: ...ten Attaching Back panel to side panels 1 Lay back panel B on a floor or flat surface Take side panel C and align holes on side to holes on tubes on right side of panel B Install by using three black...

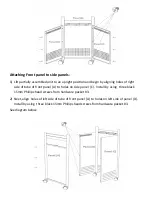
Page 6: ...right side of tube of front panel A to holes on side panel C Install by using three black 15mm Phillips head screws from hardware packet 3 2 Next align holes of left side of tube of front panel A to h...

Page 7: ...p of doors 2 Identify left cabinet door Part H and using pivot pins from hardware packet 2 in stall a pivot into the pre drilled holes on the bottom and top of doors 3 Using silver Phillips head screw...

Page 8: ...e center to underside of lec tern top 5 Once support brackets are attached to underside of top begin by holding top with front slanted downwards and aligning round grooves at the corners of underside...

Page 9: ...9...

Page 10: ...5 Place the keyboard panel Part J 1 with the side that has holes next to the front panel 6 Install cam locks into the keyboard panel holes The cams should be inserted in the larger holes as shown on...

Page 11: ...d in hardware packet 2 5 Using a silver Philips head screws and black handles from hardware packet 1 install drawer knob onto front panel Part I 1 6 Tightly Screw in one cam bolt found in packet 2 at...

Page 12: ...rt K 1 with the side that has holes next to the front panel 6 Install cam locks into the holes of the bottom panel 7 Align front panel cam bolts dowels with holes on bottom panel and push in 8 Once fr...

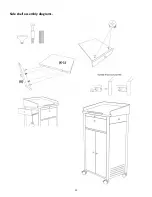
Page 13: ...13 Side shelf assembly diagrams...

Reviews: