PEC Flaw Detector PE4332 Operation Manual
+7(812) 385-54-28
info@oktanta-ndt.ru
36
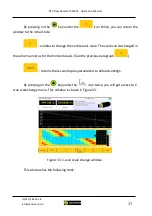
Figure 35. Window for threshold position change.
All thickness measurements, which are higher than the upper threshold
(threshold 1), will be displayed in blue on C-scan. All thickness measurements, which are
lower than the lower threshold (threshold 2), will be displayed in black on C-scan. The
thickness measurements between two thresholds are displayed on C-scan in color
according to the legend shown in Figure 35.
Each threshold has both the absolute value in mm and the relative value of the
thickness in percents (relative to the nominal thickness of the test item specified in the
test item parameters).
To select the required threshold, press on the
key located under threshold
1 or threshold 2.
You can select which parameter to be changed: mm or %. To this end, press on
the
key under the
or
icon respectively.
To change position of "Threshold 1" and "Threshold 2", use the
keys under
the
icons
.
When positions of both threshold are set, press on the
key.


